Ultimate Guide to HVAC Airflow Balancing
Uneven room temperatures? High energy bills? Weak airflow? These are all signs of poor HVAC airflow balancing, a common issue that disrupts comfort and costs you money. Proper balancing ensures your system distributes air evenly, reducing energy waste, improving indoor comfort, and extending equipment life. Here’s what you need to know:
- What it is: HVAC airflow balancing, or Testing, Adjusting, and Balancing (TAB), fine-tunes air distribution to match design specifications.
- Key benefits: Lower energy costs, consistent temperatures, and longer system lifespan.
- How it works: Technicians use tools like flow hoods and manometers to measure and adjust airflow until it meets target values.
- DIY vs. professional: While you can handle basic maintenance, professional balancing ensures precise results and avoids system strain.
If you’re noticing uneven temperatures, rising bills, or airflow issues, it might be time to consider professional TAB services. Proper balancing can make a noticeable difference in comfort and efficiency. Keep reading for a full breakdown of the process, tools, and solutions.
Flow Hood: How to Properly Balance an HVAC System
sbb-itb-99db659
What Is HVAC Airflow Balancing?
HVAC airflow balancing, also known as testing, adjusting, and balancing (TAB), ensures that air is distributed throughout a system according to design specifications. This process fine-tunes how conditioned air flows to each room, helping to eliminate temperature inconsistencies, reduce energy waste, and maintain system efficiency. Let’s dive into the core principles and technical aspects of airflow balancing.
When a single damper is closed, it increases static pressure in the trunk duct, which can raise airflow at other open vents. To achieve balance, technicians must measure and adjust airflow repeatedly until all outlets are within ±10% of their target cubic feet per minute (CFM). This interconnected nature of duct systems highlights why professional balancing requires precise tools and a thorough understanding of how adjustments impact the entire network.
Basic Airflow Balancing Concepts
Three primary measurements guide the balancing process: CFM, static pressure, and damper position.
- CFM (Cubic Feet per Minute): This measures the airflow at each vent, helping technicians ensure it meets the intended design.
- Static Pressure: Measured in inches of water column (IWC), static pressure reflects the resistance within the duct system. For instance, a dirty MERV 13 filter can add 0.20 to 0.35 IWC of resistance, potentially disrupting airflow.
- Dampers: These adjustable components control airflow to specific zones or rooms. By restricting airflow at over-performing vents, air can be redistributed to underperforming areas without compromising the overall system.
Residential branch ducts typically operate at velocities between 600 and 900 feet per minute (FPM). This range helps technicians gauge whether the system is functioning properly or if there are underlying design issues.
How System Design Affects Airflow
The design of an HVAC system plays a crucial role in airflow balance. Proper duct sizing is essential: ducts that are too small create friction losses, while oversized ducts reduce airflow velocity, leading to uneven distribution.
The layout of the duct system also matters. Longer or more complex duct runs, especially those with multiple 90-degree bends, create additional pressure drops. For example, a room located at the end of a 50-foot duct run with several bends will naturally receive less airflow compared to a room 10 feet from the air handler with a straight duct. To address these challenges, technicians often identify the “index terminal” – the vent with the highest pressure demand – and use it as a reference point for proportional balancing.
Duct leakage can further complicate balancing efforts. In commercial systems, leakage may reduce delivered airflow by over 10% compared to what the fan produces. Air lost through unsealed joints cannot be redirected, making damper adjustments ineffective. For this reason, technicians start by ensuring all dampers are fully open, filters are clean, and the fan operates at the correct speed. These steps establish a reliable baseline before fine-tuning begins.
Benefits of Proper Airflow Balancing
Getting the airflow just right in your HVAC system isn’t just about comfort – it can save money, protect your equipment, and create a more consistent indoor environment. When every room gets the right amount of conditioned air, you’ll notice lower energy bills, better comfort, and fewer repairs. Let’s break it down.
Lower Energy Costs
Balanced airflow ensures your HVAC system doesn’t have to work harder than necessary. When fans and compressors operate as intended, you avoid the problems of overcooling or overheating in certain areas, which can waste energy .
“When the system is out of balance, some areas of the building are overcooled and others are undercooled, resulting in unnecessary extended operation of the system.” – Schnackel Engineers
In fact, systems that operate outside their design parameters can lose up to 20% of their efficiency. For example, schools have managed to cut their total energy use by as much as 10% by focusing on maintenance tasks like airflow balancing.
Better Indoor Comfort
Comfort isn’t just about temperature – it’s about consistency. Balanced airflow ensures that every room receives the right amount of conditioned air, leading to steady temperatures throughout the building. This reduces drafts, minimizes indoor allergens, and prevents moisture buildup that could lead to mold or mildew.
Proper balancing also brings in the right amount of outdoor air, keeping spaces fresh and preventing stale air. In commercial settings, it can even help protect office equipment like printers by maintaining stable airflow and humidity levels.
Longer Equipment Life
When your HVAC system operates outside its intended range, it puts extra strain on components like fans and compressors, wearing them out faster. An unbalanced system often runs longer in areas that aren’t getting enough air, which can lead to mechanical fatigue .
“If the airflow is too high or too low, it can put stress on the system and cause it to wear and break down more quickly.” – Schnackel Engineers
Since most HVAC systems are designed to last 10 to 15 years, keeping the airflow balanced is key to hitting that full lifespan. Plus, the balancing process helps technicians spot potential issues – like duct leaks or stuck dampers – before they turn into costly repairs.
Tools for Measuring HVAC Airflow
When it comes to balancing airflow in HVAC systems, precise measurement is key. To ensure systems perform as designed, technicians rely on tools that measure velocity, pressure, and volume. The three main instruments used for this purpose are flow hoods, manometers, and anemometers.
Flow Hoods
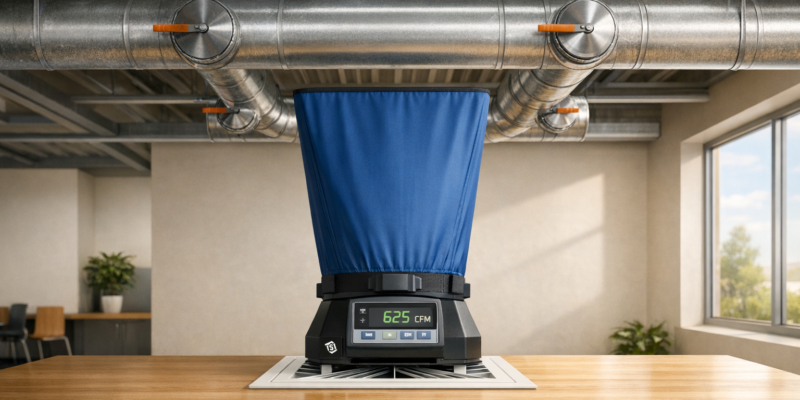
Flow hoods measure air volume in cubic feet per minute (CFM) by capturing airflow at supply or return diffusers. They’re indispensable for confirming that vents deliver the correct amount of conditioned air based on system specifications.
These tools are particularly effective for ceiling diffusers and floor registers, especially in commercial setups with 24″×24″ diffusers. However, accuracy can decrease when measuring multi-cone or high-induction diffusers unless you apply the manufacturer’s K-factor correction. Professional-grade models, like the TSI Alnor EBT731, are priced around $3,510.00, while more portable options, such as the CPS ABM EasyHood (commonly called capture hoods), are available for about $494.02.
Next, let’s look at how manometers help pinpoint pressure-related issues.
Manometers
Manometers are used to measure static and velocity pressure within ductwork, which helps identify problems such as blockages, dirty filters, or restrictive fittings. When paired with a Pitot tube, manometers calculate air velocity using the formula V = 4,005 × √VP (where VP stands for velocity pressure).
For example, a clogged MERV 13 filter can cause a pressure drop of 0.20 to 0.35 inches of water column (IWC), which can significantly reduce airflow. Digital pressure gauge kits, like the TEC Minneapolis DG-8, are commonly used and cost approximately $699.00. Technicians often take pressure readings at 16 traverse points or more for larger rectangular ducts to ensure accurate results.
Finally, anemometers provide direct velocity measurements at grilles and registers.
Anemometers
Vane anemometers are designed to measure air velocity through a rotating turbine, making them ideal for residential systems and smaller outlets like 4″×10″ floor registers.
“A vane anemometer works on the principle that a freely spinning turbine will rotate at a speed directly proportional to the wind speed.” – Peter Diperna, Mechanical Technical Specialist, Fitzmeyer & Tocci Associates Inc.
When using an anemometer, applying the manufacturer’s AK (grille) factor converts velocity readings into CFM. These tools typically provide accuracy within ±2% to 5%. For applications requiring finer resolution, such as measuring low-velocity airflow in VAV systems, thermal (hot-wire) anemometers are a better choice, offering accuracy from ±1% to 5%. Entry-level smart probes like the Testo 410i are priced around $160.65, while advanced models like the TSI 5725 can cost up to $963.00.
How to Balance HVAC Airflow: Step-by-Step Process
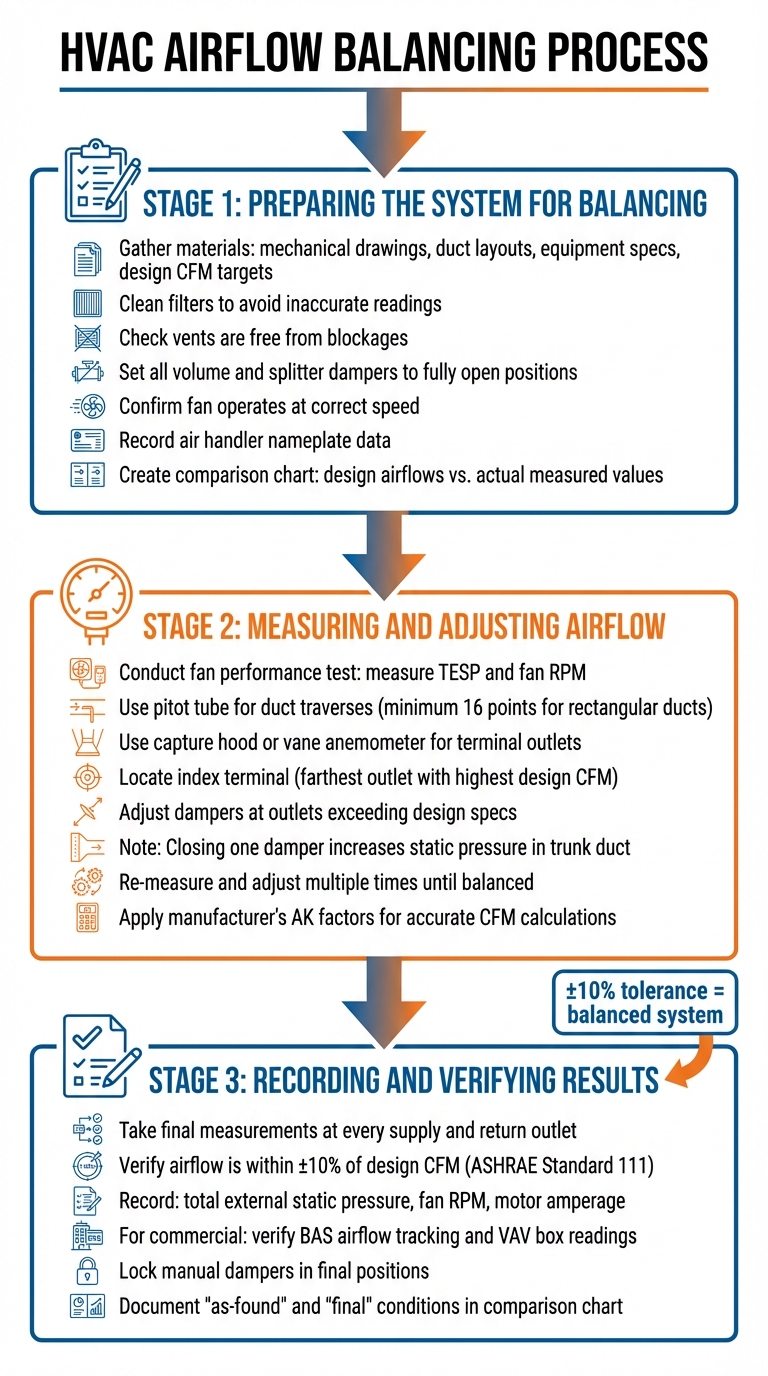
HVAC Airflow Balancing Step-by-Step Process Guide
Balancing an HVAC system takes careful planning, precise measurements, and thorough documentation to ensure the airflow meets the design specifications.
Preparing the System for Balancing
Start by gathering all necessary materials, including mechanical drawings, duct layouts, equipment specifications, and the design CFM (cubic feet per minute) targets. Make sure filters are clean to avoid inaccurate airflow readings, and check that vents are free from any blockages.
Set all volume and splitter dampers to their fully open positions before taking any measurements. Confirm the fan is operating at the correct speed and record the air handler’s nameplate data. To keep track of your progress, create a comparison chart that lists the design airflows alongside the actual measured values for each inlet and outlet.
“Every forced air system should be balanced upon initial startup… air balancing, done correctly, can alleviate [performance] issues and help ensure the equipment is operating as efficiently as possible.” – Jason Rende, HVAC Air Balancing Specialist
Once the system is prepared, you’re ready to move on to measuring and adjusting airflow.
Measuring and Adjusting Airflow
With the system prepped, begin assessing its performance. Start by conducting a fan performance test, measuring total external static pressure (TESP) and fan RPM, and compare these readings to the manufacturer’s fan curves. For duct measurements, use a pitot tube for traverses in main trunks – rectangular ducts typically require at least 16 measurement points for accurate results. For terminal outlets, use a capture hood or vane anemometer, depending on the situation.
Locate the index terminal, which is usually the outlet farthest from the fan and has the highest design CFM requirement relative to the available static pressure. Focus on adjusting dampers at outlets where airflow exceeds design specifications by the largest margin. This helps redistribute air to underperforming areas without over-restricting the system. Remember, closing one damper increases static pressure in the trunk duct, which can boost airflow at other open terminals. You’ll likely need to make several adjustments and re-measure until the system is balanced. When using anemometers, always apply the manufacturer’s AK factors to ensure accurate CFM calculations.
Recording and Verifying Results
After completing the adjustments, take final measurements at every supply and return outlet to confirm the delivered airflow. According to ASHRAE Standard 111, the acceptable range for balanced airflow is within ±10% of the design CFM. Record additional data, such as total external static pressure, fan RPM, and motor amperage, to confirm the equipment is functioning properly. For commercial systems, verify that the Building Automation System (BAS) airflow tracking and VAV box actuator readings align with your field measurements.
Once all outlets are within the 10% tolerance, lock the manual dampers into their final positions to prevent future drift. Document both the “as-found” and “final” conditions in your comparison chart. This record not only confirms the system is balanced but also serves as a reference for future maintenance.
Common Airflow Problems and How to Fix Them
Even the most well-designed HVAC systems can run into issues that disrupt airflow balance, leading to discomfort and inefficiency. Spotting these problems early and addressing them properly can save energy and prevent equipment from wearing out too soon.
Uneven Room Temperatures
If some rooms in your home are too hot or too cold, the culprit is often duct leaks or poorly adjusted dampers. These issues can let 20%–30% of conditioned air escape before it reaches certain areas. As a result, distant rooms may not get enough airflow to stay comfortable.
To fix this, seal duct leaks using mastic or foil tape (avoid cloth duct tape, as it doesn’t hold up well). Adjust branch dampers to direct more airflow to rooms that need it. In homes with multiple stories, you can further improve airflow by opening upper-floor registers more in summer (since heat rises) and reversing this in winter. Also, ensure vents have at least 18 inches of clearance from furniture, curtains, or other obstructions. If your thermostat sits in direct sunlight or near heat-generating appliances, it might give false readings, causing the system to shut off too early and creating uneven temperatures.
These imbalances don’t just affect comfort – they can also lead to higher energy costs.
High Energy Bills
When duct leaks are present, your HVAC system has to work harder and run longer cycles to make up for the lost air. This extra effort drives up energy usage and costs. Sealing gaps in the ductwork can help your system run more efficiently, ensuring every room gets the airflow it needs without overworking the fan.
Another key step is replacing furnace filters every 1–3 months. A clogged filter can restrict airflow, forcing the blower motor to use more energy and even causing the evaporator coil to freeze. For a more comprehensive solution, consider professional whole-home airflow balancing, which typically costs between $750 and $2,000. While it’s an upfront expense, it can lower your utility bills and extend the life of your equipment.
Beyond energy and cost concerns, airflow issues can also mess with your home’s humidity levels.
Poor Humidity Control
Signs of poor humidity control include condensation, musty odors, and an overall feeling of stuffiness. Proper airflow is essential for effective dehumidification, as it ensures humid air reaches the cooling coils where moisture is removed. Blocked vents or dirty filters can prevent this process, making it difficult to maintain an ideal indoor relative humidity of 30%–50%.
Start by inspecting and replacing filters regularly, and adjust branch dampers to ensure larger or more distant rooms receive enough airflow. Sealing duct leaks is also critical, as leaks can pull in humid outdoor air through cracks, bypassing the system’s filtration and dehumidification processes. Additionally, use kitchen and bathroom exhaust fans to remove excess moisture from the air .
Professional Balancing vs. DIY Methods
Getting airflow just right in your HVAC system is no small task. While basic maintenance like changing filters or cleaning vents is manageable for most homeowners, balancing airflow demands a completely different level of precision. This process isn’t just about comfort; it directly affects energy efficiency and the lifespan of your equipment. That’s why it’s worth weighing the benefits of professional balancing against the limitations of DIY methods.
Why Professional Balancing Works Better
When it comes to accuracy and reliability, professionals have a clear edge. They use advanced tools to measure airflow down to the smallest detail, tools that simply aren’t part of a typical homeowner’s toolkit. Beyond the equipment, they also rely on duct design calculations, layout drawings, and manufacturer specifications to determine the ideal airflow for each room.
“Professional HVAC maintenance is vital for the longevity, efficiency, and safety of your system. Technicians have the expertise and tools to ensure everything is running smoothly and prevent costly breakdowns down the road.” – Stanley Heating Cooling & Plumbing
Professionals also take into account technical factors like grille AK factors – manufacturer-specific data that ensures airflow measurements are mathematically accurate. They monitor key metrics like total static pressure and CFM limits during the process, ensuring adjustments don’t strain the system. Their goal is to get airflow within 10% of the design values, ensuring optimal performance. Plus, they follow the manufacturer’s guidelines to keep your warranty intact. DIY methods, by comparison, just can’t achieve this level of precision or reliability.
Drawbacks of DIY Balancing
DIY balancing often involves guesswork. Without the right tools or benchmarks, homeowners might solve one issue – like a hot or cold room – only to create new problems elsewhere in the system. Most people don’t have the training to evaluate the entire system, which goes far beyond routine tasks like cleaning filters or vents.
There’s also a safety risk. Making adjustments without proper knowledge can lead to dangerous situations. For example, closing too many dampers can increase pressure in the system, forcing it to work harder and potentially causing damage. While DIY fixes might seem like a way to save money, they can lead to higher energy bills and costly repairs down the line. For anything beyond basic maintenance, professional balancing is the safer and more effective choice.
In short, professional expertise offers the precision and safety needed for long-term HVAC performance, making it a worthwhile investment.
When to Schedule Airflow Balancing with Hydrodynamics

Call in the experts sooner rather than later to avoid discomfort and wasted energy.
Signs You Need Airflow Balancing
Are some rooms too hot while others are freezing? These temperature inconsistencies often point to poor air distribution in your HVAC system. Another red flag is weak airflow from certain vents, which suggests air isn’t circulating as it should.
If your energy bills are climbing unexpectedly, your system might be overworking due to imbalances, and a professional evaluation could help. For new installations, balancing is critical right from the start to ensure the system aligns with its design specs. In fact, some engineers or city inspectors may even require a balancing report before signing off on the project.
“Every forced air system should be balanced upon initial startup, and some engineers or city officials may require it before final approval.” – Jason Rende, HVAC Air Balancing Specialist
For older systems – especially those 10–15 years old – balancing can help maintain efficiency as wear and tear set in. To decide if it’s worth it, use the $5,000 rule: multiply your system’s age by the estimated service cost. If the result exceeds $5,000, it might be time to replace the unit instead.
If any of these issues sound familiar, it’s time to bring in a professional.
Hydrodynamics’ HVAC Services
Noticing these signs is your cue to call Hydrodynamics. Since 1994, they’ve been providing expert HVAC services to residential, commercial, and industrial clients. Their offerings go beyond basic heating and cooling, covering advanced systems like geothermal setups and ductless heat pumps. Airflow balancing is a key part of their maintenance programs, which aim to boost energy efficiency and extend the life of your equipment.
Whether you’re setting up a new system or troubleshooting an existing one, Hydrodynamics has the tools and know-how for precise airflow balancing. Their technicians adhere to industry standards, ensuring all vents operate within 10% of the design specifications. For businesses with complex ductwork or rooftop systems, their deep experience guarantees a thorough and professional job every time.
Conclusion
Getting the airflow balance right is key to making your HVAC system run efficiently and keeping your home comfortable. When air is distributed evenly, you benefit from lower energy costs, consistent temperatures throughout your space, and an HVAC unit that lasts longer. On the flip side, poor balancing forces your system to work overtime, leading to frequent cycling and unnecessary wear on components.
Balanced airflow also reduces hot and cold spots, prevents strain on equipment, and stops stagnant areas where dust and allergens often build up. Professional technicians achieve this by fine-tuning branch dampers, ensuring that each outlet operates within 10% of its intended airflow values. These precise adjustments highlight why thorough Testing, Adjusting, and Balancing (TAB) procedures are so important.
“A well-balanced system not only improves comfort but also reduces callbacks, increases equipment lifespan, and demonstrates your professionalism to customers.”
- Jason Rende, HVAC Designer and Air Balancing Specialist
While small vent adjustments can be done at home, full TAB requires specialized tools like manometers and flow hoods to ensure accurate results. As explained in this guide, proper measurements and adjustments are essential to meet design specifications. Since 1994, Hydrodynamics has been providing expert HVAC services, using advanced tools and proven methods to make sure your system works exactly as it should.
FAQs
How do I know if my HVAC system is out of balance or just undersized?
To figure out if your HVAC system is out of balance or possibly undersized, start by checking the airflow at each outlet and compare it to the design specifications. If the airflow differs by more than 10%, your system may be out of balance. Try adjusting the branch dampers and recheck the airflow.
If the problem persists even after balancing, it could indicate that the system is undersized. On the other hand, if the airflow remains uneven despite proper system sizing, the issue might lie with balancing or duct design flaws.
Will closing vents or adjusting dampers damage my HVAC system?
Blocking vents or adjusting dampers might seem like a way to save energy, but it can actually harm your HVAC system. When airflow is restricted, it disrupts the pressure balance in the ductwork, which can put extra strain on your heating and cooling equipment. Over time, this added stress can lead to mechanical problems or even system failure. For this reason, it’s usually a good idea to keep vents open, even in unused rooms, to avoid unnecessary damage and reduce the chances of costly repairs.
How often should airflow balancing be done after repairs or renovations?
HVAC airflow balancing is crucial after starting up a new system, completing repairs, or making renovations. Although there’s no strict timeline for rebalancing, it’s important to perform it whenever changes are made. This ensures proper airflow distribution and keeps the system running efficiently, helping it deliver the comfort you expect.