Water filtration system
A water filtration system removes contaminants like lead, PFAS, sediment, and bacteria from your water, ensuring it’s safer to drink and use. These systems also improve taste, reduce odors, and protect appliances from mineral buildup. Whether you rely on city water or a private well, the right filtration system can address specific issues and enhance water quality throughout your home.
Key Types:
- Point-of-Use (POU): Filters water at specific fixtures (e.g., faucets); great for drinking and cooking water. Costs range from $100 to $3,200 (including installation).
- Point-of-Entry (POE): Treats all water entering your home; ideal for whole-house filtration. Costs range from $2,000 to $10,000.
Core Technologies:
- Reverse Osmosis (RO): Removes up to 99% of dissolved solids like lead and fluoride but wastes water.
- Carbon Filtration: Eliminates chlorine, VOCs, and odors, but not heavy metals or microorganisms.
- UV Purification: Neutralizes bacteria and viruses but requires pre-filtered water to work effectively.
Maintenance:
- Replace filters every 6–12 months.
- RO membranes last 2–5 years; UV lamps need annual replacement.
- Annual sanitization prevents bacterial buildup.
To choose the right system, test your water for contaminants, compare system types, and consider household water usage. Combining POU and POE systems often provides the best results.
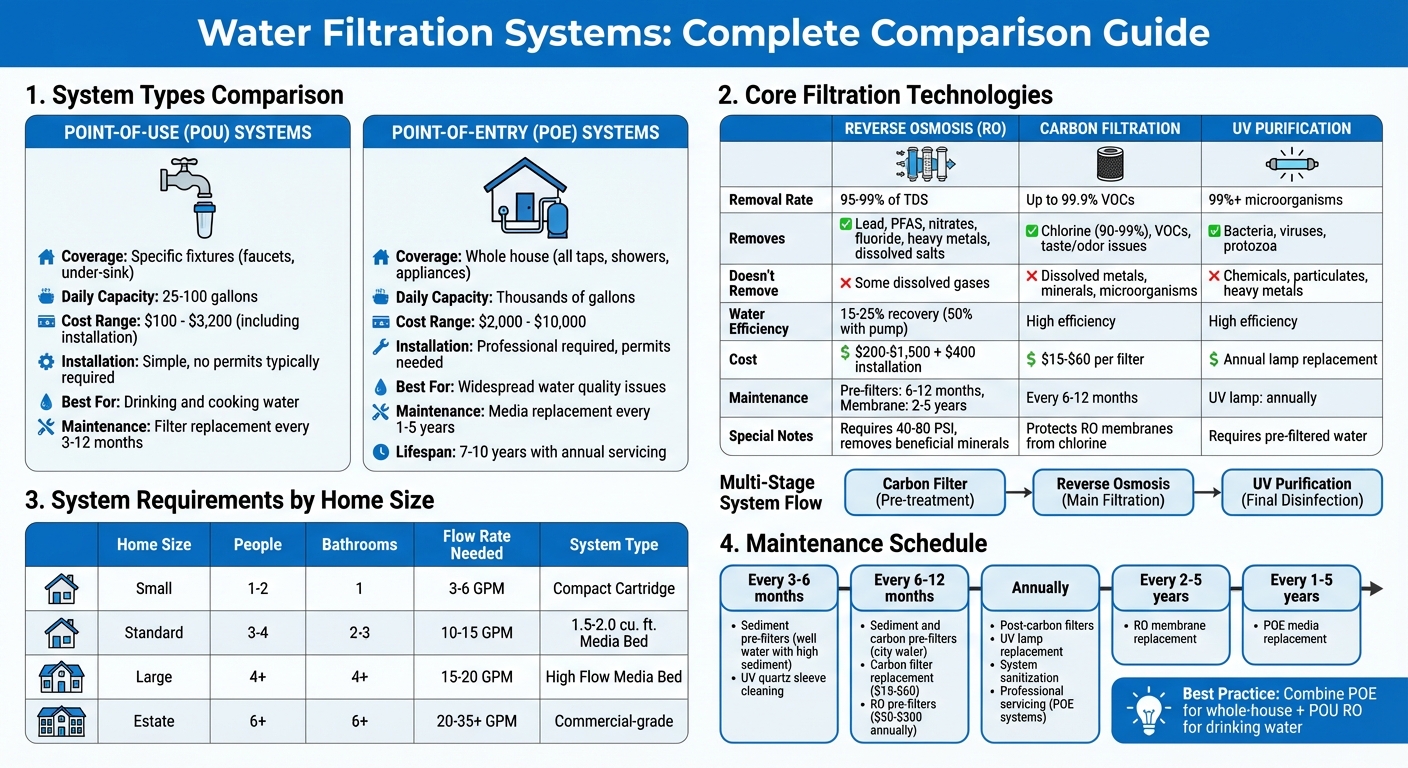
Water Filtration Systems Comparison: Types, Technologies, and Costs
How to (properly) Choose a Water Filter
sbb-itb-99db659
Types of Water Filtration Systems
Water filtration systems generally fall into two categories: Point-of-Use (POU) and Point-of-Entry (POE). POU systems target specific fixtures, while POE systems filter all the water entering your home. Choosing the right type depends on your water quality concerns and how you plan to use the filtered water.
“The real question isn’t which is better. It’s where in your home you need the protection.” – Crystal Quest
Point-of-Use (POU) Systems
POU systems are designed for localized filtration, attaching directly to fixtures like faucets or being installed under sinks. These systems are ideal for specific water needs, such as drinking or cooking, and typically produce between 25 and 100 gallons of clean water per day. They effectively remove contaminants like lead, fluoride, arsenic, PFAS, and nitrates.
Installation is relatively simple. Options like faucet filters and countertop units often cost under $100, while under-sink reverse osmosis (RO) systems can range from $400 to $1,200 for the unit alone. Professional installation for RO systems may increase the total cost to $1,600–$3,200. Since these systems don’t alter pressurized supply lines, they generally don’t require plumbing permits, making them a popular choice for renters.
However, POU systems do have some drawbacks. Their cartridges need frequent replacement – usually every 3 to 12 months. Additionally, residential RO systems are less efficient, recovering only 25% to 50% of input water as filtered water, with the rest being waste.
While POU systems are great for targeted use, they may not be sufficient for households needing broader water treatment.
Point-of-Entry (POE) Systems
POE systems filter water at the main supply line, ensuring that every tap, shower, and appliance in your home receives treated water. As Rogelio Alvarez from Monkey Wrench Plumbing explains, these systems provide whole-house filtration. They are capable of handling thousands of gallons per day, making them suitable for addressing widespread water quality issues like chlorine, sediment, iron, and hard water minerals.
For the 43 million Americans relying on private wells, POE systems are essential for protecting against bacteria and other contaminants that can affect the entire plumbing system. To maintain water pressure in a standard home with three bathrooms, a system rated for 15 to 20 gallons per minute is recommended.
Whole-house systems are more expensive than POU options, typically costing $2,000 to $5,000 including installation. In older homes with more complex plumbing, the cost can exceed $10,000. These installations are classified as plumbing work under the Uniform Plumbing Code and often require permits and inspections. On the plus side, maintenance is less frequent than POU systems, with media replacements needed every 1 to 5 years. With annual professional servicing, these systems can last 7 to 10 years.
For those seeking the best of both worlds, a combination of POE and POU systems is often recommended. A POE system can handle general filtration needs, such as removing chlorine and sediment, while a POU reverse osmosis system at the kitchen tap provides ultra-pure drinking water. This dual strategy offers comprehensive water treatment, setting the stage for exploring filtration technologies in more detail later.
Core Water Filtration Technologies
Choosing the right water filtration system starts with understanding how the main technologies work and what contaminants they target. Here’s a closer look at three key methods.
Reverse Osmosis (RO)
Reverse osmosis pushes water through a semi-permeable membrane with incredibly tiny pores (about 0.0001 microns). This process separates purified water from a concentrate that contains rejected contaminants, removing 95–99% of total dissolved solids (TDS) in the process.
“Reverse osmosis is the gold standard of home water filtration. It’s the only widely available technology that removes 95-99% of dissolved contaminants from your drinking water.”
- Crystal Quest Water Filters
A typical residential RO system includes several components: sediment and carbon pre-filters, the RO membrane, and a post-filter to improve taste. It’s highly effective against heavy metals like lead, arsenic, and chromium, as well as dissolved substances such as fluoride and nitrates. It’s even recognized by the U.S. EPA as a top option for reducing regulated contaminants. These systems can produce between 25 and 100 gallons daily and need water pressure of 40–80 PSI to function well.
However, RO systems do have some downsides. They waste water – standard units recover only 15–25% of input water as purified water. High-efficiency models with permeate pumps can improve recovery to about 50%. Another issue is that RO removes beneficial minerals, so many systems include remineralization cartridges to restore calcium, magnesium, and proper pH levels. Costs for residential RO systems range from $200 to $1,500, with professional installation adding up to $400. Maintenance, including replacing pre-filters every 6–12 months, runs $50 to $300 annually. The RO membrane itself lasts 2 to 5 years when properly maintained. For households with hard water (above 7 grains), adding a water softener can help prevent scaling on the membrane.
Carbon Filtration
Unlike RO, which physically separates contaminants, activated carbon works through adsorption. This process traps contaminants on the porous surface of the carbon media. Granular activated carbon (GAC) can remove up to 99.9% of certain volatile organic compounds (VOCs), such as trichloroethylene (TCE).
“GAC is a proven technology with high removal efficiencies (up to 99.9%) for many VOCs, including trichloroethylene (TCE) and tetrachloroethylene (PCE).”
- US EPA
Carbon filters are excellent for removing chlorine, VOCs, and impurities that affect taste and smell, making them ideal for improving municipal water quality. However, they don’t eliminate dissolved salts, heavy metals, or microorganisms. Carbon media can be made from materials like coconut shells, wood, or coal, each offering unique porous structures for trapping contaminants. In multi-stage systems, carbon pre-filters also protect RO membranes by removing chlorine, which could otherwise damage them. Replacement carbon filters cost between $15 and $60 and should be changed every 6–12 months.
UV Purification
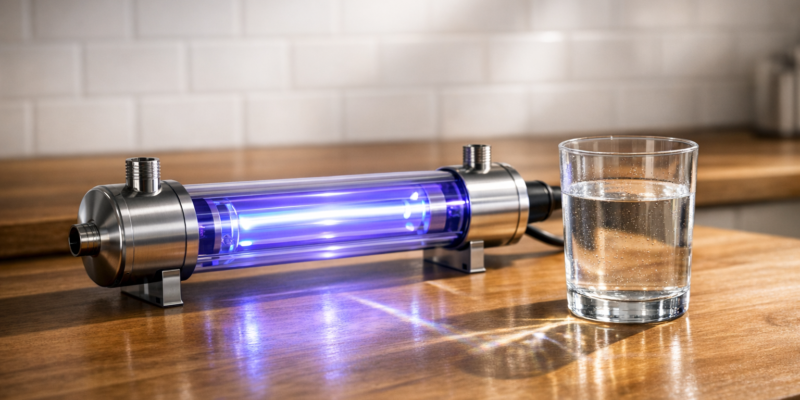
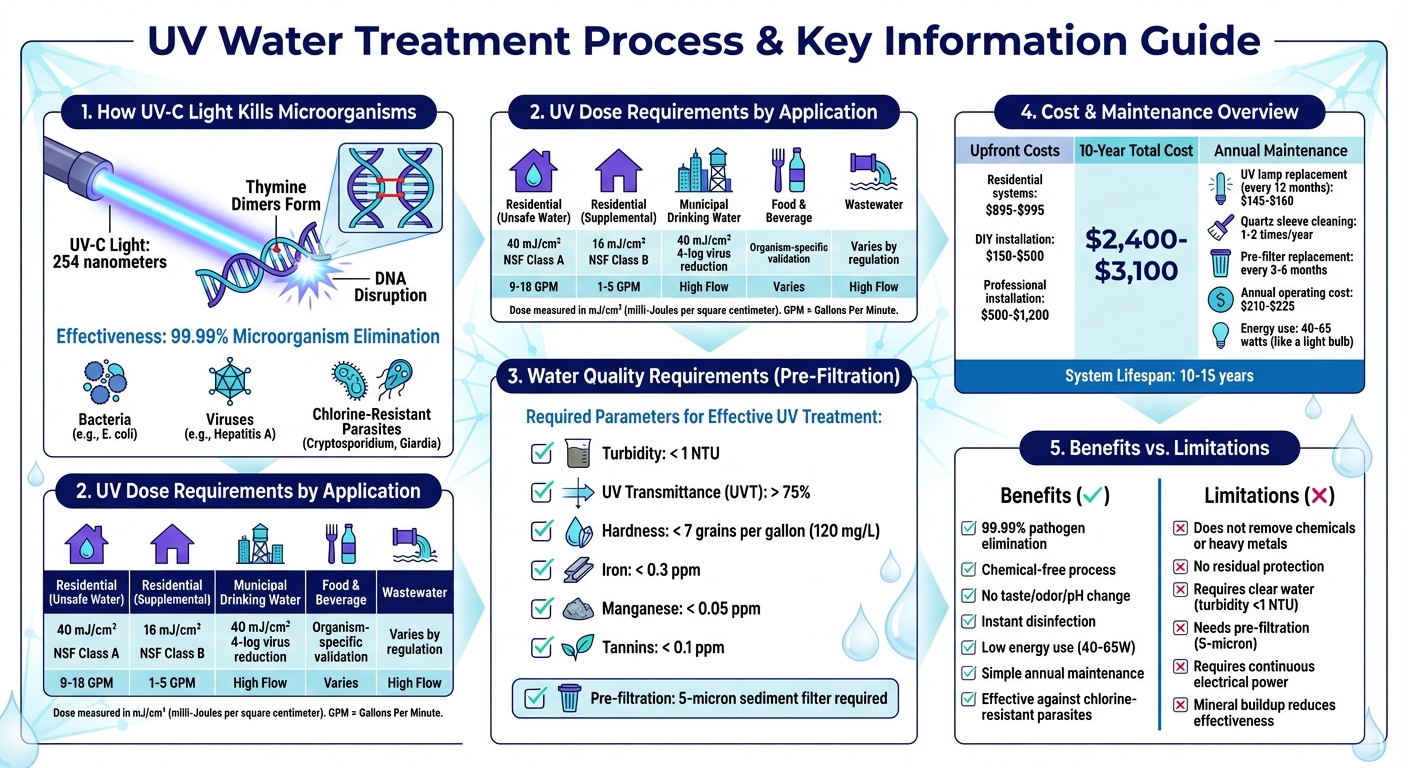
UV purification is often used as a final step after RO and carbon filtration to tackle microbial threats. It uses ultraviolet light to disrupt the DNA of microorganisms, preventing them from reproducing. This method is highly effective against bacteria, viruses, and parasites, achieving inactivation rates of over 99%.
While UV systems are great for biological contaminants, they don’t remove physical particles, chemicals, or heavy metals. For UV to work effectively, water must first pass through sediment filters to eliminate particles that could block the UV light. UV lamps typically need to be replaced annually as part of routine maintenance.
By combining carbon pre-filters, RO membranes, and UV purification, you can create a comprehensive system that addresses chemical, mineral, and biological contaminants. Carbon filters protect RO membranes while improving taste, the RO membrane removes dissolved contaminants like lead and PFAS, and UV purification ensures water is free from harmful microbes.
| Technology | Best For | What It Removes | What It Doesn’t Remove |
|---|---|---|---|
| Reverse Osmosis | Lead, PFAS, Nitrates, Fluoride, TDS | Heavy metals, dissolved salts, ions (95–99%) | Some dissolved gases |
| Carbon Filtration | Chlorine, VOCs, Taste, Odor | Chemicals, chlorine (90–99%), VOCs (up to 99.9%) | Dissolved metals, minerals, microorganisms |
| UV Purification | Bacteria, Viruses, Protozoa | Biological contaminants (99%+) | Chemicals, particulates, heavy metals |
Choosing the Right Water Filtration System
Identifying Water Quality Issues
Before deciding on a water filtration system, it’s critical to understand the quality of your water. As Crystal Quest Water Filters explains:
“Think of it this way: you wouldn’t pick a medicine without knowing the diagnosis. Water filtration works the same way.”
If you’re connected to a municipal water supply, start by reviewing your Consumer Confidence Report (CCR). This annual report, published by your local utility, lists detected contaminants and their concentrations. You can use the EPA’s CCR tool to locate this report. Precision Today emphasizes the importance of this step:
“Testing is such a crucial first step because it eliminates the guesswork and ensures you get a water filter that actually resolves your home’s issues.”
Pay close attention to any contaminants that exceed Maximum Contaminant Levels (MCLs) – these are the areas you’ll need to address.
For those using well water, professional lab testing is essential since there’s no utility monitoring your supply. State-certified labs offer mail-in kits starting at about $159, which can test for bacteria, heavy metals like lead and arsenic, nitrates, and pesticides. Well water users should also be particularly mindful of iron, manganese, and bacteria, as these issues aren’t regulated like contaminants in municipal systems.
Once you’ve identified the contaminants in your water, you can match them to the appropriate filtration technology. For example:
- Reverse Osmosis (RO): Effective for dissolved solids like lead, PFAS, and nitrates.
- Activated Carbon: Targets chlorine, unpleasant odors, tastes, and volatile organic compounds (VOCs).
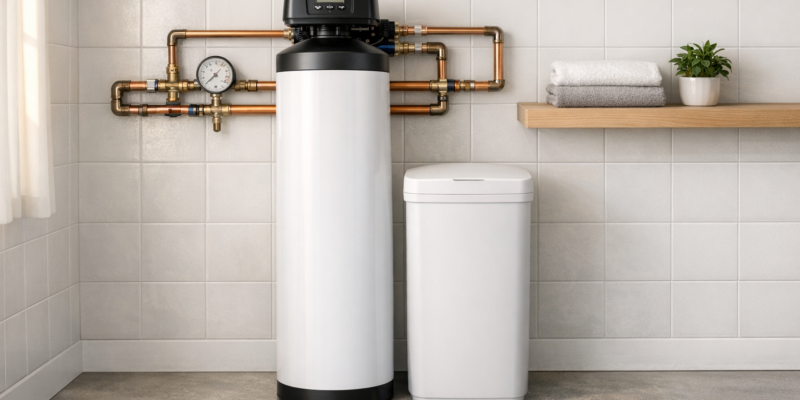
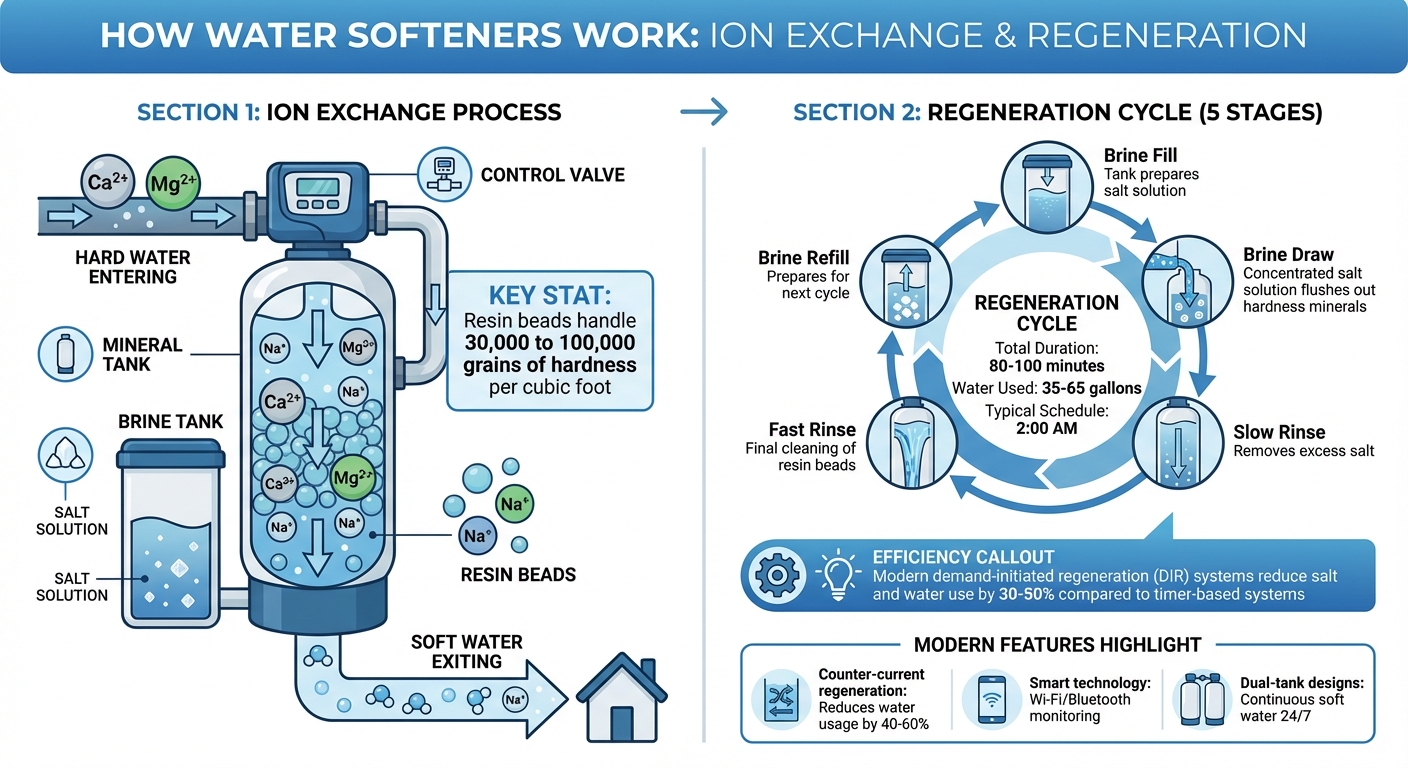
- Ion Exchange Systems: Commonly used as water softeners, these address hard water minerals like calcium and magnesium when levels exceed 7 grains per gallon.
- UV Sterilization: Ideal for neutralizing bacteria, viruses, and parasites, especially in well water.
With a clear understanding of your water’s issues, you can move on to evaluating system capacity and installation needs.
Evaluating System Requirements
After pinpointing your water’s contaminants, consider your household’s water usage and installation constraints. The size of your household and its water demands will dictate the type of system you need. For instance, a home with 3–4 people and 2–3 bathrooms typically requires a flow rate of 10–15 gallons per minute (GPM). If the system’s flow rate is too low, you may experience drops in water pressure.
There are two main types of systems to consider:
- Point-of-Entry (POE) Systems: Installed at the main water line, these treat water for the entire house, including taps, showers, and appliances. They’re great for whole-house concerns like hard water or sediment but often require professional installation and possibly permits.
- Point-of-Use (POU) Systems: Installed at a single faucet, usually under the kitchen sink, these are ideal for improving drinking water quality or for renters.
Here’s a quick guide to recommended flow rates based on home size:
| Home Size | Bathrooms | Recommended Flow Rate | System Type Example |
|---|---|---|---|
| Small (1–2 people) | 1 | 3–6 GPM | Compact Cartridge System |
| Standard (3–4 people) | 2–3 | 10–15 GPM | 1.5–2.0 cu. ft. Media Bed |
| Large (4+ people) | 4+ | 15–20 GPM | High Flow Media Bed |
| Estate/Multi-unit | 6+ | 20–35+ GPM | Commercial-grade System |
Many households find that combining both POE and POU systems works best. For example, a whole-house water softener can protect plumbing and appliances, while a POU reverse osmosis system ensures high-quality drinking water. Keep in mind the space requirements for installation: under-sink RO systems need room for a storage tank and multiple filters, while whole-house systems require space near the main water line for larger tanks.
Cost and Maintenance Considerations
Water filtration systems come with a wide range of price tags. Basic cartridge-based whole-house systems may cost a few hundred dollars, while more advanced systems, like multi-stage or whole-house reverse osmosis setups, can run into the thousands. Point-of-use systems are generally less expensive upfront, ranging from $200 to $1,500 for residential RO units, but they may have a higher cost per gallon over time compared to whole-house options.
Maintenance is another factor to weigh. Cartridge systems typically require filter replacements every 6–12 months, with costs varying:
- Carbon filters: $15–$60 per replacement
- RO pre-filters: $50–$300 annually
RO membranes, if maintained properly, can last 2–5 years, while UV bulbs generally need annual replacement. High-capacity media bed systems can handle up to 1,000,000 gallons before the media needs replacing.
To stay on top of maintenance, set calendar reminders for filter changes. Expired filters not only lose effectiveness but can also release trapped contaminants back into the water. Look for systems with NSF/ANSI certifications, such as:
- Standard 42: For chlorine removal
- Standard 53: For lead reduction
- Standard 58: For reverse osmosis systems
These certifications ensure that performance claims have been independently verified.
Finally, think about the total cost of ownership over 5–10 years, factoring in installation, filter replacements, and maintenance. While a more durable system may have a higher upfront cost, it can save you money in the long run compared to frequently replacing cheaper units.
Maintaining Your Water Filtration System
Regular Filter Replacement
Taking care of your water filtration system is just as important as picking the right one. Proper maintenance ensures clean water and keeps your system running efficiently.
A key part of this upkeep is regularly replacing filters. Overused filters let contaminants slip through long before you notice changes in taste or smell. As Mid Atlantic Water points out:
“Missing a filter change is the most common cause of poor-tasting water, slow flow, and premature membrane failure.”
Here’s a general guide for filter replacement:
- Sediment and carbon pre-filters: Replace every 6–12 months for city water. If you’re on well water with high sediment, aim for every 3–6 months.
- Reverse osmosis (RO) membranes: Typically last 2–4 years.
- Post-carbon filters: Replace annually to avoid stale flavors.
- UV lamps: Replace yearly, as they lose effectiveness after about 9,000 hours of use. Craig “The Water Guy” Phillips from Quality Water Treatment advises:
“UV lamps need annual replacements as they lose disinfection effectiveness after 9,000 hours of continuous operation.”
When replacing filters, follow these steps:
- Turn off the water supply and relieve pressure in the system before opening housings.
- Clean the housings with mild soap and a soft brush.
- Lubricate the O-ring with food-grade silicone grease to ensure a proper seal.
- Install the new filter cartridge and flush the system for 5–10 minutes to clear out carbon fines and trapped air. For RO systems, drain and refill the storage tank 2–3 times before using the water.
Cleaning and Sanitization
Even with timely filter changes, yearly sanitization is crucial to prevent bacterial buildup and biofilm formation inside your system. Plan to sanitize the system during a filter change for convenience.
To sanitize:
- Mix 2 tablespoons of unscented household bleach with 1 gallon of water.
- Remove the filters (but leave the RO membrane in place if applicable).
- Pour the bleach solution into the housings and let it circulate for 30–60 minutes.
- Flush the system thoroughly until no chlorine smell remains.
Important safety tip: Never mix bleach with ammonia or acidic cleaners, as this can create harmful fumes.
For UV systems, clean the quartz sleeve every 3–6 months to remove mineral deposits that can block UV light. If your system sits unused for an extended period, such as during a vacation, flush it thoroughly before drinking the water again to eliminate any stagnant water.
Troubleshooting Common Issues
After regular maintenance, you might still encounter a few hiccups. Here’s how to address them:
- Low water pressure: This usually means clogged pre-filters or low pressure in the RO storage tank. Replace the filters first, then check the tank’s air pressure (it should be 7–10 PSI when empty).
- Bad taste or odor: Indicates depleted carbon filters or bacterial growth. Replace the filters and sanitize the system.
- Continuous running RO system: Check the shut-off valve and test the membrane’s TDS (total dissolved solids) rejection rate. If the rejection rate falls below 90%, replace the membrane.
- Cloudy or milky water: Likely caused by air bubbles or carbon fines after a filter change. Flush the system for 30–60 seconds until the water clears.
- Gurgling or sputtering sounds: Normal for the first 24–48 hours after maintenance as trapped air escapes.
- Leaks: Usually due to dry or misaligned O-rings. Lubricate the O-rings and ensure they’re seated correctly. Avoid over-tightening housings – hand-tight plus a quarter turn with a wrench is enough.
To stay organized, keep a simple log of filter changes, monthly TDS readings, and any observations about water quality or pressure. This can help you catch issues early and extend the life of your system. With proper care, an RO system can last over 20 years, and handling maintenance yourself could save you $200–$300 annually compared to hiring a professional.
Conclusion
Choosing and maintaining the right water filtration system starts with understanding the specific contaminants in your water. Testing your water is a critical first step – whether you’re dealing with lead, PFAS, bacteria, or hard water, each issue demands a tailored solution. For example, reverse osmosis (RO) systems are excellent for removing most dissolved contaminants, UV sterilization is ideal for addressing biological risks in well water, and ion exchange systems effectively handle water hardness that can harm appliances. A targeted approach ensures all aspects of your water quality are properly managed.
The decision between a whole-house system and a point-of-use system comes down to your needs. Whole-house, or Point-of-Entry (POE), systems treat water for the entire home, protecting every faucet, shower, and appliance. This helps prevent scale buildup and extends the lifespan of items like water heaters and dishwashers. On the other hand, Point-of-Use (POU) systems focus on delivering highly purified water at a single location, like your kitchen sink. Many households opt for a combination of both – a whole-house system for general water treatment paired with an under-sink RO unit for drinking water purity. However, selecting the right system is only part of the equation – consistent upkeep is just as important.
Regular maintenance, such as timely filter replacements and annual sanitization, ensures your system runs efficiently and lasts longer. Keeping a simple log of filter changes and water quality checks can help identify problems early, and handling maintenance yourself can save money.
Beyond health benefits, water filtration systems offer practical economic and environmental advantages. They reduce the need for single-use plastic bottles, lower energy costs by preventing scale buildup in appliances, and cut down on plumbing and repair expenses. For those using private wells, reliable filtration is especially critical. Beyond these practical gains, the impact on daily life is undeniable.
Clean water improves everything from drinking and cooking to appliance performance. With the right system and proper care, you’re prioritizing your health, saving money, and ensuring safe, high-quality water throughout your home.
FAQs
Which filter removes my specific contaminant?
When it comes to choosing the right water filter, it all boils down to the specific contaminants in your water. For PFAS chemicals, such as PFOA and PFOS, look for filters that are certified to remove them. Granular activated carbon (GAC) filters are effective for tackling chlorine, lead, and heavy metals. If bacteria and viruses are your concern, UV systems are a solid choice. For sediment or nitrate problems, mechanical filters or ion exchange systems work best. The key is to test your water first and choose a filter specifically certified to address the contaminants you’re dealing with.
Do I need whole-house or under-sink filtration?
Choosing the right water filtration system depends on your specific needs. Whole-house systems treat all the water entering your home, making them a great choice if you’re looking to reduce contaminants across taps, showers, and even appliances. On the other hand, under-sink filters are installed at individual faucets, targeting drinking water or specific contaminants. While whole-house systems cover more ground, they tend to be more expensive. Under-sink systems, however, are simpler to install and maintain, offering a more focused solution.
How often should I service my system?
To keep your water filtration system running smoothly, regular maintenance is key. The service frequency depends on the type of filter you’re using:
- Sediment filters: Replace every 3–6 months.
- Carbon filters: Replace every 6–12 months.
- Reverse osmosis membranes: Replace every 2–5 years.
Beyond replacing filters, you should sanitize storage tanks every three months and check Total Dissolved Solids (TDS) levels monthly. These steps help ensure your system delivers clean, high-quality water consistently.