Role of HVAC Maintenance in Combustion Pollutant Control

Role of HVAC Maintenance in Combustion Pollutant Control

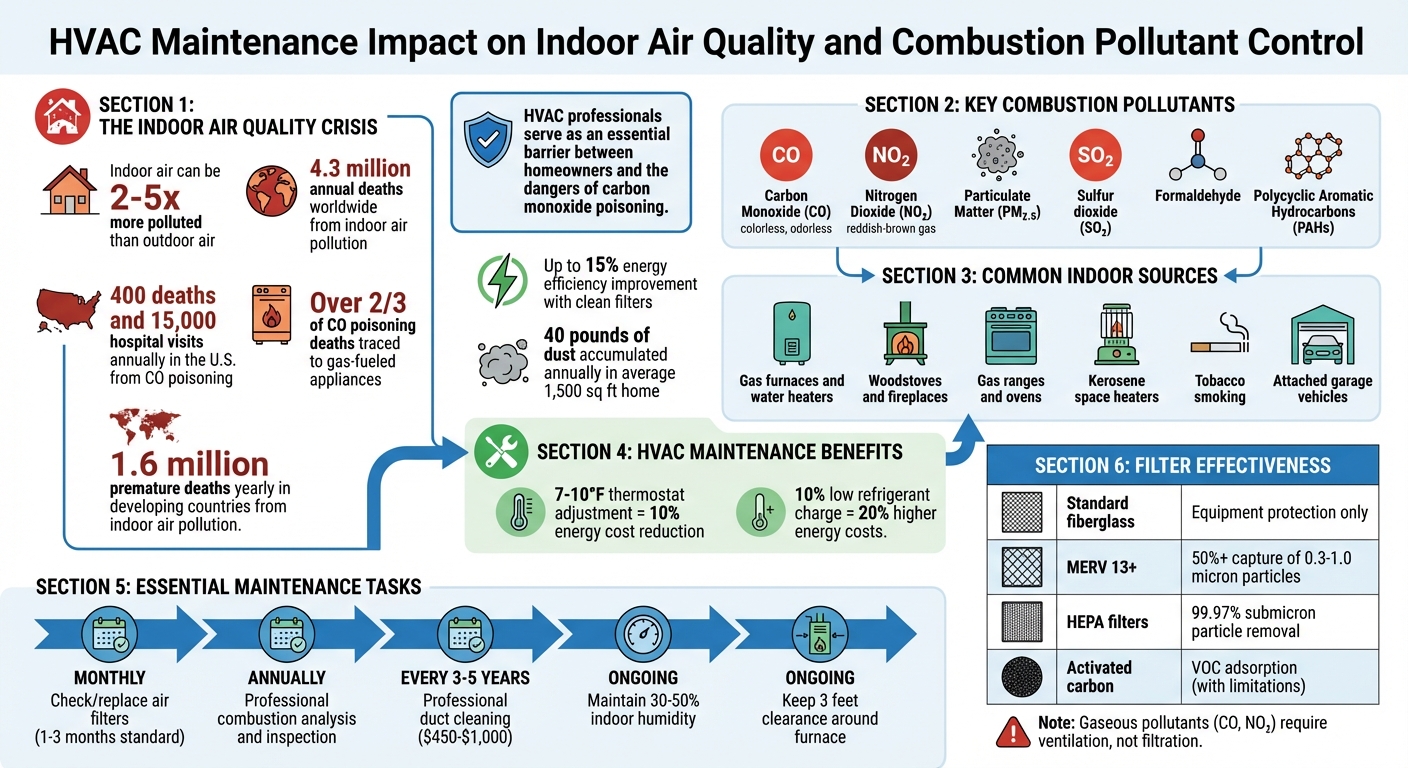
Indoor air can be 2 to 5 times more polluted than outdoor air, posing serious health risks. Combustion pollutants like carbon monoxide (CO) and nitrogen dioxide (NOâ‚‚) come from everyday appliances like furnaces, stoves, and fireplaces. Poor maintenance can worsen these risks, leading to toxic gases leaking into your home. Regular HVAC maintenance is critical to managing these pollutants and protecting your health.

Key Takeaways:

  • Health Risks: CO poisoning causes 400 deaths and 15,000 hospital visits annually in the U.S.
  • Pollutant Sources: Gas appliances, smoking, and unvented equipment are common culprits.
  • HVAC Role: Proper ventilation, filtration, and pressure management reduce pollutants.
  • Maintenance Tips:
    • Replace air filters every 1–3 months.
    • Schedule annual professional inspections to check for leaks and ensure proper exhaust.
    • Use sealed-combustion appliances to prevent backdrafting.

HVAC systems help remove pollutants, but they have limits. While filters handle particles, ventilation is essential for gases like CO. Pairing maintenance with carbon monoxide detectors and proper appliance use ensures cleaner, safer air indoors.

HVAC Maintenance Impact on Indoor Air Quality and Combustion Pollutant Control

HVAC Maintenance Impact on Indoor Air Quality and Combustion Pollutant Control

Gas Furnace Combustion Analysis Training with Tyler Nelson!

What Are Combustion Pollutants and Why They Matter

Combustion pollutants are created when fuels are burned. According to the California Air Resources Board, these pollutants come from burning materials like wood, natural gas, and other fuels. Key examples include carbon monoxide (CO), nitrogen dioxide (NOâ‚‚), particulate matter (PM), sulfur dioxide (SOâ‚‚), formaldehyde, and polycyclic aromatic hydrocarbons (PAHs).

What makes these pollutants especially hazardous is how easily they can go unnoticed. Take carbon monoxide, for example – it’s a colorless, odorless gas that disrupts oxygen delivery in the body. Nitrogen dioxide, on the other hand, is a reddish-brown gas that irritates the respiratory system, while particulate matter consists of microscopic particles that can penetrate deep into the lungs.

The health effects of these pollutants can vary widely, from mild to severe. Short-term exposure might mimic flu symptoms, such as headaches, dizziness, fatigue, nausea, and confusion. Over time, however, the risks escalate significantly. Long-term exposure has been linked to chronic respiratory issues like asthma and emphysema, cardiovascular disease, permanent damage to the brain and heart, and even cancers affecting the lungs, stomach, and bladder. Some groups – like infants, the elderly, those with pre-existing conditions, and even unborn children – are particularly vulnerable to these risks. Understanding these dangers is essential to addressing the everyday sources of combustion pollutants in indoor spaces.

Common Indoor Sources of Combustion Pollutants

Combustion pollutants can originate from a surprising number of everyday household appliances and activities. Gas-fired furnaces, water heaters, woodstoves, fireplaces, gas ranges, ovens, and kerosene space heaters are all common culprits. While these appliances emit pollutants as part of their normal operation, faulty equipment or poor maintenance can dramatically increase the risks.

Beyond appliances, daily habits can contribute to indoor pollution. Smoking tobacco, running gas-powered tools like lawnmowers or generators, idling cars in attached garages, and even hobbies like welding or soldering release combustion byproducts. Cooking on a gas stove – especially when frying or grilling at high heat – can also generate nitrogen dioxide and particulate matter.

The problem intensifies when pollutants seep into living areas due to unvented appliances, malfunctioning equipment with cracked heat exchangers, or backdrafting. Backdrafting occurs when pressure imbalances pull exhaust gases, like carbon monoxide, back into the home instead of venting them outside. Shockingly, over two-thirds of carbon monoxide poisoning deaths have been traced to gas-fueled appliances like furnaces and water heaters.

Health Effects and Air Quality Concerns

The numbers surrounding indoor air pollution are staggering. Around 4.3 million people worldwide die annually from indoor air pollution – 600,000 more than those who die from outdoor pollution. Of these deaths, roughly 60% are linked to heart issues, while 40% stem from lung-related conditions. In developing countries, where biomass fuels are often used for cooking and heating, indoor air pollution causes an estimated 1.6 million premature deaths each year.

Each pollutant has its own way of harming the body. Carbon monoxide deprives vital organs of oxygen, nitrogen dioxide damages mucous membranes and hampers breathing, and PM2.5 – a particularly tiny form of particulate matter – can enter the bloodstream or carry carcinogens like radon deep into the lungs. Children are especially at risk, with indoor air pollution contributing to half of all pneumonia-related deaths in kids under five.

Additionally, combustion processes release water vapor, which can raise indoor humidity levels. This creates a breeding ground for mold and dust mites, further exacerbating air quality issues. Recognizing these risks underscores how proper HVAC system maintenance can play a critical role in reducing exposure to these harmful pollutants.

How HVAC Systems Reduce Combustion Pollutants

HVAC systems do much more than regulate your home’s temperature – they actively help reduce harmful combustion pollutants in your indoor air. The process begins as the system pulls in air, filters it, and redistributes it throughout your home. When properly maintained, this cycle ensures cleaner, healthier air. However, neglecting maintenance can turn your HVAC system into a source of indoor air issues, spreading dust, allergens, and even mold spores. This initial filtration is just the starting point for more advanced pollutant reduction strategies.

One of the most effective ways HVAC systems combat pollutants is through mechanical ventilation. By exchanging stale indoor air with fresh outdoor air, your system dilutes dangerous levels of carbon monoxide, nitrogen dioxide, and other combustion byproducts. This continuous airflow prevents pollutants from accumulating in stagnant areas, which can pose serious health risks. Without proper ventilation, even minor amounts of combustion gases can build up over time, leading to hazardous conditions. Both filtration and ventilation are integral to maintaining a safe indoor environment.

Another critical factor is pressure management. HVAC systems must maintain balanced air pressure throughout your home to avoid backdrafting – a condition where combustion gases are drawn back into your living areas instead of being vented outside. Pressure imbalances, often caused by exhaust fans or air leaks, can reverse the normal flow of air in chimneys or flues, creating significant safety risks.

Air Filtration and Airflow Management

Not all air filters are created equally. Standard fiberglass filters are primarily designed to protect HVAC equipment from large debris, not to improve air quality. Filters with higher MERV (Minimum Efficiency Reporting Value) ratings, however, can trap smaller particles like smoke and fine dust from combustion sources. For even better results, HEPA filters and activated carbon filters go a step further, capturing microscopic particles and absorbing chemical pollutants like volatile organic compounds (VOCs).

Advanced filtration systems take things up a notch by actively purifying air as it circulates. These systems neutralize odors from cooking or smoke and capture allergens that basic filters may miss. However, their effectiveness depends on clean filters and unobstructed airflow. Clogged filters not only reduce a system’s efficiency but also allow pollutants to bypass the filtration process entirely. Ensuring proper airflow is crucial for evenly distributing filtered air throughout your home, preventing pollutant buildup in areas with poor ventilation.

While filtration is a vital component, comprehensive pollutant control also requires effective ventilation strategies to manage air exchange across your entire home.

Ventilation and Safe Combustion Appliance Operation

Ventilation is your home’s first defense against combustion pollutants. HVAC systems manage this by removing contaminated air, introducing fresh air, or balancing both processes to dilute pollutant concentrations effectively.

“Proper ventilation does more than circulate air; it removes contaminants and controls humidity, ensuring that your living spaces remain comfortable throughout the year.” – Chris Roe, Owner, Precision Heating & Air

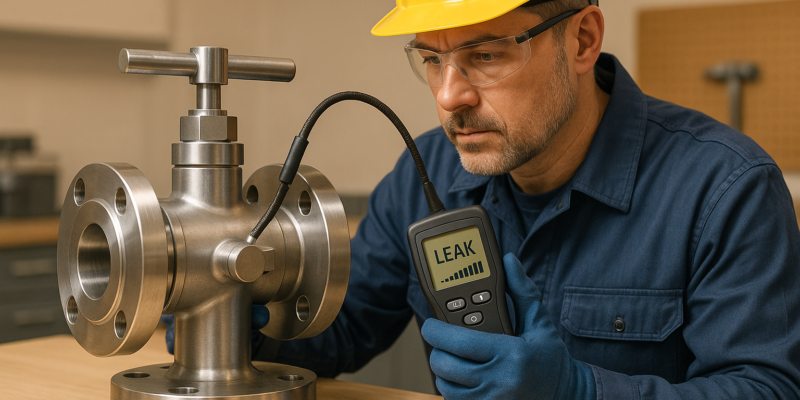
Regular HVAC inspections play a crucial role in ensuring the safe operation of combustion appliances. Annual maintenance should include combustion analysis, where technicians check that fuel-fired appliances receive the correct mix of fuel and air to minimize carbon monoxide production. Inspections should also cover heat exchangers for cracks – an often-invisible hazard that can allow combustion byproducts to leak into your home’s air – and verify that exhaust systems properly vent gases outdoors rather than back into your living space.

“Annual service needs to include combustion analysis during which the HVAC professional checks that the appliance is getting the correct mix of fuel and air in the combustion process.” – National Carbon Monoxide Awareness Association (NCOAA)

When upgrading your system, consider sealed-combustion appliances as a safer option. These units draw combustion air directly from outside through a dedicated pipe and expel exhaust through a separate sealed pipe, eliminating the risk of backdrafting and ensuring combustion gases stay out of your indoor air. These measures are key to maintaining air quality and minimizing the risks associated with combustion pollutants.

HVAC Maintenance Tasks for Controlling Combustion Pollutants

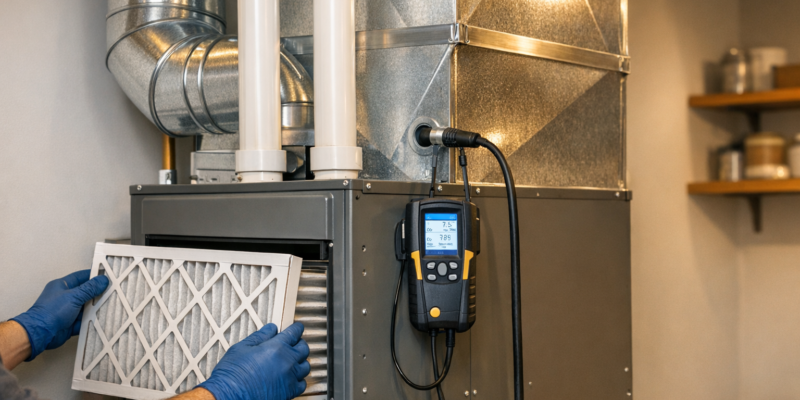
Keeping up with HVAC maintenance is a critical step in managing combustion pollutants in your home. One of the simplest yet most effective tasks is replacing air filters regularly – every 1 to 3 months. This helps maintain proper airflow and prevents particles from recirculating. If you have pets, smokers, or family members with respiratory issues, swapping out filters monthly is a smart move for better air quality. A quick visual check can also guide you – if the filter looks gray or clogged, it’s time for a change, even if it’s ahead of schedule. These small efforts go a long way in ensuring your indoor air stays clean and safe.

Annual professional tune-ups are just as important. Technicians conduct combustion analyses to make sure fuel-fired appliances are running with the right fuel-to-air ratio, which reduces carbon monoxide emissions. They also inspect critical components like the heat exchanger for cracks – a potential source of dangerous carbon monoxide leaks. Additionally, they check venting systems and flues to confirm exhaust gases are being properly expelled outdoors. These inspections are essential for keeping your HVAC system effective at managing combustion pollutants.

Filter Replacement Schedules

Replacing air filters regularly is a key part of maintaining both air quality and system efficiency. Clogged filters make your HVAC system work harder, increasing energy use. In fact, swapping out a dirty filter can boost energy efficiency by up to 15%. Clean filters also trap dust, pollen, and pet dander, while preventing mold growth that can occur in damp, dirty filters. The general recommendation is to replace filters every 1–3 months, but during peak heating or cooling seasons, checking them monthly is wise. Before replacing a filter, always turn off the HVAC unit to avoid pulling in unfiltered air and debris. Signs like higher energy bills, weaker airflow from vents, or visible dust around registers often indicate it’s time for a replacement.

Duct Cleaning and Equipment Inspections

While filters handle daily particle removal, duct cleaning tackles the buildup that filters might miss. An average 1,500-square-foot home can accumulate about 40 pounds of dust annually, much of which ends up in ductwork. Hiring professionals to clean ducts every 3–5 years can remove stubborn debris, soot, and allergens. The cost typically ranges from $450 to $1,000, depending on the size of your home and the level of contamination.

Equipment inspections are another vital step for combustion safety. Technicians clean burners to remove soot and debris that can cause incomplete combustion and lead to carbon monoxide production. They also inspect duct joints for leaks, which can allow unfiltered air or pollutants from areas like garages or crawlspaces to enter the system.

“HVAC professionals serve as an essential barrier between homeowners and the dangers of carbon monoxide poisoning.” – National Carbon Monoxide Awareness Association (NCOAA)

To ensure you’re in good hands, verify that technicians have certifications in carbon monoxide safety and combustion analysis, such as NCI, NATE, or COSA.

System Adjustments and Performance Tuning

Fine-tuning your HVAC system not only boosts efficiency but also enhances safety. For example, thermostat calibration helps prevent short-cycling – when the system turns on and off too often – which improves combustion efficiency and reduces wear on components. Adjusting your thermostat to lower temperatures by 7–10°F for eight hours a day can cut energy costs by up to 10%. Technicians also check refrigerant levels, as even a 10% low charge can increase annual energy costs by as much as 20%.

Other performance-tuning tasks include cleaning the blower motor, flame sensors, and igniters to prevent shutdowns and ensure proper airflow and combustion. To stop air leaks and keep pollutants out, sealing duct gaps with mastic sealant or metal-backed foil tape is far more effective than standard duct tape. Lastly, maintaining at least three feet of clearance around your furnace and keeping flammable items away ensures safe airflow and reduces fire risks.

Limitations of HVAC Systems in Pollutant Control

HVAC systems are great at managing many pollutants, but they fall short when dealing with certain gaseous contaminants. Knowing these limitations is crucial for setting realistic expectations and recognizing when extra measures may be needed. For instance, regular maintenance alone often isn’t enough to tackle invisible gaseous pollutants.

Differences Between Particulate and Gaseous Pollutant Control

HVAC systems approach solid particles and gases in completely different ways. Standard filters, including high-efficiency HEPA filters, are excellent at capturing physical particles like dust, soot, and pollen through mechanical straining. They can remove 99.97% or more of submicron particles. However, when it comes to gaseous pollutants like carbon monoxide, nitrogen dioxide, and volatile organic compounds (VOCs), these filters just don’t work.

“Air cleaning for carbon monoxide and radon is challenging because these compounds have a low reactivity.”
– Lawrence Berkeley National Laboratory

Even advanced filters with activated carbon, which aim to adsorb VOCs, face hurdles. A study conducted by Aarhus University in March 2022 tested eight high-end air cleaners (costing $900–$5,000) in a 100 m³ (roughly 3,500 ft³) classroom. Seven of the eight units showed much lower VOC removal rates compared to their ability to remove particles. Alarmingly, one PECO-based cleaner even emitted harmful by-products, releasing 350 μg/h of formaldehyde and 200 μg/h of methacrolein during operation. Saturated carbon filters can also release trapped VOCs back into the air, emphasizing the importance of supplemental ventilation.

Pollutant Type HVAC Control Method Major Limitation
Particulate Matter Mechanical Filtration (HEPA/MERV) Only works when the system is running
VOCs (Gaseous) Adsorption (Activated Carbon) Filter saturation and re-emission
VOCs (Gaseous) Oxidation (PCO/PECO) Produces toxic by-products like formaldehyde
CO / Radon Ventilation / Dilution Low reactivity makes removal difficult

These challenges underline why HVAC systems need to be paired with other strategies to effectively manage indoor air quality. Since they only clean air while running, short operating times may not be enough to keep up with high pollutant levels.

Balancing Cost and Energy Use

Advanced filtration options come with trade-offs, particularly in energy use and costs. Upgrading to high-efficiency filters like MERV 13 or higher improves particle capture – they can trap at least 50% of particles in the 0.3–1.0 micron range. However, these filters also increase static pressure in the ductwork, making HVAC systems work harder. This can lead to higher energy bills and potentially shorten the lifespan of the equipment.

While better filters can improve air quality, they also come with added costs. In many cases, controlling pollutants at their source is more economical than filtering them after they’ve been released. For example, ensuring proper venting of combustion appliances or using sealed combustion units is often more effective than relying solely on filtration. Maintaining indoor humidity between 30–50% also helps because high humidity can reduce the effectiveness of carbon filters by making water vapor compete with VOCs for adsorption sites.

“Technologies based on adsorption do not permanently remove VOCs, but merely retain them temporarily at varying degree.”
– Anders Feilberg and Kasper Kristensen, ScienceDirect

For gaseous pollutants that HVAC systems can’t handle, mechanical ventilation systems like Energy Recovery Ventilators (ERVs) can bring in fresh outdoor air to dilute indoor contaminants. While this does increase energy use, it’s often the most practical solution for gases that standard filters can’t capture. The key lies in striking the right balance between pollutant control, energy efficiency, and operating costs based on your specific air quality needs. This highlights the importance of regular HVAC maintenance and making informed choices about your equipment to maintain a healthier indoor environment.

Conclusion

Keeping up with regular HVAC maintenance is a key step in protecting your home or business from harmful combustion pollutants. By scheduling professional service at least once a year, you safeguard both your equipment and the people inside. Technicians play a crucial role – they ensure proper combustion, check flues and heat exchangers, and identify potential carbon monoxide leaks.

“HVAC professionals serve as an essential barrier between homeowners and the dangers of carbon monoxide poisoning.”
– National Carbon Monoxide Awareness Association (NCOAA)

Routine maintenance goes beyond just addressing carbon monoxide risks. It also manages particulate pollutants by focusing on tasks like replacing filters and cleaning ducts. Swapping out filters every one to three months helps keep soot, allergens, and mold spores from circulating back into the air. Plus, a well-maintained system helps maintain indoor humidity levels between 30–50%, reducing the chances of mold and mildew.

On top of health benefits, regular upkeep improves system efficiency. A properly maintained HVAC setup uses less energy, which translates to lower utility bills and a smaller carbon footprint. It can also extend the life of your equipment, saving you from the cost of an early replacement.

When arranging maintenance, make sure your technician is certified by organizations like the National Comfort Institute (NCI) or North American Technician Excellence (NATE) for gas furnace service. Combine these professional inspections with carbon monoxide detectors, and check your air filters monthly – especially if you have pets, smokers, or family members with allergies.

FAQs

Can my HVAC system remove carbon monoxide?

Your HVAC system isn’t designed to directly remove or filter out carbon monoxide. However, keeping up with regular maintenance and inspections can play a big role in preventing carbon monoxide buildup. By ensuring proper ventilation and the safe operation of combustion systems, you can reduce risks and help maintain both indoor air quality and overall safety.

How do I know if my home is backdrafting exhaust gases?

Look out for warning signs such as soot or dark residue near your water heater, strange odors, or persistent dampness around vents. To check for backdrafting, hold a small flame near the draft diverter – if the flame wavers or isn’t drawn into the vent, there could be a problem. Using a carbon monoxide detector can also help identify issues. If you suspect backdrafting, it’s best to reach out to a professional HVAC technician for thorough testing and to ensure your safety.

What should an annual HVAC combustion safety check include?

An annual HVAC combustion safety check is essential for keeping your system running safely and efficiently. This process should include a combustion analysis, which evaluates the fuel-to-air ratio, checks exhaust gases, and ensures fuel-burning appliances are operating correctly. Along with this, venting systems must be inspected to identify any leaks or blockages that could compromise safety or air quality.

How to Test for High-Pressure System Leaks

How to Test for High-Pressure System Leaks

Testing for leaks in high-pressure systems is critical to maintaining safety and performance in industries like oil and gas, manufacturing, and aerospace. Even small leaks can lead to serious risks and costly failures. Here’s a quick summary of the process and tools needed:

  • Tools Required:
    • Digital pressure gauges (rated for 2–4x the system pressure).
    • Soap solution for bubble testing (1–30 psi range).
    • Stainless steel test manifolds and fittings for durability.
  • Testing Methods:
    • Bubble Testing: Apply a soap solution and look for bubbles at suspected leak points.
    • Pressure Decay Testing: Monitor pressure changes over time in an isolated system (5–150 psi range).
    • Tracer Gas Testing: Use a gas detector to pinpoint leaks in pressurized sections.
    • Ultrasonic Detection: Noninvasive option for hard-to-access systems.
  • Preparation:
    • Depressurize the system and inspect for visible damage.
    • Use OSHA-compliant Lockout/Tagout (LOTO) procedures to ensure safety.
  • Safety Tips:
    • Always wear PPE, including goggles, gloves, and protective footwear.
    • Inspect gear for damage before use.
    • Be cautious of hazards like flying debris or chemical exposure.

Testing ensures systems are safe, efficient, and compliant with standards like ASME and ISO. Regular inspections help catch issues early, reducing downtime and repair costs.

Leak testing on high pressure reactors

Required Tools and Equipment for Leak Testing

When it comes to high-pressure leak testing, having the right tools is non-negotiable. These instruments must be designed to handle elevated pressures safely and deliver accurate results. Here’s a breakdown of the essential tools, their specifications, and the compliance measures required for effective leak testing.

Essential Tools for Leak Detection

  • Digital Pressure Gauges: Opt for gauges that can measure pressures 2–4 times higher than the system’s operating requirements. This ensures both safety and precision.
  • Bubble Immersion Testing: Use a soap solution to visually detect leaks. This method works best at pressures ranging from 1 to 30 psi.
  • Test Manifolds and Fittings: Choose components rated to withstand pressures above the testing range. Stainless steel is a preferred material for its durability and reliability under high-pressure conditions.

Standards and Compliance for Accurate Measurements

  • Calibration: All equipment must be calibrated to U.S. standards, recording pressure in psi and temperature in °F. Adhere to NIST calibration standards to maintain accuracy and compliance.
  • Pressure Ranges: Different methods have specific pressure requirements. For example, Pressure Decay Testing operates effectively between 5 and 150 psi, while Bubble Immersion Testing is optimal at 1 to 30 psi.
  • Material Selection: Metallic components like stainless steel or aluminum are better suited for high-pressure applications compared to polymer-based options. Seal materials, such as Viton or Buna-N, must be compatible with the test fluids and capable of maintaining integrity under pressure.
  • Regulatory Standards: Always follow manufacturer-recommended pressure limits and comply with regulatory standards like ASME, ISO, and ASTM. Testing equipment should include built-in safety factors and clearly marked burst ratings to prevent failures.

Step-by-Step Leak Detection Process

Conducting a leak test requires careful planning and a detail-oriented approach. The process is broken down into several key phases to ensure accurate results while prioritizing safety.

System Preparation and Isolation

Start by fully depressurizing the system using relief valves or venting points. Give the system time to stabilize, allowing pressure and temperature to reach equilibrium.

Next, perform a visual inspection to spot obvious issues like corrosion, loose fittings, or signs of previous leaks. Pay close attention to joints and connectors, as these are common trouble spots.

Implement OSHA-approved Lockout/Tagout (LOTO) procedures. This includes tagging isolation valves, posting warnings, and documenting the test boundaries. Be sure to highlight any sections that remain energized.

To define the testing area and prevent interference, use temporary isolation points such as blind flanges or valve caps rated for the system’s specifications.

Selecting the Right Testing Method

The choice of testing method depends on the system’s pressure and specific needs. For low-pressure systems, visual techniques like bubble immersion or soap solution testing are effective for spotting leaks. For moderate-pressure systems, pressure decay testing is often the go-to method, where any drop in pressure over time is carefully monitored.

For situations requiring greater sensitivity, tracer gas testing is a reliable option. If depressurizing the system isn’t feasible, noninvasive methods like ultrasonic detection can be used as an initial screening tool. Once the method is chosen, proceed to the testing phase.

Performing the Leak Test

For soap solution or bubble testing, prepare the solution and apply it to areas where leaks are suspected. Pressurize the system to the test level and watch for bubble formation, which indicates escaping gas. The size and frequency of the bubbles can help gauge the severity of the leak.

In pressure decay testing, pressurize the test section and isolate it. Use calibrated gauges to monitor the pressure over a set period, noting any drops. Keep track of ambient conditions, as temperature changes can affect the readings.

For tracer gas testing, evacuate the section to be tested, then fill it with the tracer gas to the required pressure. Use a calibrated leak detector to scan the area systematically. If using ultrasonic detection, follow the manufacturer’s instructions for adjusting sensitivity and positioning the device near potential leak points.

Recording and Evaluating Results

Thorough documentation is critical. Record key details such as test pressure, ambient temperature, test duration, and the locations of any leaks. Use calibrated gauges for accuracy, and standardized forms can help maintain consistency and streamline future repairs.

If needed, calculate the leak rate based on industry standards. Compare the results to acceptable thresholds for the application to determine whether repairs or additional maintenance are required. Depending on the findings, follow up with further testing or repair work to address any issues uncovered during the initial test.

Safety Measures and Best Practices

Once the detailed leak detection process is complete, implementing strict safety measures is essential to ensure testing is conducted securely. High-pressure leak testing can be hazardous, making adherence to safety protocols non-negotiable.

Personal Protective Equipment (PPE)

Personal protective equipment (PPE) serves as the first line of defense during high-pressure leak testing. Before entering the test area, all personnel must be equipped with the appropriate gear.

“Always wear appropriate PPE, including safety goggles, gloves, and protective footwear. Additional PPE, like face shields or protective suits, might be necessary depending on the test medium and the system.”

Essential PPE includes safety goggles, steel-toed boots, and work gloves. Depending on the testing environment, additional gear like face shields, hard hats, or hearing protection may also be required to shield against flying debris, sharp edges, or potential chemical exposure.

To ensure effectiveness, PPE should be regularly inspected and maintained. Before each use, check for damage – such as cracks in goggles, worn-out gloves, or compromised boot soles – and replace any defective items immediately.

The risks at pressure testing sites are real. Common injuries include eye damage, skin ruptures, lacerations, fractures, concussions, and contusions. In more severe cases, hazards like asphyxiation from inert gases or electrocution in electrically active areas can occur. Proper PPE and vigilance are critical to mitigating these dangers.

Summary and Service Overview

High-pressure leak testing plays a critical role in protecting both equipment and personnel. By focusing on proper system isolation, choosing the right testing methods, and maintaining thorough documentation, this process ensures systems are safe and reliable.

Regular testing helps identify weak points early on, reducing the risk of expensive repairs and improving energy efficiency. Safety measures are not just best practices – they are essential for preventing serious injuries and meeting regulatory requirements.

Investing in routine professional maintenance often offsets its cost by avoiding system failures and enhancing energy performance. If you’re looking for expert help to maintain these standards, keep reading to discover what our services can offer.

Hydrodynamics Inc. has been a trusted provider of high-pressure system maintenance since 1994. Serving residential, commercial, and industrial clients, they offer comprehensive leak detection services, preventative maintenance programs, and emergency repairs. Their skilled technicians are equipped to handle everything from straightforward leak detection to advanced testing for HVAC, plumbing, refrigeration, and industrial heating systems.

Whether it’s a residential heat pump, commercial rooftop HVAC unit, or industrial heating system, professional leak testing ensures your high-pressure systems run safely and efficiently.

FAQs

What are the common signs of a leak in a high-pressure system?

Leaks in high-pressure systems often make themselves known through unexpected sounds like banging, hissing, or gurgling. These noises can signal escaping air or imbalances in water pressure. You might also spot visible clues, such as water stains, mold growth, damp patches on walls or ceilings, or even an unusually high water bill – any of which could be a red flag for a potential leak.

Catching these signs early is key to avoiding further damage or reduced efficiency in your system.

How often should I test high-pressure systems for leaks to stay safe and compliant?

High-pressure systems need leak testing at least twice a year. However, for systems that are critical or operate in high-risk environments, testing should be done more frequently to ensure safety and meet regulatory requirements.

Routine inspections are key to catching problems early, maintaining system performance, and avoiding expensive repairs down the line. Be sure to stick to manufacturer recommendations and industry standards when it comes to testing schedules and procedures.

What steps should I take if I discover a leak during a high-pressure system test, and how can I avoid leaks in the future?

If you notice a leak during a high-pressure system test, shut down the system immediately. This step is critical to avoid further damage or putting safety at risk. To locate the leak, rely on tools like ultrasonic detectors, infrared cameras, or acoustic devices. Once you’ve identified the source, resolve the issue by tightening loose fittings, replacing any damaged parts, or applying the appropriate sealants.

To reduce the chances of leaks in the future, focus on regular maintenance and inspections. Use durable, high-quality seals, fittings, and materials specifically designed for high-pressure systems. Make leak detection a routine practice by conducting pressure tests and visual inspections. Staying consistent with upkeep is key to ensuring the system runs safely and efficiently.

R-454B vs. R-32: Comparing Energy Efficiency

R-454B vs. R-32: Comparing Energy Efficiency

R-32 and R-454B are two leading refrigerants replacing R-410A in HVAC systems due to environmental regulations. Here’s what you need to know:

  • R-32: Offers higher energy efficiency (107% of R-410A baseline) and requires up to 40% less refrigerant. It’s widely used in ductless and mini-split systems and costs less at approximately $4.11 per pound. However, it has a higher Global Warming Potential (GWP) of 675.
  • R-454B: Preferred for central residential systems by U.S. manufacturers like Carrier and Lennox. It has a lower GWP of 466, reducing direct emissions further but is less efficient (102% of R-410A baseline) and more expensive at $12.89 per pound.

Quick Comparison

Feature R-32 R-454B
Efficiency 107% of R-410A baseline 102% of R-410A baseline
Refrigerant Usage Up to 40% less About 10% less
GWP 675 466
Cost per Pound $4.11 $12.89
Best Use Case Ductless systems Central air systems

R-32 is ideal for maximizing energy savings, while R-454B is a better choice for those prioritizing lower GWP in central air systems.

R-454B vs R-32 Refrigerant Comparison Chart

R-454B vs R-32 Refrigerant Comparison Chart

A2L Refrigerants. 454B vs R32 – Which is Better?

Technical Specifications and Properties of R-454B and R-32

As the push for energy efficiency reshapes refrigerant choices, it’s important to understand the technical differences between R-454B and R-32. R-32 is composed entirely of difluoromethane, while R-454B is a zeotropic blend made up of 68.9% R-32 and 31.1% R-1234yf. This compositional difference impacts how these refrigerants behave in systems, especially during charging and maintenance.

One key distinction lies in temperature glide. R-32 has no temperature glide, making it straightforward to handle. On the other hand, R-454B has a glide of 1.0–1.3 K, which demands precise liquid-phase charging. If an R-454B system develops a leak, the components may escape unevenly, often necessitating a complete recharge instead of just topping off. This is not typically an issue with R-32 systems. These characteristics underline the need for a deeper technical comparison.

Technical Comparison of R-454B and R-32

Although both refrigerants share the same critical temperature of 78.1°F (172.6°F), their operational traits differ. R-32 operates at pressures similar to R-410A and provides around 20% better heat transfer efficiency. Meanwhile, R-454B’s slightly reduced operating pressures ease compressor strain and make it a closer match for R-410A systems.

These performance differences are reflected in efficiency and capacity. R-32 systems achieve efficiency ratings over 107% compared to R-410A, with a capacity boost exceeding 110%. In contrast, R-454B systems typically reach about 102% efficiency and a capacity increase of 97%. Additionally, R-32 systems require up to 40% less refrigerant than R-410A systems, while R-454B systems need about 10% less.

Environmental Impact of Both Refrigerants

The environmental performance of these refrigerants is another critical factor. Both meet the EPA AIM Act’s GWP (Global Warming Potential) limit of 750, but R-454B has a GWP of 466, which is roughly 31% lower than R-32’s GWP of 675. This translates into significant reductions in direct emissions: R-454B cuts climate impact by 81.6% compared to R-410A, while R-32 achieves a 73.6% reduction. Both refrigerants also have an Ozone Depletion Potential (ODP) of zero, ensuring they don’t harm the ozone layer.

However, the broader environmental impact extends beyond direct emissions. Indirect emissions from energy usage make up 70% to 80% of an HVAC system’s total carbon footprint, while refrigerant emissions account for less than 20%. As Daikin explains:

R-32 refrigerant’s increased efficiency helps OEM engineers design systems with low electricity consumption over the system’s life, compensating for Direct Emissions.

Energy Efficiency Performance of R-454B and R-32

When comparing R-32 and R-454B, R-32 generally comes out ahead in energy efficiency. Lab tests conducted under identical conditions show that R-32 systems deliver 5–10% higher SEER ratings than R-454B systems. This translates into noticeable savings on electricity bills over the lifespan of an HVAC system. Considering that energy consumption makes up 70–80% of an HVAC system’s total carbon footprint, the efficiency edge of R-32 carries significant weight. Let’s break down how these refrigerants stack up in terms of energy performance.

R-32: High Heat Transfer Efficiency

R-32 owes its strong performance to its thermodynamic properties, which improve heat transfer by around 20% compared to R-410A. This advantage becomes even more critical during heat waves, as R-32 systems tend to maintain consistent performance better than R-454B systems. This reliability during peak grid demand makes R-32 an attractive choice for extreme temperature conditions.

In practical applications, the efficiency of R-32 is clear. For example, commercial R-32 VRF (Variable Refrigerant Flow) and rooftop systems can achieve up to 12% energy savings in large-scale environments like retail stores and office buildings. Additionally, its higher volumetric capacity allows for more compact system designs. As of May 2025, the average cost for installing a 3-ton R-32 mini-split system was approximately $3,500, compared to $4,000 for a 3-ton R-454B central air system. These factors make R-32 a compelling option for maximizing energy efficiency and reducing costs.

R-454B: Balancing Efficiency and Environmental Goals

R-454B, while slightly less efficient than R-32, offers its own set of benefits, including a low Global Warming Potential (GWP) of 466. Its lower operating pressures help reduce strain on the compressor, potentially extending the lifespan of equipment.

“R-454B bridges the gap between ‘regulatory compliance’ and ‘performance utility,’ laying the foundation for the next decade of HVAC development.”

In 2025, homeowners using Carrier’s R-454B-optimized Infinity systems reported cutting their electricity bills by about 15% compared to older units. R-454B also showed strong performance in the U.S. Department of Energy‘s Cold Climate Heat Pump Challenge, where it excelled in extreme heating scenarios. For residential central air systems replacing R-410A units, R-454B offers a practical upgrade with measurable energy and environmental benefits.

Case Study: Residential vs. Commercial Energy Savings

The market adoption of these refrigerants highlights their unique strengths. R-32 is a top choice for ductless systems, thanks to its efficiency and compact design. On the other hand, R-454B is better suited for central air systems, as it works seamlessly with scroll compressors and closely matches the operating characteristics of R-410A.

Leading U.S. manufacturers like Carrier, Lennox, and Bryant have leaned toward R-454B for residential central air systems. Meanwhile, international brands such as Daikin and Mitsubishi have favored R-32 for their products. Daikin, for instance, has deployed over 160 million R-32 units worldwide as of 2024, proving its long-term effectiveness and reliability across a variety of climates. These trends underscore the importance of choosing the right refrigerant for the specific application to achieve the best energy efficiency and cost savings.

Choosing Between R-454B and R-32 for Your HVAC System

Picking the right refrigerant for your HVAC system depends on several factors, including your system type, the expertise of local contractors, and your maintenance priorities. Both R-32 and R-454B meet modern efficiency standards, but they excel in different scenarios. Knowing where each refrigerant fits best can help you save money and reduce maintenance headaches.

Availability and Market Adoption

R-32 has an extensive global presence, with over 160 million units installed worldwide by 2026. It’s particularly dominant in ductless mini-split and VRF (Variable Refrigerant Flow) markets, with brands like Daikin, Mitsubishi, and LG leading the charge. On the other hand, R-454B has gained traction among major U.S. manufacturers such as Carrier, Lennox, and Trane for central residential systems.

A 2025 survey revealed that 63% of U.S. contractors prefer R-454B for whole-home systems, while 70% favor R-32 for ductless setups. One notable distinction is that R-32 is widely available and produced by multiple manufacturers, whereas R-454B is a proprietary blend. If you’re considering R-32 for a central system, ensure your local HVAC contractors are certified to handle A2L refrigerants.

Beyond market trends, system compatibility is a critical factor when deciding between these refrigerants.

System Compatibility and Maintenance

Neither R-32 nor R-454B can replace older refrigerants like R-410A or R-22 directly. Both require systems specifically designed for A2L refrigerants, which are mildly flammable. These systems must also include safety sensors and use synthetic POE oil.

R-32’s single-component design makes recharging simpler, while R-454B’s blend requires careful liquid-phase charging to prevent fractionation. If you plan to reuse copper piping from an older system, a professional flush is essential to remove residual mineral oil.

It’s also worth noting the difference in compressors: R-454B systems are often paired with scroll compressors, common in U.S. central air systems, while R-32 systems typically use rotary compressors.

Cost Implications and Long-Term Benefits

R-32 systems generally come with lower upfront costs and achieve higher SEER (Seasonal Energy Efficiency Ratio) ratings. Meanwhile, R-454B’s lower GWP (Global Warming Potential) might justify its higher price tag for some users. R-32 systems require up to 40% less refrigerant compared to R-410A systems, while R-454B systems use about 10% less. Additionally, R-32 systems typically achieve 5% to 10% higher SEER ratings, which translates to reduced electricity bills over time.

“R-32 refrigerant’s increased efficiency helps OEM engineers design systems with low electricity consumption over the system’s life, compensating for Direct Emissions.”

For ductless systems, R-32 often delivers the best efficiency-per-dollar and easier long-term maintenance. In contrast, R-454B is better suited for central air replacements, offering compatibility with standard U.S. residential setups and easier servicing in areas with stricter safety regulations. These considerations play a key role in determining which refrigerant is the right fit for your HVAC needs.

Conclusion: Selecting the Right Refrigerant for Energy Efficiency

Main Differences in Energy Efficiency

Choosing between R-32 and R-454B often comes down to balancing energy efficiency with environmental priorities. R-32 stands out for its energy performance, achieving over 107% efficiency compared to R-410A, while R-454B reaches over 102% efficiency. This translates to 5% to 10% higher SEER ratings in tests. Additionally, R-32’s single-component design avoids temperature glide, making it easier to service and preventing changes in composition during leaks. On the other hand, R-454B offers a lower GWP of 466, compared to R-32’s 675, making it more aligned with tightening environmental regulations.

Cost is another factor to weigh. R-32 is priced at about $4.11 per pound, significantly less than R-454B’s $12.89 per pound. R-32’s efficiency can also result in lower electricity costs over 15 to 20 years, and it typically requires up to 40% less refrigerant, compared to R-454B’s 10% reduction. These distinctions can help determine the best refrigerant for specific needs.

Recommendations for HVAC Applications

For ductless mini-splits and VRF systems, R-32 is the top choice. It delivers superior efficiency, straightforward maintenance, and excels in high-temperature climates above 110°F. This makes it ideal for areas like inland California or Texas, where heat transfer efficiency is especially critical.

For central residential air conditioning, R-454B is a strong contender, particularly for systems from manufacturers like Carrier, Trane, or Lennox, which are optimized for this refrigerant. Its lower discharge temperatures also make it a solid option for large commercial systems, extending compressor life.

If long-term energy savings and maintenance simplicity are your priorities, R-32 is the better fit. However, if achieving the lowest possible GWP is your main goal, R-454B provides a regulatory advantage, though it comes with higher upfront costs and slightly lower efficiency. For tailored advice on the best refrigerant for your HVAC system, certified contractors at Hydrodynamics can offer expert guidance based on your specific requirements, climate, and efficiency objectives.

FAQs

Which refrigerant will lower my electric bill more?

R-32 can help lower your electric bill thanks to its higher energy efficiency and superior cooling capacity when compared to R-454B. This means HVAC systems using R-32 consume less energy while delivering better overall performance.

Can I retrofit my R-410A system to use R-32 or R-454B?

Retrofitting an R-410A system to use R-32 or R-454B isn’t a simple switch. These refrigerants have different pressure levels, chemical compositions, and compatibility requirements, meaning the system may need specific alterations to function correctly. It’s essential to work with a professional who can evaluate whether the retrofit is possible and make the necessary adjustments safely and effectively.

How does A2L flammability affect installation and servicing?

A2L refrigerants, such as R-454B and R-32, are classified as mildly flammable. This means they require extra care during installation and servicing to ensure safety. Technicians working with these refrigerants must stick to strict safety measures, including:

  • Ensuring proper ventilation in the work area.
  • Keeping all ignition sources far from the refrigerant.
  • Wearing appropriate personal protective equipment (PPE).

Performing thorough leak checks and strictly following the manufacturer’s guidelines are key steps to reducing fire risks. While these refrigerants are known for their environmental advantages, their flammable nature means specialized training and precautions are non-negotiable for safe operation.