Common Drainage Problems and Solutions
When water lingers on your property after rain, it can lead to serious issues like foundation damage, erosion, and mosquito infestations. Key causes include clogged gutters, poor yard grading, compacted soil, and underground water buildup. Addressing these problems quickly is essential to protect your home and landscape. Here’s a quick breakdown of common issues and fixes:
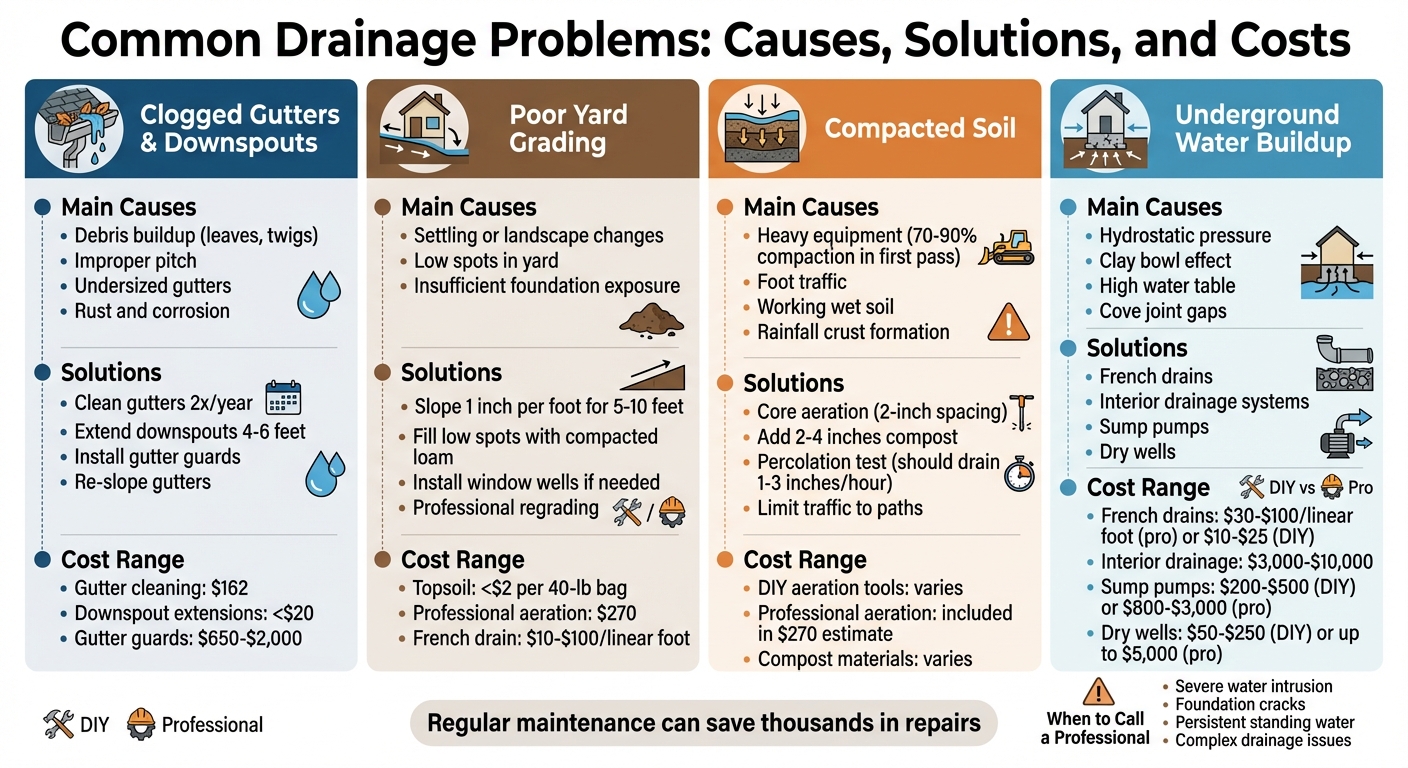
- Clogged Gutters & Downspouts: Debris buildup and improper slope can cause overflow. Regular cleaning, downspout extensions, and gutter guards can help.
- Poor Yard Grading: Water pooling near your foundation signals grading issues. Fix with proper slope adjustments or professional regrading.
- Compacted Soil: Heavy traffic or machinery compresses soil, reducing water absorption. Core aeration and adding compost improve drainage.
- Underground Water Buildup: Hydrostatic pressure can damage foundations. Solutions include French drains, sump pumps, and interior drainage systems.
Key Tip: Regular maintenance like gutter cleaning and soil aeration can save you thousands in repairs. For severe drainage issues, professional help is often the best choice. Keep reading for detailed solutions to safeguard your property.
Common Drainage Problems: Causes, Solutions, and Costs Comparison
Backyard Drainage Solutions | Ask This Old House

sbb-itb-99db659
Clogged or Poorly Installed Gutters and Downspouts
Gutters and downspouts play a crucial role in protecting your home from water damage, especially during heavy rainfall. When they fail, water can overflow and collect around your foundation, leading to serious problems. As C.E. Larusso, Contributing Writer at Angi, aptly states:
“A bad gutter can drag your home’s foundation into the gutter pretty quickly!”
Let’s break down the common causes of these issues and how to address them.
What Causes Gutter and Downspout Problems
One of the main issues is debris buildup. Leaves, twigs, dirt, and even nests from birds and squirrels can clog gutters, preventing water from flowing properly through the downspouts. Another frequent problem is an improper pitch, which causes water to pool instead of draining toward the downspout. Additionally, undersized gutters or downspouts can’t handle the volume of water during heavy storms, leading to overflows.
Structural wear and tear also contribute. Rust, corrosion, and loose seams can allow water to leak through cracks instead of being directed away from your home. During winter, standing water in gutters can freeze, creating ice dams that cause further overflow when the ice melts. All of these issues can lead to pooling water around your foundation, increasing the risk of soil erosion, basement flooding, mold, and even structural damage.
How to Fix Gutter and Downspout Issues
The best way to prevent these problems is through regular maintenance. Clean your gutters at least twice a year – once after the fall leaves drop and again in early spring. If your home is surrounded by trees, you might need to check them more frequently, especially during the fall. Hiring a professional to clean your gutters typically costs around $162, which is far less than the $9,250 it could cost to install a French drain if water damage becomes severe.
Another effective solution is to extend your downspouts so water is discharged 4 to 6 feet away from your foundation. For added protection, some experts recommend extending them 5 to 10 feet. You can use flexible plastic tubing or rigid materials like PVC or aluminum, which cost less than $20. Installing gutter guards or downspout screens can also help by keeping out large debris while allowing water to flow freely. Professional installation for these systems typically ranges from $650 to $2,000.
Lastly, make sure your gutters are properly sloped toward the downspouts. If you notice pooling water, re-slope the affected sections to ensure efficient drainage. These simple steps can go a long way in protecting your home from water damage.
Incorrect Yard Grading and Low Spots
Poor yard grading can cause water to flow toward your foundation, leading to pooling, basement leaks, and even structural damage like buckled floors. Oklahoma State University emphasizes:
“Soils should slope outward from a house. In some cases, settling or other landscape activities might reduce the slope, causing water to pond adjacent to the house.”
How to Spot Yard Grading Problems
One of the simplest ways to detect grading issues is to observe where water collects after a heavy rain. If water pools near your foundation or in low spots in your yard, it’s a clear sign of trouble. These areas not only harm your lawn by killing grass – most turfgrasses can’t survive more than three days of flooding – but also create persistent mud.
Another clue is the amount of foundation visible above ground. Ideally, there should be 6 to 8 inches of exposed foundation between the ground and your siding. This gap helps protect against rot and keeps water from breaching your home. To measure your yard’s slope accurately, use stakes, nylon rope, and a line level to calculate the vertical drop (rise) over a horizontal distance (run).
How to Fix Yard Grading Problems
For optimal drainage, aim for a slope of about 1 inch per foot extending away from your home for the first 5 to 10 feet. For small DIY fixes, bagged topsoil is an affordable option, costing under $2 per 40-lb bag. However, avoid using loose topsoil or mulch alone, as they’re too permeable and prone to washing away. Instead, fill low spots with compacted loam or clay-heavy soil for better stability.
When filling these areas, work with dry soil and use a plate compactor or tamper to pack it down firmly. This prevents future settling and ensures a long-lasting solution. If raising the ground level might obstruct basement windows, consider installing window wells to act as retaining walls. Don’t forget to call 811 before you dig to locate underground utilities and ensure compliance with IRC regulations.
For larger or more complicated grading issues, hiring a professional may be the best option. Professional aeration for large lawns typically costs around $270, while installing a French drain ranges from $10 to $100 per linear foot. These upgrades not only resolve grading problems but also improve your overall drainage system.
Compacted Soil and Poor Water Absorption
Soil health plays a huge role in your property’s drainage system, often as much as gutters and grading. When soil becomes overly compacted, its air pockets disappear, making it harder for water to seep in. According to the University of Minnesota Extension:
“A compacted soil has a reduced rate of both water infiltration and drainage.”
This means that instead of soaking into the ground, rainwater pools on the surface, creating muddy patches and runoff. Healthy soil relies on large pores to absorb water, but compression caused by heavy equipment, foot traffic, or even rainfall slows this process significantly. If your soil drains less than 1 inch per hour, it’s classified as poorly drained. Most plants, however, prefer drainage rates between 1 and 3 inches per hour.
What Causes Soil Compaction
Soil is most vulnerable to compaction when it’s wet. Moisture acts like a lubricant, letting soil particles pack tightly together under pressure. In fact, up to 70% to 90% of compaction happens during the first pass of heavy machinery. Loads exceeding 10 tons can compact soil up to two feet deep, making it nearly impossible to fix with basic tools.
Other culprits include foot traffic, parked cars, repeated tilling, and even raindrops. Raindrops can form a crust as thick as ½ inch on the soil surface, blocking water from entering and preventing seeds from sprouting.
How to Improve Water Absorption in Soil
Start by testing your soil’s drainage with a simple percolation test. Dig a 12-inch-deep hole, fill it with water, let it drain, and refill it. Measure how far the water level drops in one hour. If it’s less than 1 inch, you’ve got a drainage issue.
Core aeration is one way to loosen compacted soil without disrupting its structure. A mechanical aerator removes small plugs of soil, creating channels for air and water to reach roots. For lawns, aim for holes spaced about two inches apart. Adding a 2- to 4-inch layer of compost to the top 6 to 12 inches of soil can also help. Compost improves soil aggregation, which creates larger pores for better drainage. The University of Minnesota Extension emphasizes:
“Improving soil structure is the best defense against soil compaction.”
Before tilling, try the squeeze test: grab a handful of topsoil and form it into a ball. If it crumbles, it’s ready to till. If it stays intact, the soil is too wet, and working it will only make compaction worse . For long-term results, limit foot and vehicle traffic to designated paths to keep the rest of your yard uncompacted.
These steps can go a long way in boosting your soil’s ability to absorb water and prevent drainage issues. They work well alongside other drainage solutions to protect your property.
Poor Surface Water Management
When rainfall surpasses what the soil can absorb, the excess water needs to be redirected. Without a proper plan to manage this runoff, water tends to pool on hard surfaces, leading to flooding and soil erosion. In areas like Tampa Bay, where annual rainfall exceeds 50 inches, often delivered in intense storms, standard drainage systems can easily be overwhelmed.
Signs of Surface Water Management Problems
Beyond common issues like clogged gutters or improper grading, inadequate surface water management can lead to more serious drainage problems. For instance, if puddles linger long after a rainstorm, this could indicate a drainage issue that needs attention. Similarly, if your lawn feels consistently soggy or spongy – even during dry spells – it’s a sign that water is accumulating either on the surface or just below it.
Other warning signs include erosion channels cutting through your yard or soil washing away near downspouts and slopes. Water pooling on patios, driveways, or walkways not only creates access issues but can also cause cracks and surface wear over time. Foundation problems may present as water stains on walls, basement moisture, or water backing up near downspouts. Oversaturated soil can also harm your landscaping, leading to dying grass, yellowing plants, or even root rot in trees and shrubs. Additionally, stagnant puddles can become breeding grounds for mosquitoes, signaling poor drainage.
Natural Methods for Managing Surface Water
Natural solutions can be an effective way to address surface water problems. One option is swales, which are shallow, sloped ditches lined with vegetation. These direct runoff away from structures to safer areas like dry wells or gardens. Professional installation costs range from $5 to $15 per linear foot, but a DIY approach using basic materials can cost as little as $1 to $3 per linear foot.
Another solution is rain gardens, which are planted in low-lying areas and use deep-rooted native plants to absorb stormwater and direct it into the ground. Creating a rain garden yourself, including the cost of native plants, typically runs about $5 per square foot. Dry creek beds are another option. These use rocks of various sizes to create a channel for stormwater, doubling as a drainage solution and a decorative element. They usually cost between $3 and $4 per square foot.
For improved drainage, replacing impervious surfaces like concrete or asphalt with permeable materials such as pea gravel or crushed stone can help divert water away from foundations. If you’re planning any digging for drainage projects, don’t forget to call 811 to have underground utility lines marked before starting.
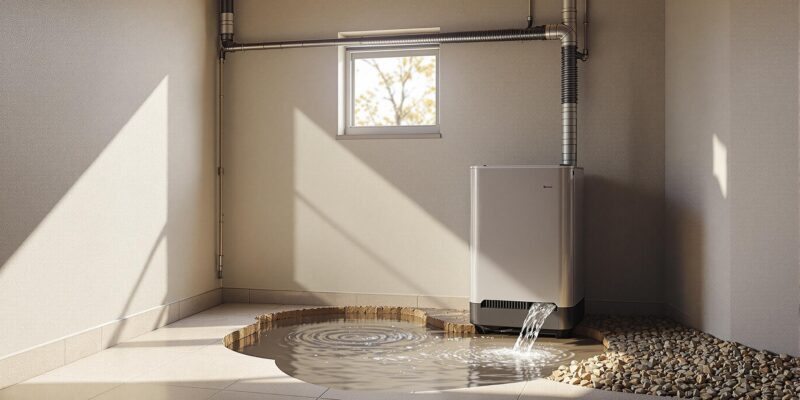
Underground Water Buildup
Water below the surface can pose serious risks to your home’s structural stability, even when surface issues seem manageable. When heavy rains saturate the soil, the added water weight creates hydrostatic pressure. This pressure forces moisture through tiny pores in concrete, as well as through cracks and joints in your foundation. The problem is even worse in areas with clay-heavy soil, which tends to hold onto water. During extended rainfall, this can raise the water table above your basement floor, leading to significant issues.
One major contributor to this problem is the “clay bowl effect.” The looser, backfilled soil around your foundation acts like a sponge, trapping water and pressing it against your home. This hidden pressure can compromise your basement’s integrity, making it crucial to address the issue with targeted solutions.
How to Identify Underground Drainage Problems
Spotting underground water issues early can save you from expensive repairs. One common entry point for water is the cove joint, where the basement floor meets the foundation wall. These sections are poured at different times and rarely seal perfectly, leaving a vulnerable gap. If you notice water pooling along this seam during or after rain, it could indicate subsurface water pressure.
Another clue is efflorescence, a white, chalky residue left behind when groundwater seeps in and evaporates. This mineral trail often points to active seepage. Additional warning signs include damp spots on lower walls, musty odors, peeling paint near the floor, and persistently wet soil around your home.
To confirm whether the moisture is from groundwater and not a plumbing issue, try the main water shutoff test. Turn off your home’s water supply for several hours. If water still seeps into the basement, the source is likely underground. Another method involves taping a 2-foot square of plastic sheeting to your basement floor. If moisture collects on the underside after 24 to 48 hours, water is migrating up through the slab.
How to Manage Subsurface Water
Several solutions can help manage underground water effectively:
- French drains: These trenches, filled with gravel and a perforated pipe, collect and divert groundwater. Professional installation costs range from $30 to $100 per linear foot, while a DIY version might cost $10 to $25 per linear foot.
- Interior drainage systems: Also called drain tiles, these systems involve cutting a channel along your basement’s perimeter to direct water to a sump pit. Professional installation typically costs between $3,000 and $10,000.
- Sump pumps: Essential for removing water from sump pits, these pumps cost $200 to $500 for DIY installation or $800 to $3,000 when professionally installed with a battery backup.
“The correct approach is to relieve or redirect the pressure using a drainage system that gives water a controlled path to a sump pump rather than trying to stop it with surface treatments alone.” – The Basement Guide Staff
- Dry wells: These underground basins filled with stone collect runoff and allow it to seep deeper into the soil. DIY materials cost between $50 and $250, while professional installation can go up to $5,000.
For visible foundation cracks, polyurethane or epoxy injection kits can temporarily seal gaps. DIY kits cost $50 to $100, while professional repairs range from $250 to $500 per crack. However, sealing cracks without addressing hydrostatic pressure is often a short-term fix.
When to Call a Professional for Drainage Problems
Some drainage issues can be tackled with a bit of DIY effort, but others require professional intervention to avoid expensive repairs and protect your home’s foundation. Understanding when to bring in an expert is key to preventing long-term damage.
DIY vs. Professional Solutions
It’s important to distinguish between tasks you can handle on your own and those that need professional attention. Simple fixes, like cleaning gutters or adding downspout extensions, can address minor surface water problems. However, complex issues often demand specialized tools and expertise.
| Method | Type | Effectiveness | Maintenance Needs |
|---|---|---|---|
| Downspout Extensions | DIY | Moderate; redirects water a short distance. | High; prone to clogs and detachment. |
| Gutter Cleaning | DIY | Moderate; prevents overflow. | High; seasonal cleaning required. |
| French Drains | Professional | High; handles subsurface water effectively. | Low; requires professional installation. |
| Catch Basins | Professional | High; ideal for low-lying areas like driveways. | Moderate; needs sediment removal. |
| Grinder Pumps | Professional | Very High; moves water uphill or long distances. | Low; best with professional upkeep. |
| Yard Regrading | Professional | High; fixes poor water flow at its source. | Very Low; permanent if done properly. |
These examples show when basic repairs might work and when more advanced solutions are necessary.
You should call a professional if water is entering your basement or pooling near your foundation – these are serious signs of drainage failure. Persistent standing water, recurring drain backups (often caused by tree roots), severe erosion near downspouts, ice accumulation on walkways in winter, or large areas of dead vegetation in oversaturated soil are all red flags that DIY methods can’t fix.
“Ignoring the issue can lead to incredibly expensive and lasting damage to your home’s foundation and structure.” – Alex Riza, Plumbing Expert
A quick test: during heavy rain, if your gutters overflow or water flows toward your house, it’s time to act fast and call a professional. For soil drainage, dig a small hole and fill it with water. Healthy soil should drain in about 4 hours; anything longer – especially 12 to 24 hours – signals a problem.
Hydrodynamics‘ Drainage Services

When DIY solutions fall short, professional services can address the root of the problem. Hydrodynamics specializes in identifying and solving persistent drainage issues that threaten your home’s foundation. Their plumbing assessments can uncover hidden problems like tree root intrusion, collapsed pipes, or improper grading – issues that might go unnoticed during routine inspections. With advanced camera inspections, they pinpoint problems without unnecessary digging.
For properties dealing with elevation challenges or heavy runoff from nearby areas, Hydrodynamics offers grinder pump installations to move water uphill or to distant drainage mains. Costs for residential grinder pumps range from $1,000 to $4,500, while high-capacity systems for larger properties can cost $10,000 to $25,000.
They also provide seasonal maintenance plans to keep systems like sump pumps, grinder pumps, and catch basins clear of debris and ready to handle heavy rainfall. Maintenance and repairs typically cost between $500 and $2,000, while system upgrades range from $3,500 to $7,000. Custom drainage solutions can cost anywhere from $4,000 to $8,500.
Hydrodynamics offers additional services like mechanical root cutting to clear blocked pipes, backwater prevention valve installations to stop sewer backups, and construction of berms and swales to redirect runoff from higher elevations. Since 1994, this family-owned business has been serving residential, commercial, and industrial clients, bringing decades of experience to every project.
Conclusion: Preventing Drainage Problems Year-Round
Keeping your drainage system in good shape requires a mix of regular maintenance and professional expertise. Ignoring drainage issues can lead to expensive foundation damage. A simple yet effective step is cleaning your gutters and downspouts twice a year – ideally before spring and fall rains – to keep water flowing away from your home. This helps protect your foundation and reduces the risk of basement flooding.
It’s also important to inspect your drainage system regularly. Check French drain outlets, catch basins, and pipes for debris that could block water flow. Aerating your lawn can improve water absorption by breaking up compacted soil, especially in areas with heavy foot traffic. Another key tip: ensure your yard is properly graded so water flows away from your house, and maintain at least 4 inches of clearance between the soil and your siding.
“Good yard drainage starts with gutters.” – Lee Wallender, The Spruce
While routine maintenance is crucial, some problems require professional attention. Persistent standing water, basement leaks, or recurring backups are signs that it’s time to call in the experts. Since 1994, Hydrodynamics has been solving complex drainage challenges with services like mechanical root cutting, grinder pump installations, and custom drainage system repairs. Their seasonal maintenance plans can prepare your system for heavy rainfall, helping you avoid costly emergencies down the road.
FAQs
How do I tell if water near my house is from grading or gutters?
During rain, water’s behavior can reveal underlying issues. If water tends to pool around your foundation or in low-lying areas after a heavy downpour, it’s likely due to grading problems – where the land slopes toward your house instead of away from it.
On the other hand, gutter issues can lead to water overflowing or collecting near the roofline or around downspouts. If your gutters are clean and water still pools, the problem is probably with the grading. However, clogged gutters can cause overflow no matter how well your property is graded.
What’s the fastest way to figure out if my basement moisture is groundwater?
Inspect for signs of hydrostatic pressure, such as water bubbling up through cracks in the floor or pooling at the base of walls. Look for external problems too, like improper grading around the property or visible cracks in the foundation. If you notice moisture lingering after rain or cleaning – and especially if it appears to be coming from below the surface – it’s probably groundwater. To get a clear picture of the issue, consider bringing in a professional to assess the soil and groundwater conditions around your home.
Which drainage fix should I do first to protect my foundation?
To safeguard your foundation, the first thing to tackle is any drainage problems that might lead to water pooling around it. Bring in a professional to evaluate and fix the foundation’s drainage system. These types of repairs are usually not suitable for DIY projects, so relying on an expert can help you avoid water seepage and potential damage, particularly during heavy rainstorms.