Drinking water systems
When it comes to clean, safe drinking water, understanding your options is key. Tap water often contains contaminants like lead, PFAS, and bacteria, which modern filtration systems can address effectively. Here’s a quick breakdown of the main systems:
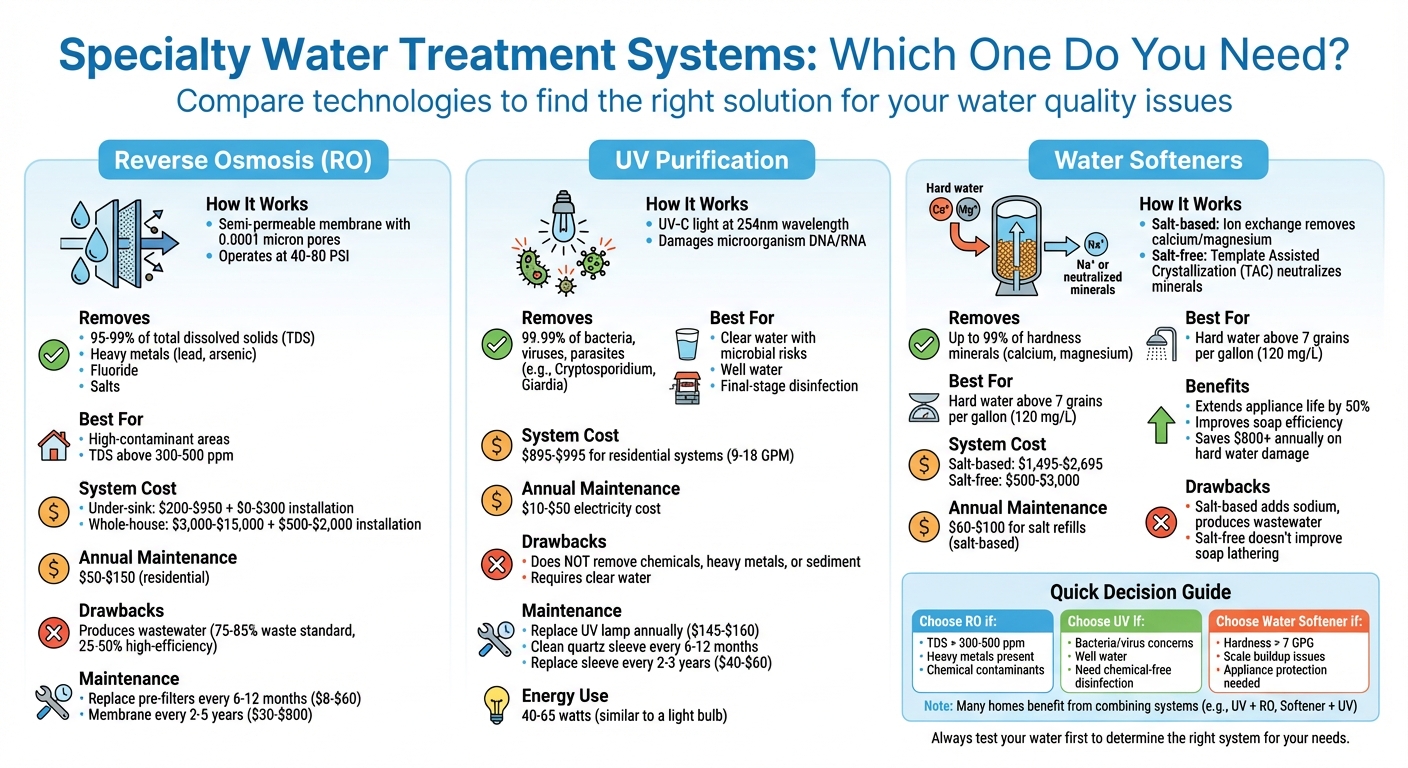
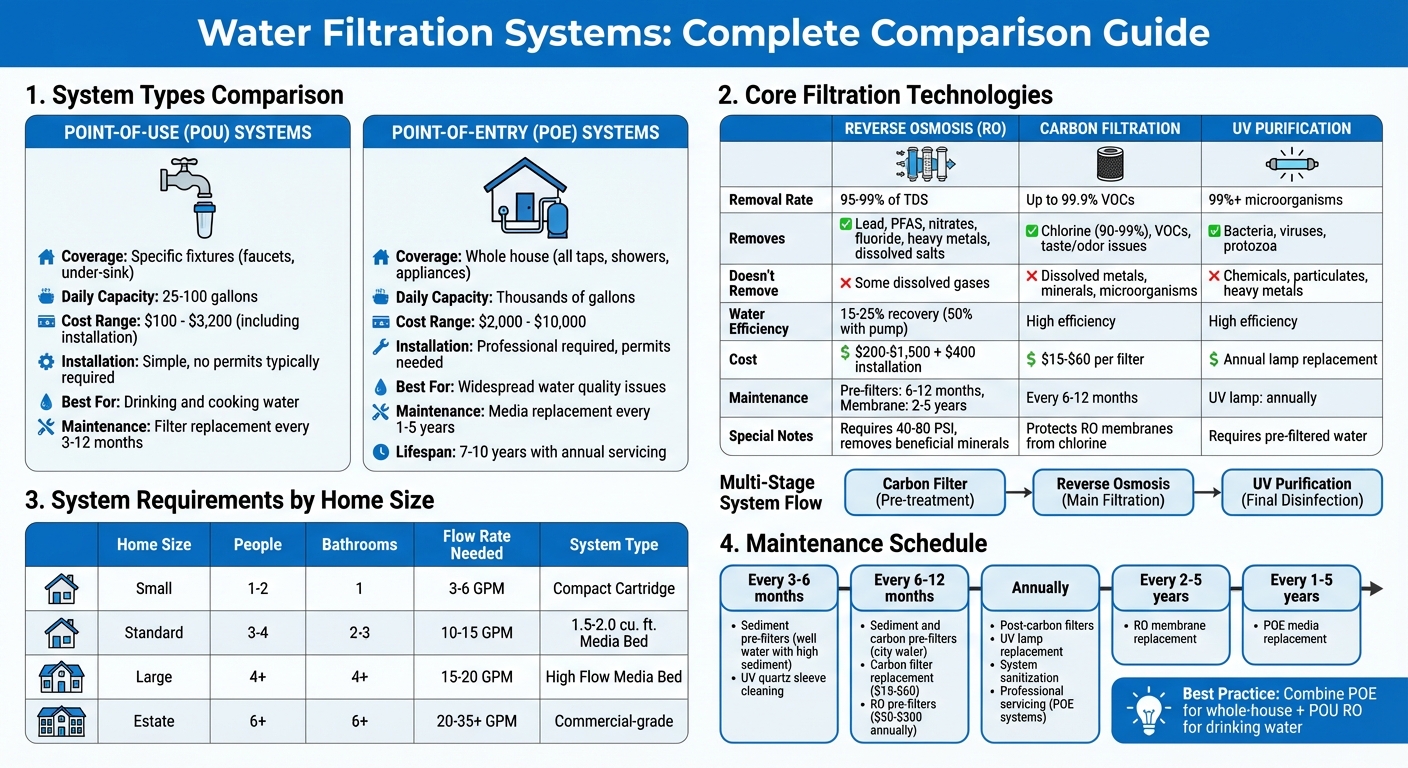
- Reverse Osmosis (RO): Removes 95–99% of dissolved solids, heavy metals, and chemicals. Costs range from $200 to $15,000+, depending on the system size.
- UV Purification: Eliminates 99.99% of bacteria and viruses using UV light. Ideal for well water and costs $300–$1,000+.
- Carbon Filtration: Improves taste and removes chlorine, VOCs, and odors. Affordable, with systems costing $50–$200.
Maintenance is crucial for all systems, including regular filter replacements and sanitization. Testing your water before choosing a system ensures you target the right contaminants. Whether you need better-tasting water or protection from harmful pollutants, there’s a system to fit your needs and budget.
Best Water Filter for Every Budget (2026 Guide)
sbb-itb-99db659
Types of Drinking Water Systems
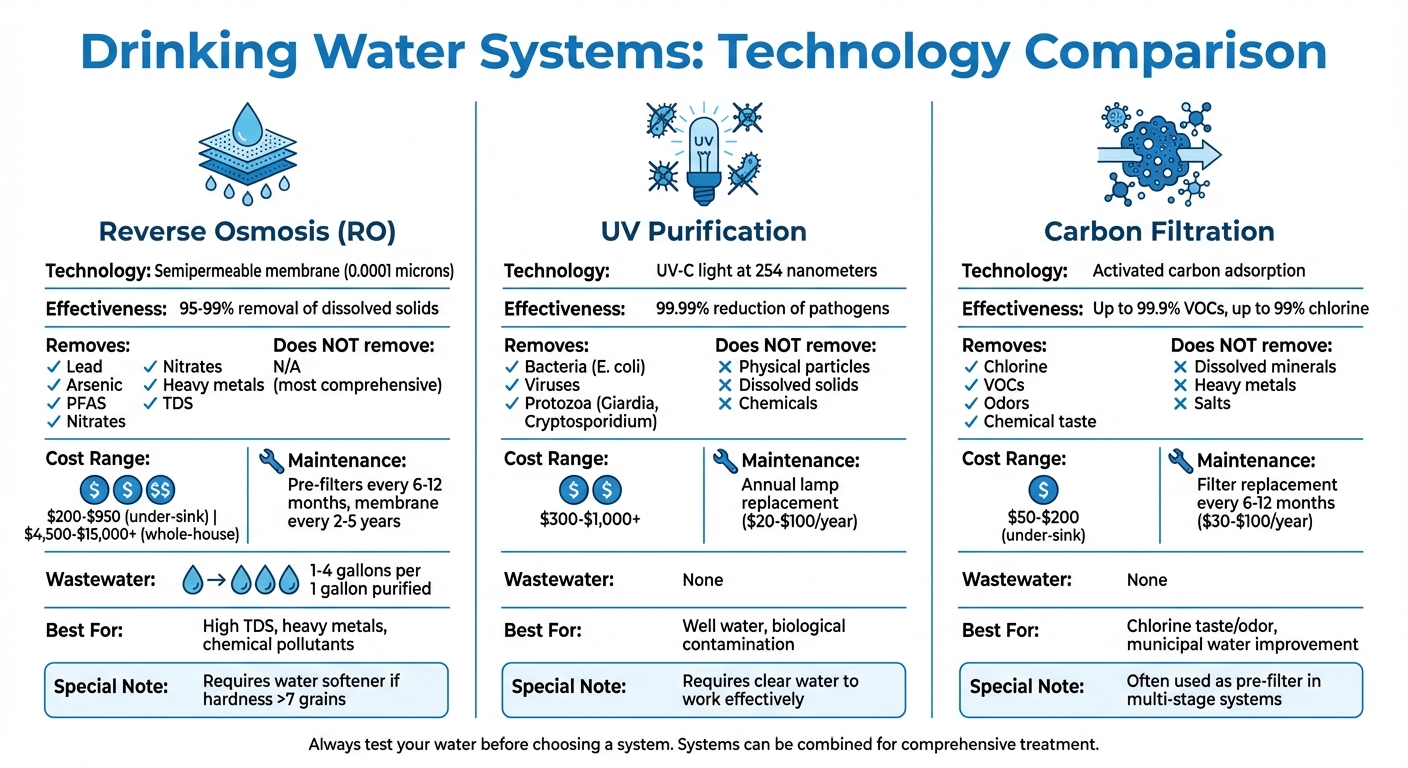
Drinking Water Filtration Systems Comparison: RO vs UV vs Carbon
Different drinking water systems tackle contaminants using specific technologies. Reverse osmosis filters at the molecular level, UV light eliminates microorganisms, and carbon filtration removes impurities through adsorption. Understanding these methods can help you choose the right system for your water needs. Let’s break down how each works, along with their benefits and costs.
Reverse Osmosis Systems
Reverse osmosis (RO) systems use a semipermeable membrane with pores as small as 0.0001 microns to filter water. This process relies on high pressure to push water molecules through the membrane, leaving behind contaminants like lead, arsenic, PFAS, and nitrates. The result? 95-99% of total dissolved solids (TDS) are removed.
“Reverse osmosis is the gold standard of home water filtration. It’s the only widely available technology that removes 95-99% of dissolved contaminants… including PFAS, lead, arsenic, and nitrates.” – Crystal Quest Water Filters
While effective, RO systems discharge 1–4 gallons of wastewater for every gallon of purified water. Costs vary widely: under-sink systems run from $200 to $950, while whole-house units can cost $4,500 to $15,000+. These systems are ideal for addressing high TDS levels, heavy metals, or chemical pollutants. However, if your water is hard (over 7 grains), installing a water softener first is crucial to prevent membrane damage.
UV Purification Systems
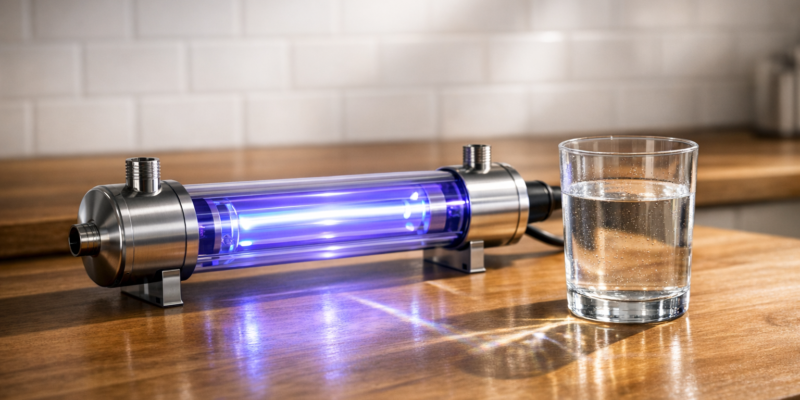
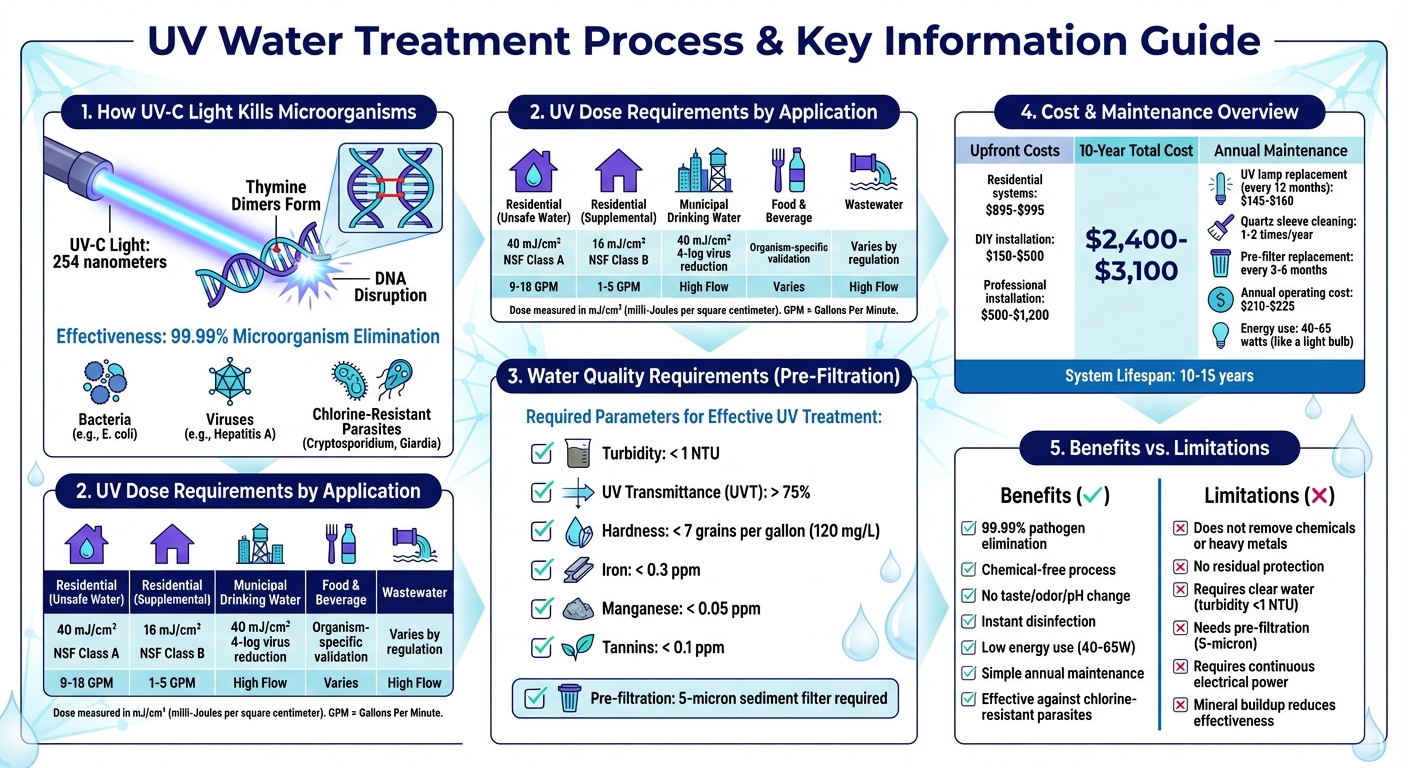
UV purification relies on ultraviolet light at 254 nanometers to neutralize bacteria, viruses, and protozoa by damaging their DNA. This process achieves a 99.99% or greater reduction in harmful pathogens like E. coli, Giardia, and Cryptosporidium.
“UV purification is not filtration – it’s disinfection. It uses UV-C light at 254nm to destroy DNA in bacteria, viruses, and protozoa, rendering them harmless.” – HisoAir
UV systems don’t produce wastewater and require no chemicals, but they don’t remove physical particles or dissolved solids. Clear water is essential for UV to work effectively since cloudy water can block the light. These systems cost $300 to $1,000+, with annual lamp replacements ranging from $20 to $100. They’re especially useful for well water or sources prone to biological contamination.
Carbon Filtration Systems
Carbon filtration uses activated carbon to trap contaminants through adsorption. This method is highly effective at removing chlorine, volatile organic compounds (VOCs), and odors that affect water taste and smell. Granular activated carbon can eliminate up to 99.9% of VOCs and up to 99% of chlorine from municipal water.
“We use carbon to remove PFAS, but if you want to be absolutely sure about your drinking water, a reverse osmosis system underneath the sink is the best guarantee.” – Aidan, Lead Technical Expert, Mid Atlantic Water
Carbon filters don’t remove dissolved minerals, heavy metals, or salts. Most systems don’t require electricity, making them simple and cost-effective. Under-sink carbon systems range from $50 to $200, with annual filter replacement costs between $30 and $100. If your primary concern is chlorine taste or chemical odors, carbon filtration is a great choice. It’s also commonly used as a pre-filter in multi-stage systems to protect RO membranes from chlorine damage.
How to Choose a Drinking Water System
The first step in picking the right water system is understanding what’s in your water. If you rely on municipal water, check your Consumer Confidence Report (CCR) online. If you use a private well, you’ll need to test your water through a certified lab, which typically starts at around $159. Always test your water before buying a filtration system.
Once you know what contaminants are present, match them to the appropriate technology. For example, carbon filters are great for reducing chlorine taste and odor, reverse osmosis systems handle dissolved solids and heavy metals, and UV purification is best for neutralizing bacteria and viruses. If your water contains elevated levels of lead or PFAS, consider upgrading to a reverse osmosis system or one certified under NSF 53 standards.
“Reverse osmosis is not the right answer for everyone. If your water test shows only minor chlorine taste issues… a quality pitcher or faucet-mount filter will handle the job at a fraction of the cost.”
- David King, Founder, OffGrid Filters
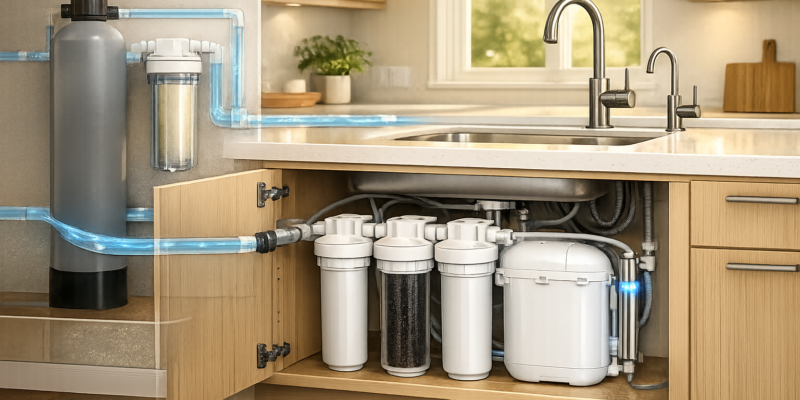
Household size is another key factor. A family of four typically uses 2–4 gallons of water daily for drinking and cooking. Your system, whether it’s under-sink or whole-house, should meet your flow rate needs. For whole-house systems, aim for 10–15 gallons per minute to prevent pressure drops when multiple fixtures are used simultaneously. Also, think about installation requirements. Reverse osmosis systems need under-sink space, a dedicated faucet, and a drain connection, while carbon and UV systems are more compact and easier to set up.
Lifetime costs are worth considering too. Point-of-use systems like under-sink filters are cheaper upfront but have higher per-gallon costs over time. Whole-house systems, on the other hand, require a larger initial investment but are more economical in the long run. For instance, whole-house carbon systems cost about $0.0013 per gallon, while countertop reverse osmosis systems range between $0.11 and $0.19 per gallon. Always check for NSF/ANSI certifications: Standard 42 for chlorine and taste, Standard 53 for health-related contaminants like lead, and Standard 58 for reverse osmosis systems.
Now that you know the basics, let’s take a closer look at how different technologies stack up in terms of efficiency, installation, and maintenance.
System Comparison: Reverse Osmosis, UV Purification, and Carbon Filtration
Here’s a quick breakdown of how reverse osmosis, UV purification, and carbon filtration compare:
| System Type | Contaminant Removal Efficiency | Installation Requirements | Maintenance Frequency | Suitable Applications |
|---|---|---|---|---|
| Reverse Osmosis | High: Removes 95–99% of dissolved solids, lead, PFAS, nitrates | Moderate: Needs a drain connection and often a storage tank | Moderate: Pre-filters every 6–12 months; membrane every 2–5 years | Residential drinking water, laboratories, high-TDS areas |
| UV Purification | Biological only: Kills 99.99% of bacteria and viruses | Simple: Inline installation; requires an electrical outlet | Low: Annual UV lamp replacement | Well water with biological contamination |
| Carbon Filtration | Chemical/taste: Removes chlorine, VOCs, odors | Simple: Available as countertop, under-sink, or whole-house options | High: Cartridge changes every 6–12 months | Municipal water, taste/odor improvement |
Maintenance and Troubleshooting
Common Problems and How to Fix Them
Water filtration systems tend to run into a few predictable problems. For reverse osmosis (RO) systems, slow water flow is a frequent issue, often caused by clogged pre-filters or low pressure in the storage tank. If the tank is empty, use a bicycle tire gauge to check the air pressure and adjust it to 5–8 psi. If water keeps draining continuously, the likely culprits are either a faulty automatic shut-off (ASO) valve or a malfunctioning check valve. Bad taste or odors? That’s usually due to an exhausted carbon post-filter or biofilm buildup – both of which require replacing the filters and sanitizing the system.
UV purification systems, while simpler, still need attention. If the alarm goes off, the UV lamp likely needs replacing (usually every 12 months). During this process, clean the quartz sleeve with a cloth soaked in vinegar or citric acid to remove scaling. Keep in mind, just because the lamp glows doesn’t mean it’s effectively killing germs – it needs to emit UV light at the specific 254 nm wavelength. Leaks at the chamber? That’s a sign of worn-out O-rings, which should be replaced and lubricated with food-grade silicone, such as Molykote 111.
For carbon filtration systems, reduced water pressure is often caused by sediment clogging the filter cartridge. If you start noticing a chlorine taste in the water, the carbon media is likely used up and needs replacing.
Here’s a quick troubleshooting guide:
| System Type | Common Issue | Likely Cause | Troubleshooting Steps |
|---|---|---|---|
| Reverse Osmosis | Slow water flow | Clogged pre-filters or low tank pressure | Replace pre-filters; check and adjust tank pressure to 5–8 psi |
| Reverse Osmosis | Continuous draining | Faulty ASO valve or check valve | Inspect and replace the ASO or check valve |
| Reverse Osmosis | Bad taste/odor | Exhausted carbon filter or biofilm buildup | Replace filters and sanitize the system |
| UV Purification | Alarm sounding | Lamp failure or low UV intensity | Replace the lamp; clean the quartz sleeve |
| UV Purification | Leaking at chamber | Worn O-rings | Replace and lubricate O-rings with food-grade silicone |
| Carbon Filtration | Reduced pressure | Sediment clogging | Replace the cartridge; check for kinked tubing |
| Carbon Filtration | Chlorine taste | Media exhaustion | Replace the carbon filter |
Addressing these common issues is easier when combined with regular maintenance.
Regular Maintenance Tips
Routine care is the best way to avoid problems and extend the life of your system. One of the most important aspects is sticking to a filter replacement schedule. For RO systems, sediment and carbon pre-filters should be replaced every 6–12 months, while the RO membrane can last anywhere from 2 to 5 years, depending on water quality. UV lamps need replacing every 12 months, and carbon filters typically last between 6–12 months. If you’re using well water, you may need to replace pre-filters more frequently – about every 3–6 months – due to higher levels of sediment or iron.
Sanitization is another critical step. To prevent bacterial growth and keep your water tasting fresh, sanitize your RO system and storage tank annually or whenever you replace the membrane. Use a diluted chlorine solution or an RO-safe cleaner for this process. After sanitizing or replacing filters, flush the system by filling and draining the storage tank at least three times before using the water. For new carbon filters, run water through them for several minutes to clear out any loose carbon dust.
Don’t overlook O-ring maintenance. Every time you open a housing, check the O-rings for wear and replace them every 2–3 years. Apply a thin layer of food-grade silicone lubricant to prevent leaks – avoid petroleum jelly, as it can degrade rubber seals.
To keep everything running smoothly, invest in a basic toolkit. This should include:
- A filter wrench for opening housings
- A bicycle tire gauge and pump for tank pressure adjustments
- A TDS (Total Dissolved Solids) meter to monitor water quality (costs around $10–$15)
- A soft cloth for cleaning UV sleeves
Lastly, regular performance monitoring is essential. Use a TDS meter to ensure your RO system is working efficiently – if effectiveness drops below 80%, it’s time to replace the membrane. For whole-house filters, a pressure drop of more than 5–7 psi indicates the filter needs replacing. Also, keep in mind that RO production decreases by about 1–2% for every degree Fahrenheit below 77°F.
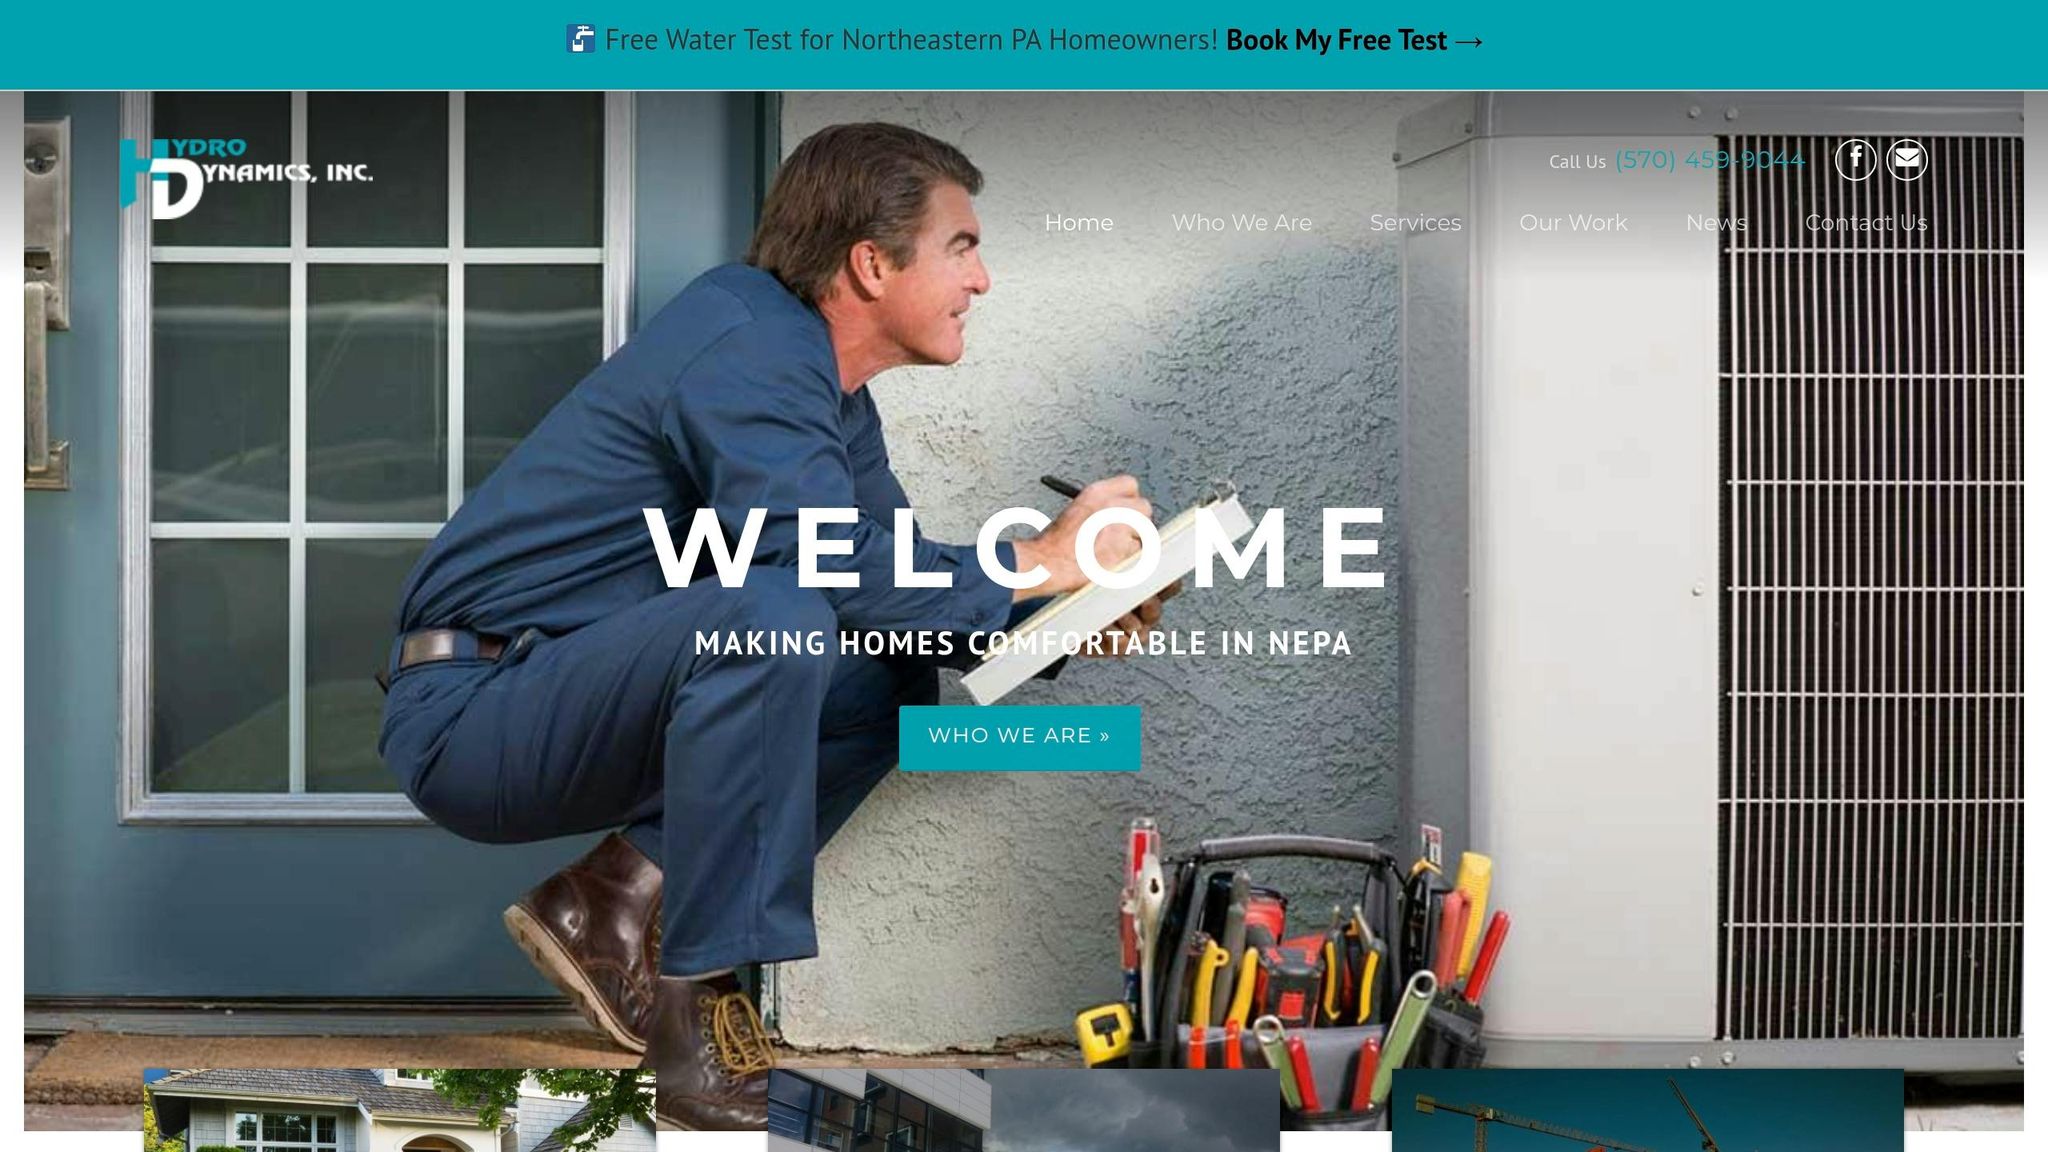
Hydrodynamics Water Conditioning Services
Since 1994, Hydrodynamics has been a go-to provider for water conditioning services in Northeastern Pennsylvania.
Located in Hazleton, PA, the company focuses on delivering personalized water treatment solutions with a strong emphasis on customer care.
Hydrodynamics starts by offering a free water test for homeowners in NEPA. This test helps identify common issues like mineral buildup, chlorine taste, or even lead contamination. Once the problem is pinpointed, they design a tailored water treatment system. Their team includes technicians certified in A.S.S.E. Backflow Testing and EPA 609 standards, ensuring high-quality service.
The company specializes in reverse osmosis systems, which can remove up to 99% of contaminants. They also provide carbon filtration and water softening options to address a variety of water quality concerns.
“Our certified technicians have years of experience in water treatment and HVAC services… Your satisfaction is our priority, and we offer ongoing support to ensure your system operates flawlessly.” – Hydrodynamics Inc.
Hydrodynamics doesn’t just install systems – they also offer ongoing maintenance to keep everything running smoothly. They recommend annual professional check-ups to ensure your system stays in top condition. By following these maintenance practices, Hydrodynamics helps homeowners achieve long-term performance from their water systems.
Their commitment to customer satisfaction is echoed in testimonials like this one from Emma K. of Drums, PA:
“They were prompt and knowledgeable and efficient. Very pleased with their work.” – Emma K., Drums, PA
The company also boasts a 74% recommendation rate based on customer reviews, reflecting their dedication to quality service.
Whether you’re struggling with hard water, sediment, or just want cleaner drinking water, Hydrodynamics understands the specific needs of Northeastern Pennsylvania residents. Their localized expertise ensures they address the unique challenges of the region while delivering the benefits of advanced water treatment systems.
Conclusion
The first step to selecting the right drinking water system is testing your water to identify specific contaminants – whether it’s lead, PFAS, or bacteria. Once you know what you’re dealing with, you can choose the appropriate technology. For example, reverse osmosis (RO) systems are effective for removing dissolved solids and heavy metals, activated carbon filters handle chlorine and improve taste, and UV purification tackles microbial threats. Under-sink RO units typically range from $200 to $950, with annual maintenance costs of $80–$150. This knowledge forms the foundation for choosing and maintaining your system.
Regular upkeep is crucial to protect your investment. Replace sediment and carbon pre-filters every 6 to 12 months to extend the life of your RO membrane. UV lamps should be replaced annually – even if the light appears functional – because their germicidal effectiveness decreases over time. Using a TDS (Total Dissolved Solids) meter to monitor your RO system’s performance is also a smart move; a noticeable drop in rejection rate signals it may be time to replace the membrane.
Basic troubleshooting can often resolve performance issues. Slow water flow is a common problem and usually points to clogged pre-filters or low feed pressure (below 40 PSI), which might require a booster pump. If your water develops an unusual taste or odor, it could mean your activated carbon filters are no longer removing chlorine effectively. When simple fixes don’t work, calling in a professional ensures your system operates at its best.
For more complex water issues – like hard water, sediment, or emerging contaminants – expert advice can make a big difference. Hydrodynamics offers free water testing and customized solutions, including RO systems, activated carbon filters, and water softeners, designed to tackle your specific concerns. Their certified technicians handle everything from installation to routine maintenance, ensuring your system consistently delivers safe, high-quality water. Following these steps not only guarantees cleaner water but also ensures your system remains reliable for years to come.
Ready to take the next step? Contact Hydrodynamics to schedule your free water test and get expert guidance on choosing and maintaining the perfect system for your home.
FAQs
Do I need RO, UV, or carbon for my water?
The right water purification system depends on your water quality and what you’re aiming to achieve. Reverse Osmosis (RO) systems are excellent for eliminating dissolved contaminants such as heavy metals and salts. UV purification focuses on neutralizing bacteria and viruses, making it ideal for biological threats. Carbon filters, on the other hand, enhance taste and odor by removing chlorine and organic compounds. For broader coverage, combining different systems can be a smart choice. Start by testing your water and consulting an expert to find the best solution for your specific needs.
Should I test my water before buying a system?
Testing your water before buying a treatment system is a smart move. It helps pinpoint specific contaminants like bacteria, chemicals, or heavy metals in your supply. This ensures you select a system that matches your needs, making the treatment more effective and dependable.
How often do filters or UV lamps need replacing?
Filters should typically be replaced every 6 to 12 months, while UV lamps usually need replacement every 12 months to keep everything running efficiently. Staying on top of regular maintenance is key to ensuring good water quality and keeping the system performing at its best.