HVAC Energy Loss Solutions & Fixes

Fixing HVAC Energy Loss: Common Solutions

When your HVAC system isn’t running efficiently, it can lead to higher energy bills, reduced comfort, and system wear. The good news? Most energy loss stems from a few common, fixable issues:

  • Dirty air filters: Block airflow, increase energy use, and strain components.
  • Leaky ductwork: Wastes 20–30% of conditioned air, raising costs.
  • Dirty coils: Reduce heat transfer, forcing the system to work harder.
  • Low refrigerant levels: Cause inefficiency and compressor strain.
  • Thermostat issues: Lead to incorrect readings and wasted energy.

Simple fixes like replacing filters, sealing ducts, and cleaning coils can boost efficiency by 15–30%, saving hundreds annually. For persistent problems, professional services ensure long-term performance and savings. Regular maintenance is key to avoiding breakdowns and keeping your HVAC system running smoothly.

Where am I losing energy from my heating and cooling system? (Duct leakage)

Dirty Air Filters and Restricted Airflow

A dirty air filter might seem like a minor issue, but it can have a big impact on your HVAC system’s performance and energy use. When filters get clogged with dust, your system has to work harder to push air through your home. This extra effort not only drives up energy bills – heating and cooling typically make up almost half of the average household’s $1,900 yearly energy costs – but also puts strain on key components like fans and heat exchangers. Over time, this can lead to costly repairs or even shorten the lifespan of your system. In fact, the leading causes of heating and cooling system failure are dirt and neglect.

“A dirty air filter will cause your heating and cooling system to work harder to distribute air throughout your home. This can increase energy costs and damage your equipment, leading to early failure.” – ENERGY STAR

Signs of Clogged Filters

How can you tell if your air filter needs attention? Look out for these warning signs:

  • Higher energy bills without any significant changes in weather or usage.
  • Weak or uneven airflow coming from your vents.
  • Difficulty maintaining the temperature set on your thermostat.
  • More dust building up around registers and grilles than usual.

These clues often point to a filter that’s overdue for cleaning or replacement.

How to Maintain Air Filters

Keeping your air filters in good shape is simpler than you might think. Here’s what to do:

  • Check your filters monthly, especially during peak heating or cooling seasons, and replace them every three months – or sooner if they’re visibly dirty.
  • When replacing a filter, make sure the arrow on the edge points toward the furnace or blower unit. This ensures proper airflow.
  • For safety, always turn off your system at the thermostat or circuit breaker before working on it.
  • If you notice gaps around the filter holder, seal them with duct tape to stop unfiltered air from slipping through.

A little regular maintenance can go a long way in keeping your HVAC system running efficiently and saving you money in the long run.

Leaky or Blocked Ductwork

After dealing with air filters, it’s time to look at your ductwork – another key factor in HVAC efficiency. Damaged or poorly sealed ducts can waste 20–30% of conditioned air, letting energy escape into unconditioned areas like attics, crawlspaces, or wall cavities. Shockingly, about 75% of buildings suffer from duct leakage, making it a frequent culprit behind energy loss.

Leaky ducts can cut your system’s efficiency by as much as 20%. For example, if your HVAC costs you $2,500 annually, fixing duct leaks could save you approximately $500 per year. Beyond the monetary impact, leaks force your HVAC system to work harder, which can wear out components faster and shorten its lifespan.

How to Identify Ductwork Problems

Catching duct issues early can help you avoid bigger headaches later. Uneven temperatures – those frustrating hot and cold spots around your home – are often a sign of air escaping through leaks or blockages. Weak airflow from vents or hissing and whistling sounds when the system runs are also telltale signs of escaping air.

Another clue? Excessive dust. If return ducts are leaking in areas like attics or crawlspaces, they can pull in dust, insulation particles, and allergens, spreading them throughout your home. You might also notice musty odors or chemical smells if leaks are drawing air from damp spaces or garages storing items like paint or pesticides. And if your utility bills suddenly spike without a clear reason, your ductwork might be the problem.

For a DIY check, try the smoke test. While your system is running, hold a lit incense stick or smoke pencil near duct joints. If the smoke wavers or gets drawn into a seam, you’ve likely found a leak. You can also visually inspect ducts in accessible areas like attics or crawlspaces for holes, disconnected sections, or crushed flexible ducts. Look for discoloration or loose drywall around air registers – these can signal air escaping behind walls.

Sealing and Insulating Ducts

Once you’ve identified duct problems, sealing and insulating them is essential for restoring efficiency. Start with sealing – insulation won’t help if the ducts are still leaking. Mastic sealant is highly recommended for this job. It’s a paint-on solution that provides a strong, flexible, and permanent seal, making it perfect for joints, curves, and connections.

“Mastic is the undisputed champion. It provides a superior, long-lasting seal that ensures you’re not just patching the problem, but solving it”.

For flat surfaces, foil HVAC tape with acrylic adhesive works well. But avoid using standard cloth-backed “duct tape” – despite its name, it doesn’t hold up under temperature changes and pressure. Before applying any sealant, clean the duct surface with a mild solution to ensure proper adhesion.

After sealing, add insulation to ducts in unconditioned spaces like attics or garages. Fiberglass duct wrap is a popular and budget-friendly option for retrofitting, but be sure to wear safety gear like gloves and a mask when handling it. According to the International Energy Conservation Code, ducts in unconditioned attics need at least R-8 insulation, while those in other unconditioned areas require R-6. DIY materials for this project typically cost between $55 and $170, while hiring professionals for duct sealing and insulation can range from $1,000 to $2,700, depending on the size of your system and how accessible the ducts are.

Fixing duct leaks pairs perfectly with other maintenance tasks, such as replacing air filters, to boost your HVAC system’s performance and energy efficiency.

Dirty Coils and Heat Transfer Problems

Your HVAC system’s coils – the indoor evaporator and outdoor condenser – play a key role in heat transfer. When these coils are covered in dust, pet hair, or grime, your system’s efficiency takes a hit. Even a thin 0.02-inch layer of dust can reduce heat transfer by 15% and airflow by 11%, which may lead to energy consumption spiking by over 30%.

Dirt acts like an insulating layer on the aluminum fins, blocking proper refrigerant heat exchange and limiting airflow. This can force the blower motor to work harder, and as heat transfer becomes less effective, your system has to run longer and more frequently to meet the thermostat setting. This extra strain impacts the compressor significantly. In fact, for every 10% drop in airflow caused by dirt, your system’s efficiency can decline by 6% to 8%. Over time, this wear and tear could shave 3 to 5 years off your HVAC system’s lifespan. Knowing these risks highlights the importance of regular maintenance to keep your system running smoothly.

Signs of Dirty Coils

Dirty coils, like clogged filters or leaky ducts, can severely limit your HVAC system’s energy efficiency. There are several warning signs to watch for. If the air from your vents feels weak or warmer than usual, it might be time to check the coils. Ice forming on the refrigerant lines or the evaporator coil is another indicator. This happens when a dirty coil fails to absorb enough heat, causing refrigerant temperatures to drop too low and condensation to freeze.

You might also notice musty or “dirty sock” odors coming from your ductwork. This smell often points to mold or biofilm growth on the coils, which can lead to microbial counts up to 300 times higher than those found in clean systems. Additionally, rising energy bills can signal trouble. A 10% efficiency loss could add $100 to $150 annually to your energy costs, while a 25% loss might increase expenses by $250 to $400. If your home feels humid even with the AC running, dirty coils are likely behind the problem.

Cleaning and Maintaining Coils

Keeping your coils clean is critical for maintaining efficiency and avoiding expensive repairs. Aim to clean them once a year. However, if you have pets, smokers in the house, or live in a humid coastal area, you may need to clean them every 4 to 6 months. For light maintenance, you can use a no-rinse foaming coil cleaner and a soft brush vacuum attachment. Just remember to turn off the system before starting. For a deeper clean, schedule professional servicing every two years to recover up to 95% of lost heat transfer capacity.

“If your coil can’t breathe, your AC can’t perform – and your wallet will feel it.” – Samantha Reyes, Smart Comfort Specialist

Professional coil cleaning typically costs between $150 and $250 for surface cleaning, or $300 to $450 for a deep chemical clean. While this may seem like an investment, it’s far less expensive than replacing a damaged coil, which can cost $800 to $1,500, or a failed compressor, which ranges from $1,200 to $2,000. Additionally, flushing the condensate drain with vinegar and warm water can help prevent clogs. Combining regular coil cleaning with filter replacement ensures your HVAC system operates efficiently and keeps repair costs at bay.

Low Refrigerant Levels and Compressor Strain

When refrigerant levels drop due to a leak, your HVAC system has to work overtime to maintain cooling, which can increase energy consumption by as much as 30%. This strain doesn’t just affect efficiency – it puts extra pressure on the compressor, the most expensive part of the system. Low refrigerant also disrupts the balance of indoor humidity, leaving your home feeling damp and uncomfortable. Ideally, humidity levels should stay between 30% and 50%.

Refrigerant leaks don’t resolve themselves. Because the refrigerant remains pressurized, it will continue to escape whether the system is running or not, eventually depleting entirely. Common causes include corrosion in the evaporator coil, loose connections, or worn seals. Like clogged filters or leaky ducts, refrigerant leaks interfere with system performance and drive up energy costs. Catching these issues early can help you avoid expensive compressor repairs.

Detecting Refrigerant Issues

Refrigerant problems often show up in noticeable ways. If your vents are blowing warm or room-temperature air, it could be a sign of low refrigerant. Unusual sounds like hissing or whistling may indicate gas leaking under pressure, while bubbling noises suggest liquid refrigerant escaping. Ice forming on the evaporator coils is another red flag – low refrigerant causes moisture in the air to freeze on the coils. Short cycling, where the system frequently turns on and off without reaching the desired temperature, is another symptom. Additionally, an unexplained increase in your energy bill might point to a refrigerant issue.

It’s also important to consider health risks. Leaking refrigerant can lead to symptoms like headaches, dizziness, nausea, and respiratory irritation. In severe cases, exposure might cause seizures or even loss of consciousness.

Recharging Refrigerant and Repairing Leaks

If you suspect a refrigerant leak, turn off your thermostat and circuit breaker right away. This helps prevent further damage to the compressor and reduces the risk of exposure to harmful chemicals. Avoid trying to refill the refrigerant yourself – this is a job for licensed HVAC professionals. They can identify the source of the problem, whether it’s a crack in the lines, corrosion in the evaporator coil, or a worn seal, and then repair or replace the faulty components. Afterward, they’ll recharge the system according to the manufacturer’s guidelines.

Routine maintenance can help prevent refrigerant leaks, just as it does for filter and coil issues. Repairing a refrigerant leak typically costs between $250 and $1,600, while replacing an entire AC unit due to extensive damage can cost anywhere from $3,900 to $8,000. After repairs, keep an eye on your system for recurring issues like higher energy bills or strange noises. Scheduling annual professional maintenance is a smart way to monitor refrigerant levels and spot early signs of wear on critical components like coils.

Thermostat and Control Issues

Once you’ve tackled filters, ductwork, and coils, paying attention to your thermostat setup is the next step to keep your HVAC system running efficiently.

The thermostat is essentially the command center for your HVAC system. If it’s not calibrated or set up correctly, it can lead to wasted energy and higher utility bills. For example, a thermostat reading 72°F when the actual temperature is 75°F may shut the system off too early. This premature shutdown forces the system to restart sooner than necessary, wasting energy and potentially making your home uncomfortable. This issue, known as short cycling, not only increases energy use but also puts extra strain on your system’s components.

Where you place your thermostat matters just as much as how it’s set up. Installing it near heat sources like lamps, ovens, or direct sunlight can result in inaccurate temperature readings. Similarly, placing it near drafty windows or vents can cause false readings, leading to unnecessary shutdowns or longer operating times. Older programmable thermostats can also lose accuracy over time as their sensors drift out of calibration.

Common Thermostat Problems

One of the most noticeable signs of an issue is incorrect temperature readings. To test this, place a reliable thermometer next to your thermostat and wait about 15 minutes. If the readings differ by more than 2°F, your thermostat likely needs recalibration. Dust buildup on internal sensors can also affect accuracy. To fix this, carefully remove the thermostat cover and use compressed air or a soft brush to clean away dust and debris.

Unresponsive controls are another frequent problem. If your thermostat isn’t responding, check the batteries and replace them if necessary – doing this annually is a good habit. Inspect the wiring for any loose connections or signs of corrosion. Also, make sure the thermostat is set to the correct mode. For example, having it on “heat” during summer or “cool” during winter can cause it to malfunction.

How to Optimize Thermostat Settings

For the best performance, install your thermostat on an interior wall, ideally 52–60 inches above the floor. Avoid placing it near windows, doors, or heat sources to ensure it measures the average temperature of your living space instead of localized hot or cold spots.

Programming your thermostat to match your daily schedule is another way to improve efficiency. Set lower or higher temperatures (depending on the season) during times when no one is home, and use the recovery feature to have your home at the desired temperature by the time you return. Avoid constantly overriding the programmed settings, as this can make the system run longer at high-energy levels than necessary.

Remember, most residential air conditioners are designed to maintain a 20°F difference between indoor and outdoor temperatures. Cranking the thermostat lower during a heatwave won’t cool your home faster; it will just push the system to work at full capacity for extended periods. Upgrading to a modern digital or smart thermostat can help reduce HVAC runtime by up to 15%, offering both convenience and energy savings.

Preventative Maintenance for Energy Efficiency
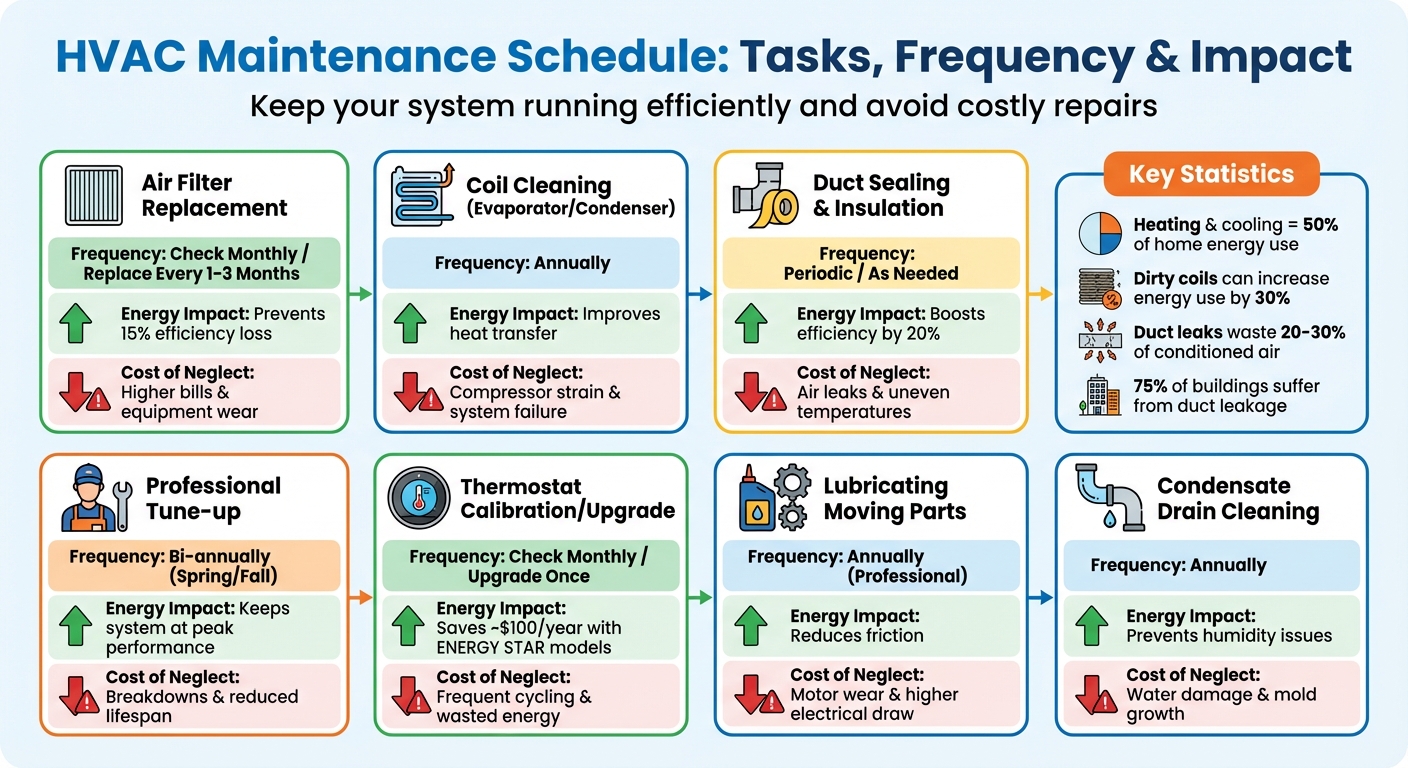
HVAC Maintenance Schedule and Energy Efficiency Impact Guide

HVAC Maintenance Schedule and Energy Efficiency Impact Guide

Once you’ve tackled thermostats, filters, ductwork, and coils, the next step is sticking to consistent maintenance. Why? Because heating and cooling make up nearly 50% of a typical home’s energy use, which means they play a huge role in your annual energy costs. Skipping regular upkeep can quickly cause those costs to climb.

A good maintenance routine combines simple monthly tasks with professional check-ups twice a year. For example, checking air filters every 30 days and replacing them when dirty can prevent up to a 15% efficiency drop caused by restricted airflow. Scheduling a professional tune-up in the spring for cooling systems and in the fall for heating systems ensures your equipment is ready when you need it most. Plus, contractors are often more available during these off-peak times, making it easier to book an appointment. A well-planned schedule can help you avoid unnecessary energy losses.

Maintenance Schedule Overview

Not all tasks need to be done with the same frequency, but each one plays a direct role in keeping your system efficient. Here’s a quick breakdown of recommended tasks and why they matter:

Maintenance Task Frequency Energy Efficiency Impact Potential Cost of Neglect
Air Filter Replacement Monthly (Check) / 1–3 Months (Change) Prevents 15% loss Higher costs & equipment wear
Coil Cleaning (Evaporator/Condenser) Annually Improves heat transfer Compressor strain; system failure
Duct Sealing & Insulation Periodic / As Needed Boosts efficiency by 20% Air leaks; uneven temperatures
Professional Tune-up Bi-annually (Spring/Fall) Keeps system at peak performance Breakdowns; reduced lifespan
Thermostat Calibration/Upgrade Monthly (Check) / Once (Upgrade) Saves ~$100/year with ENERGY STAR models Frequent cycling; wasted energy
Lubricating Moving Parts Annually (Professional) Reduces friction Motor wear; higher electrical draw
Condensate Drain Cleaning Annually Prevents humidity issues Water damage; mold growth

Benefits of Regular Maintenance

Regular maintenance goes beyond quick fixes like cleaning coils or sealing ducts – it strengthens your system’s overall performance. It saves energy, extends the lifespan of your equipment, reduces emergency repair needs, and keeps your home comfortable year-round. For instance, even a thin layer of dust (just 0.042 inches) on an evaporator coil can reduce heat transfer efficiency by up to 21%. That’s a big drop for skipping a simple annual cleaning.

Sealing ductwork can recover 20% to 30% of the air typically lost through leaks. Upgrading to an ENERGY STAR-certified smart thermostat can save you about $100 per year, and replacing outdated equipment might cut your annual bills by nearly $140. Keeping detailed maintenance records is also smart – it helps you spot recurring problems early and ensures your manufacturer warranties remain valid.

Professional Solutions from Hydrodynamics

Hydrodynamics

Some energy efficiency issues call for professional know-how. Since 1994, Hydrodynamics has been a trusted provider in Northeastern Pennsylvania, offering services like duct sealing, coil cleaning, refrigerant management, and energy-efficient installations. Their factory-trained technicians stay up-to-date with the latest HVAC advancements, ensuring systems operate at peak efficiency. This expertise complements DIY efforts, helping maintain long-term energy savings.

These professional services go beyond basic fixes, addressing energy loss with a thorough approach. For instance, Hydrodynamics’ EPA 609 Certified Technicians handle refrigerant management and conduct high-pressure leak tests to ensure both safety and optimal performance. According to the U.S. Department of Energy, properly sealed ducts can significantly reduce energy waste and may even qualify for Federal Tax Credits of up to $1,200.

Hydrodynamics also installs energy-efficient systems, including heat pumps, geothermal units, ductless mini-splits, and high-velocity air handlers. They provide tailored maintenance plans aimed at cutting energy waste and extending equipment lifespan – without pushing unnecessary upgrades. Emma K. from Drums, PA shared her experience:

“They were prompt and knowledgeable and efficient. Very pleased with their work.”

Hydrodynamics echoes this commitment to customer focus:

“Customer satisfaction is always our number one goal.” – Hydrodynamics Inc.

Whether you’re maintaining an older HVAC system or investing in new equipment, Hydrodynamics offers solutions for residential, commercial, and industrial clients. With over 30 years of local experience, they bring a deep understanding of energy-efficient problem-solving to every project.

Conclusion

Tackling HVAC energy loss means addressing the root causes that undermine your system’s efficiency. By combining straightforward DIY measures with professional solutions, you can help your system regain its optimal performance. Ignoring these issues can lead to higher energy bills and unnecessary strain on components, which accelerates wear and tear.

The financial consequences are no small matter. Energy and air losses not only increase costs but can also reduce your HVAC system’s typical lifespan of 10–15 years. Simple tasks like replacing filters monthly and setting your thermostat correctly can make a noticeable difference. This mix of regular upkeep and professional care ensures your system remains efficient and your expenses stay manageable.

That said, some issues – such as refrigerant leaks, duct sealing, or coil cleaning – require the expertise of trained professionals. Partnering with experienced service providers, like Hydrodynamics, can deliver the repairs and upgrades needed for long-term efficiency and savings.

Whether you’re trying to extend the life of an aging system or prevent future breakdowns, the key lies in balancing proactive DIY efforts with regular professional maintenance. This approach not only safeguards your investment but also keeps your home comfortable and your energy costs in check year-round.

FAQs

What HVAC fix saves the most energy first?

Sealing and insulating your ductwork is a smart way to cut down on energy waste. By minimizing air leaks, it boosts the efficiency of your HVAC system and ensures that conditioned air gets where it’s supposed to go. This straightforward upgrade can make a noticeable difference in your system’s performance and help trim your energy bills.

How do I know if my ducts are leaking?

You can spot duct leaks by looking for visible cracks, holes, or disconnected sections in your ductwork. Other clues include uneven heating or cooling, higher-than-usual energy bills, or rooms that are hard to keep at a comfortable temperature. Pay attention to inconsistent airflow throughout your home – this can also signal potential leaks. Regular inspections can help catch these problems early.

When should I call Hydrodynamics for HVAC help?

If your HVAC system isn’t running as it should, routine troubleshooting isn’t solving the problem, or you’re looking for expert maintenance or ways to improve energy efficiency, call Hydrodynamics for help. They can assist with tasks like sealing ducts, cleaning coils, or upgrading your system to enhance performance. Tackling energy loss issues early or scheduling regular maintenance can also help you avoid expensive repairs and keep your system running smoothly.
How to Spot HVAC Energy Waste

How to Spot HVAC Energy Waste

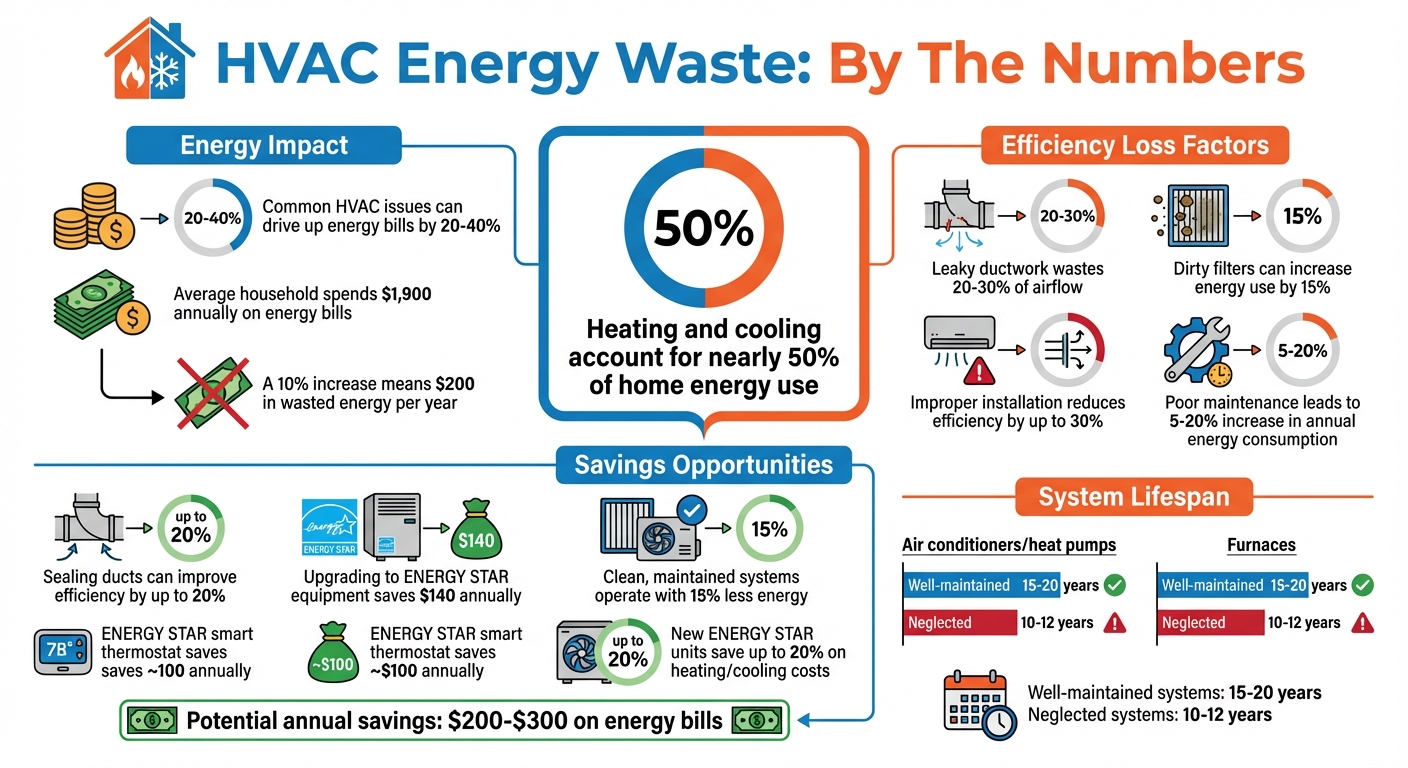
Your HVAC system could be wasting energy – and money – without you realizing it. Common issues like dirty filters, leaky ducts, and aging equipment can drive up energy bills by as much as 20%–40%. Heating and cooling account for nearly 50% of home energy use, making efficiency crucial for your comfort and wallet.

Here’s how to spot energy waste quickly:

  • Check your utility bills: Compare costs month-to-month and year-to-year for unexplained increases.
  • Inspect airflow and temperatures: Weak airflow, uneven room temperatures, or blocked vents signal inefficiencies.
  • Listen and smell for warning signs: Unusual noises or odors often point to mechanical or electrical problems.
  • Review the system’s age: Units older than 10–15 years lose efficiency and cost more to run.
  • Maintain filters: Replace clogged filters every 1–3 months to avoid overworking your system.

Simple fixes like sealing ducts can improve efficiency by up to 20%, while upgrading to ENERGY STAR-certified equipment could save $140 annually. Regular maintenance and professional inspections can reduce energy waste and extend your system’s lifespan. Keep your HVAC system efficient to cut costs and stay comfortable year-round.

HVAC Energy Waste Statistics and Savings Opportunities

HVAC Energy Waste Statistics and Savings Opportunities

5 BIGGEST HVAC Energy Wasters Homeowners Don’t Know!

Review Energy Bills for Unusual Increases

Your utility bill can be a goldmine of clues when it comes to spotting HVAC energy waste. The trick is knowing how to examine it and what patterns to look for.

How to Review Monthly Utility Statements

Start by pulling together your utility bills from the past 12 months. Compare each month’s bill to the same month from the previous year – like January 2026 against January 2025, or July 2025 versus July 2024. This approach accounts for seasonal differences in weather.

Pay close attention to high-demand months, such as winter and summer. Look for unexplained spikes in your bill that don’t align with changes in weather or usage. For example, if your January bill jumped from $180 last year to $245 this year, but your energy habits and the weather stayed consistent, it’s worth investigating.

Many utility companies now offer online tools or downloadable resources to help you track and analyze your energy usage over time. These tools can simplify spotting trends and irregularities. Considering that the average household spends about $1,900 annually on energy bills, even a modest 10% increase could mean nearly $200 in wasted energy each year.

If you notice unexplained increases, it’s time to dig deeper into potential issues with your HVAC system.

Common Signs of HVAC Energy Waste

When your bills rise unexpectedly, it’s often due to specific HVAC system problems. For instance, leaky ductwork can waste 20% to 30% of airflow, and clogged filters can restrict air circulation, forcing your system to work harder and consume more energy.

“A dirty filter will slow down air flow and make the system work harder to keep you warm or cool – wasting energy.” – ENERGY STAR

Another culprit could be improper installation of new equipment, which can reduce efficiency by up to 30%. Even if your system is brand-new, poor installation can lead to higher bills. Additionally, as HVAC systems age – typically beyond 10 to 15 years – their components naturally wear out, reducing efficiency and driving up energy costs. If you notice your bills creeping up year after year during the same seasons, it’s a sign your system might be struggling to keep up.

Check for Temperature and Airflow Problems

Uneven temperatures and weak airflow are clear signs your HVAC system might be wasting energy. If some rooms feel like a sauna while others are freezing, or if barely any air comes out of the vents, your system is likely overworking to compensate – pushing up your energy bills in the process.

These issues often point to duct leakage or pressure imbalances that disrupt air distribution. In fact, airflow problems alone can reduce your HVAC system’s efficiency by as much as 15%. The good news? You can spot these problems yourself with a few simple checks.

Measure Temperature Differences Between Rooms

Grab a digital thermometer and check the temperature in every room of your home. Jot down the readings and compare them to your thermostat’s setting. If you notice a difference of more than 3–5°F, you’ve likely uncovered an energy efficiency issue. Fixing these imbalances not only makes your home more comfortable but also helps cut down on wasted energy.

Large temperature differences often signal duct leaks or improper system sizing. An HVAC system that’s too large will cycle on and off frequently, failing to evenly distribute air. On the other hand, an undersized unit will struggle to maintain comfortable temperatures, running constantly without ever catching up.

For another quick test, place a glass thermometer next to your thermostat and leave it there for 15 minutes. If the readings differ by more than one degree, your thermostat might need recalibration. This could mean your system is kicking on unnecessarily, wasting energy every time it runs.

Test Airflow at Vents

Airflow testing is straightforward. Turn on your HVAC system, ensure all vents are open, and hold a piece of paper near each supply vent. The paper should flutter noticeably. If it barely moves – or doesn’t move at all – you’ve found an airflow problem.

Weak airflow can stem from several issues: a clogged air filter restricting circulation, dirty evaporator coils blocking airflow, or a failing blower motor struggling to push air effectively. These problems force your system to work overtime, wasting energy and wearing down components faster – which could lead to expensive repairs and a shorter system lifespan.

Here’s a quick breakdown of common symptoms, their causes, and how they impact energy use:

Symptom Potential Cause Impact on Energy
Hot/Cold Spots Leaky Ducts or Poor Insulation High: Conditioned air escapes to unconditioned spaces
Weak Airflow Clogged Filter or Failing Blower Medium: System runs longer to reach the target temperature
Frequent Cycling Oversized HVAC Unit High: Increased wear and inefficient operation
Rattling Doors Pressure Imbalance Low/Medium: Air struggles to circulate properly

Keep all vents open in every room. Closing vents might seem like a way to save energy, but it actually increases internal pressure in the system, making your HVAC work harder and less efficiently. Also, make sure vents are free from obstructions like furniture or curtains to allow air to circulate properly.

Identify HVAC Warning Signs

When it comes to spotting HVAC inefficiencies, don’t just rely on your bills or indoor temperatures. Pay close attention to what you can hear and smell – strange sounds and odors often hint at underlying issues that force your system to work harder than necessary. Unusual noises and odd smells are often early indicators of mechanical problems. Addressing these promptly can stop small issues from escalating into costly repairs.

“If you notice unusual sounds, schedule an inspection immediately.”

Taking preventive steps when these warning signs appear can improve your system’s performance by up to 45%. That’s not just a boost in efficiency – it’s also a noticeable decrease in your monthly energy costs.

Strange Noises from Your System

Every unusual sound your HVAC system makes tells a story, and unfortunately, it’s rarely a good one. Each type of noise often points to a specific problem that wastes energy. For example, whistling or wheezing could mean leaky ductwork or a clogged air filter, both of which restrict airflow. On the other hand, hissing often signals refrigerant leaks, which force the system to run longer to maintain desired temperatures. It’s worth noting that 20% to 30% of conditioned air is typically lost in homes due to duct issues.

Other sounds can indicate mechanical or electrical issues. Rattling or banging might mean loose parts like fan blades or motor mounts, or debris caught inside the system – problems that increase resistance and wear. Buzzing is often tied to electrical faults, such as failing contactors or loose wiring, which disrupt power flow and cause inefficiencies. Screeching or grinding may point to worn motor bearings or a slipping belt, both of which increase friction and energy consumption. Ignoring these issues can lead to expensive repairs, with AC motor fixes ranging from $300 to $600, and compressor replacements averaging $1,200.

If you hear a sharp, continuous squeal from your outdoor unit, it’s time to act fast. This could indicate dangerously high compressor pressure – turn the system off immediately. For noises like whistling or thumping, start by checking your air filter (refer to the air filter section for more details).

Noise Type Potential Mechanical Problem Impact on Energy/Efficiency
Whistling Leaky ducts, clogged filters High energy waste
Hissing Refrigerant or valve leak Prolonged operation; increased waste
Screeching Worn fan belt or motor bearings Higher friction and power consumption
Buzzing Electrical issues or failing fan Inefficient power usage
Banging Loose motor mounts or broken parts Severe inefficiency; risk of failure

Odd Smells from Vents

Unusual smells are just as telling as strange noises when it comes to spotting HVAC problems. For example, musty odors often mean mold caused by moisture buildup, which restricts airflow and increases energy use. Poor maintenance can lead to a 5-20% increase in energy consumption annually.

Burning smells are a red flag for electrical or overheating issues. These could stem from worn components or internal friction within motors, both of which drive up energy use and risk complete system failure. If you catch a burning smell, turn off the power at the breaker immediately to avoid potential electrical fires.

A sweet or chloroform-like scent might indicate a refrigerant leak. Since refrigerant is essential for heat transfer, even a small leak can force your system to run longer cycles, wasting significant energy. If this smell comes with hissing or bubbling noises, shut off the unit to prevent compressor damage.

“If the air is ten degrees or more warmer than normal and the filter is clean, refrigerant loss is likely.” – John Williams, Chief Executive Officer, Stan’s Heating, Air, Plumbing & Electrical

If smells seem to come from specific vents, there may be blockages or leaks in the ductwork trapping moisture. For musty odors, consider having your evaporator coils and ducts professionally cleaned. This service usually costs between $150 and $780, but it can eliminate mold, restore proper airflow, and improve dehumidification – helping your system run more efficiently and saving you money in the long run.

Inspect and Replace Air Filters

The air filter plays a crucial role in keeping your HVAC system running efficiently. When filters get clogged with dust, pet hair, and other debris, they restrict airflow. This forces your system to work harder, which can spike energy use by as much as 15%. Not only does this increase your utility bills, but it also puts unnecessary strain on your system.

“A dirty filter will slow down air flow and make the system work harder to keep you warm or cool – wasting energy.” – Energy Star

A clogged filter can also lead to short cycling and cause dust to build up on internal components, further reducing performance. Since dirt and neglect are leading causes of HVAC system failure, keeping your air filter clean is a simple yet essential step to maintain efficiency and extend the life of your system. Here’s how you can check and manage your air filter to keep everything running smoothly.

How to Check Air Filter Condition

Regular maintenance not only cuts down on wasted energy but also helps your system last longer. Checking your air filter is quick and can save you money in the long run. Start by locating the filter slot, which is usually found in the air handler or behind a return air grill. Before handling the filter, make sure to turn off your HVAC system at the thermostat to avoid any injuries or debris being pulled into the system.

Next, remove the filter and hold it up to a light source. If little to no light passes through, it’s time to replace it. Even if the filter doesn’t appear completely clogged, a gray or brown tint means enough buildup has occurred to restrict airflow and waste energy. While the filter is out, take a moment to check for dust around the surrounding area. Excess dust can quickly clog a new filter.

How Often to Replace Filters

Inspect your filter monthly and aim to replace it at least every three months. However, certain household factors might require more frequent replacements. Homes with shedding pets, wood-burning fireplaces, or those located in high-pollution areas may need filter changes every 60 days. During peak heating or cooling seasons, when your system is running constantly, filters could clog as quickly as 30 days.

The type of filter you use also determines its lifespan:

  • Flat or fiberglass filters: Replace every 30 days
  • Pleated filters: Last 90 days to 4 months
  • HEPA filters: Replace annually
  • Washable filters: Clean monthly

When installing a new filter, make sure the arrows on the frame point toward the blower motor to ensure proper airflow. If your filter slot doesn’t have a cover, seal any gaps with duct tape or a magnetic cover to prevent air leaks.

For professional HVAC maintenance and energy-saving solutions, contact Hydrodynamics. They can help keep your system running efficiently year-round.

Review System Age and Repair Records

Taking a closer look at your HVAC system’s age and repair history can reveal inefficiencies that might be draining your wallet.

If your system is more than 10–15 years old, it’s likely missing modern energy-saving technology. Air conditioners and heat pumps generally last 10–12 years, while furnaces can operate for 15–20 years. Once these systems surpass their expected lifespans, their efficiency tends to drop significantly.

Switching to an ENERGY STAR certified unit could help you save up to 20% on heating and cooling costs compared to a heat pump or air conditioner that’s a decade old. Additionally, older systems often suffer from component wear, which can lead to energy-wasting issues like short-cycling and even damage critical parts like the compressor.

Check Your System’s Age

You can find the installation date on the manufacturer’s label located on your indoor or outdoor unit. If your air conditioner or heat pump is over 10 years old, or if your furnace or boiler is older than 15 years, it’s time to have it inspected by a professional.

Older systems may also lack features like variable-speed motors and smart controls that help optimize energy use. If your system still uses R-22 refrigerant (commonly known as Freon), it’s a good idea to replace it. R-22 is being phased out, making repairs not only more difficult but also increasingly expensive.

Review Repair History and Costs

Take a moment to review your repair records. Frequent breakdowns and rising energy bills are clear indicators of a system losing its efficiency. A helpful guideline is the “$5,000 Rule”: multiply your system’s age by the cost of a repair. If the result exceeds $5,000, replacing the system is typically the smarter financial decision.

For example, if a 12-year-old air conditioner requires a $500 repair, the total ($6,000) suggests replacement is the better option. Another rule to consider is the “50% rule”: if a single repair costs 50% or more of what a new system would cost, replacement is usually the way to go.

Keep an eye out for signs like uneven temperatures, unusual noises, or rapid on-and-off cycling. These issues often point to deeper problems and should be addressed by a professional. For expert advice on your system’s condition, reach out to Hydrodynamics.

When to Contact a Professional

While you might be able to identify some energy inefficiencies on your own, many problems stay hidden without the help of certified technicians equipped with specialized tools. After addressing visible issues, professionals can uncover deeper problems that aren’t immediately apparent.

Professional Testing for Hidden Problems

HVAC technicians use tools like manometers and flow hoods to measure air pressure and airflow at vents. These tools help detect blockages, undersized ducts, or loose joints that can lead to uneven temperatures in your home.

Duct leaks are another frequent source of energy loss that often go unnoticed without a professional inspection. These leaks can waste 20%–30% of conditioned air, especially in unconditioned areas like attics or basements. Experts address these leaks with long-lasting solutions, such as mastic sealant or metal-backed foil tape, which are far more effective than regular duct tape.

Refrigerant issues also demand professional attention. Even a small refrigerant loss – around 10% – can increase your annual energy costs by as much as 20%. Simply topping off refrigerant is a short-term fix and can become an expensive habit.

Other hidden issues, like loose electrical connections, dirty blower wheels, or gaps in insulation, can also impact your system’s performance. Advanced diagnostic methods, such as those used by Hydrodynamics, can identify these energy-draining problems that might otherwise go unnoticed.

Professional inspections do more than just reveal hidden issues – they also provide actionable steps for effective maintenance.

Benefits of Regular Maintenance

Regular maintenance goes beyond fixing current issues; it also helps prevent energy waste from creeping back into your system. A clean and well-maintained HVAC system can operate with up to 15% less energy, potentially saving homeowners between $200 and $300 annually on energy bills.

“Dirt and neglect are the top causes of heating and cooling system failure and inefficiency.” – Denise Minor-Hoes, ENERGY STAR

Routine tune-ups ensure your system stays in peak condition by cleaning evaporator and condenser coils, fine-tuning airflow, lubricating moving parts, and calibrating thermostat settings. These steps reduce the strain on your system, which not only lowers energy usage but also minimizes wear and tear on its components.

Scheduling bi-annual maintenance – checking your cooling system in the spring and your heating system in the fall – can help catch minor problems before they escalate into costly emergencies. While an annual maintenance visit typically costs between $150 and $300, emergency repairs can range anywhere from $300 to over $1,000. Regular upkeep can also extend your HVAC system’s lifespan to 15–20 years, compared to just 10–12 years for systems that are neglected.

For a thorough energy efficiency evaluation or maintenance services, consider reaching out to Hydrodynamics. Their technicians offer specialized tests, such as duct blaster assessments and thermographic inspections, to ensure your HVAC system is running as efficiently as possible. These professional services are the perfect complement to your efforts to reduce energy waste and keep your home comfortable year-round.

Conclusion

Catching HVAC energy waste early can trim your energy bills by as much as 15%. Keep an eye on your monthly utility bills – unexplained spikes might be a red flag. Also, watch for warning signs like weak airflow, strange noises, or unpleasant odors, which could mean your system is overworking unnecessarily.

Regular maintenance is a game changer when it comes to efficiency. HVAC systems over 10 years old often lose their edge and may need replacing to keep operating costs under control.

“Addressing issues early can help you save up to 15% on your energy bills.” – U.S. Department of Energy

But maintenance isn’t the only piece of the puzzle. Energy waste can stem from leaky ducts, poor insulation, or blocked vents. Sealing and insulating ducts alone can improve efficiency by up to 20%. And if you upgrade to an ENERGY STAR® certified smart thermostat, you could save around $100 annually.

If routine checks and maintenance don’t completely solve the problem, it’s time to bring in a professional. Hydrodynamics offers advanced diagnostic services to uncover hidden issues like duct leaks or refrigerant loss – problems that DIY fixes often overlook. Whether it’s routine upkeep or a professional inspection, taking action now can help you cut energy costs, extend your HVAC system’s lifespan, and keep your home comfortable throughout the year.

FAQs

How can I tell if my HVAC system is outdated and inefficient?

If your HVAC system has been around for more than a decade, it might be worth checking if it’s still running efficiently. Common signs that your system may be outdated include rising energy bills, frequent repairs, and inconsistent indoor temperatures. Most air conditioners and heat pumps are built to last about 10–12 years, so if yours is approaching or exceeding that age, it may not be performing at its best.

Older systems often have trouble maintaining steady performance, which can result in frequent on-and-off cycling or certain rooms feeling too hot or too cold. Upgrading to a modern, energy-efficient HVAC system can reduce utility costs and create a more comfortable environment in your home or business.

What are the warning signs that my HVAC system needs maintenance?

Your HVAC system often sends out clear signals when it needs professional care. Be alert for unusual sounds like rattling, squealing, or grinding. Pay attention to strange smells, such as a burning odor or a musty scent, and watch for temperature inconsistencies that don’t match your thermostat settings. Other red flags include uneven heating or cooling, frequent cycling (when the system keeps turning on and off), or unexpected spikes in your energy bills.

When these issues pop up, it’s time to bring in a professional. A qualified technician can handle tasks like cleaning components, replacing filters, calibrating sensors, and inspecting ductwork to get your system back to peak performance. Regular maintenance not only helps avoid expensive repairs but can also reduce your utility bills. Hydrodynamics provides expert HVAC maintenance services to ensure your system stays efficient and reliable all year long.

How often should I change my HVAC air filter to keep it running efficiently?

To keep your HVAC system running smoothly, make it a habit to replace the air filter regularly. Inspect the filter monthly, especially during high-usage times like summer and winter. If it looks dirty, don’t wait – replace it right away.

Most filters need to be swapped out at least once every 30 days. If your system sees lighter use, you might stretch this to three months, but even if the filter looks clean, replacing it every quarter helps prevent debris buildup that could overwork your system. If you have pets, smokers, or a lot of dust in your home, you may need to replace the filter more often – sometimes as frequently as every two weeks.

Changing your filter regularly not only improves airflow but also reduces energy waste and can extend the lifespan of your HVAC system.

Ultimate Guide to Smart Thermostat Troubleshooting

Ultimate Guide to Smart Thermostat Troubleshooting

Smart thermostats save energy and improve comfort, but issues like power failures, WiFi problems, and inaccurate temperature readings can disrupt their performance. Here’s how to fix common problems:

  • Power Issues: Check the circuit breaker, replace batteries, inspect wiring, and ensure the C-wire is secure.
  • WiFi Problems: Verify your internet connection, position the router within 30–50 feet, use the 2.4 GHz band, and update firmware.
  • Temperature Errors: Avoid direct sunlight, heat sources, or vents. Clean sensors, recalibrate using a thermometer, and check placement.
  • Heating/Cooling Failures: Inspect wiring (W-wire for heat, Y-wire for cooling), wait for compressor delays to reset, and review thermostat settings.

If these steps don’t resolve the issue, professional help may be needed for wiring, calibration, or hardware malfunctions. Regular maintenance, like cleaning sensors, updating firmware, and testing systems seasonally, keeps your thermostat running efficiently and can save up to 10% on energy bills annually.

Nest Thermostat No C Wire Problem and Solutions

Nest Thermostat

Fixing Power and Connectivity Problems

When it comes to smart thermostats, power and connectivity hiccups are among the most common issues. If your thermostat loses power or struggles to connect to WiFi, it can become as ineffective as an old manual model – or worse, it might stop controlling your HVAC system altogether. The silver lining? Most of these problems are caused by simple, fixable issues like dead batteries, tripped breakers, or WiFi router glitches.

Checking Power Supply and Connections

A completely blank thermostat screen is often the first sign of a power problem. But don’t panic – start with a few basic checks that can often resolve the issue without needing advanced technical know-how.

  • Check your circuit breaker. Go to your electrical panel and locate the breaker labeled for your HVAC system or thermostat. If it’s tripped, it’ll either be in the middle position or set to “off.” Flip it fully off, then back on. This quick step can resolve many power interruptions caused by surges or temporary overloads.
  • Replace batteries if needed. If your thermostat runs on batteries or has a battery backup, make sure the batteries are fresh. Most models need replacements every 6–12 months to keep running smoothly. Even hardwired thermostats often rely on backup batteries to retain settings during outages.
  • Inspect the wiring. If the screen remains blank, remove the thermostat’s cover and check the wiring. Look for loose wires, damaged insulation, or connections that aren’t secure. Pay special attention to the C-wire (common wire), which provides consistent power to many smart thermostats. If you spot loose wires, ensure they’re stripped properly and reinsert them securely into their terminals.

For those comfortable with basic electrical work, a digital multimeter can help confirm whether power is reaching your thermostat’s terminals. But if the wiring looks damaged or you’re unsure of the setup, it’s best to call a professional. Incorrect wiring can pose safety risks and potentially harm your HVAC system.

  • When to call in the pros. If your thermostat remains non-functional after checking the breaker, replacing batteries, and inspecting connections, the problem might be more serious – such as a blown transformer or internal damage. In these cases, professional repair or replacement is necessary.

Once the power issue is fixed, make sure your thermostat is connected to WiFi for full functionality.

Fixing WiFi and App Connection Problems

After restoring power, the next step is ensuring your thermostat has a strong WiFi connection. Without it, you lose the remote control features that make smart thermostats so convenient. Most WiFi issues stem from weak signals, incorrect passwords, or router settings, and they can usually be resolved with a few straightforward steps.

  • Test your internet connection. Before assuming the thermostat is the problem, check your WiFi by connecting another device like your phone or laptop. If those devices can’t connect either, the issue lies with your internet service or router.
  • Check the distance and obstacles. WiFi signals weaken over distance and when blocked by walls, metal objects, or appliances. Ideally, your thermostat should be within 30–50 feet of your router with minimal obstructions. If that’s not possible, consider moving the router closer or using a WiFi extender to strengthen the signal.
  • Double-check the WiFi password. Typos are surprisingly common. Access your thermostat’s settings and re-enter the password, paying close attention to capitalization, numbers, and special characters.
  • Connect to the right frequency band. Many smart thermostats only support 2.4 GHz networks, even though some routers also broadcast on the 5 GHz band. Make sure your thermostat is connected to the 2.4 GHz network.
  • Restart your devices. Power down your thermostat, router, and modem for about 30 seconds, then turn them back on. This simple reset often resolves connectivity issues.
  • Update your router’s firmware. Outdated firmware can cause compatibility problems with smart devices. Log into your router’s admin panel (usually through a web browser) and check for updates. Follow the manufacturer’s instructions to install them.
  • Update your thermostat’s firmware. Firmware updates fix bugs and improve performance. In your thermostat’s settings, look for an “Updates” or “Software” option. Make sure the thermostat has a stable WiFi connection and enough battery power (if applicable) before starting the update. Follow the on-screen instructions carefully, and don’t interrupt the process by turning off the power.
  • When to call for help. If issues persist after trying these steps – like moving the router, updating firmware, or resetting devices – it could mean the thermostat’s internal WiFi hardware is faulty. At this point, professional diagnosis and repair are necessary.

With power restored and WiFi running smoothly, your smart thermostat should be back to managing your home’s comfort with ease.

Fixing Incorrect Temperature Readings

Once you’ve tackled power and connectivity issues, the next step is addressing temperature inaccuracies. If your smart thermostat says it’s 72°F but your home feels more like 68°F or 76°F, the readings are clearly off. This can lead to your HVAC system running at the wrong times, wasting energy and causing discomfort. These inaccuracies often result from environmental factors or calibration issues.

Identifying Environmental Interference

Where your thermostat is installed has a huge impact on its ability to measure your home’s temperature accurately. Even the most advanced smart thermostats can give false readings if they’re placed in areas where the conditions don’t reflect the room’s true temperature.

Direct sunlight is one of the biggest culprits. When sunlight hits your thermostat, it can heat up the device, tricking the sensor into thinking the room is warmer than it actually is. To fix this, you can install a small shade specifically designed for thermostats. This will block sunlight while still allowing airflow. Another simple option is using a white foam board to shield it from direct light.

Heat-producing appliances, like ovens, lamps, TVs, or computers, can also throw off your thermostat if they’re too close. If you suspect this is the problem, consider relocating the thermostat to a more neutral spot away from these heat sources.

Good air circulation is also key. For the best results, install your thermostat on an interior wall at a height of 52–60 inches (roughly eye level). Avoid mounting it on exterior walls, in corners, behind furniture, near bathrooms (where humidity fluctuates), or close to supply vents and return air ducts. These spots can lead to inaccurate readings.

Over time, dust and debris can build up on the thermostat sensor, reducing its accuracy. To fix this, remove the cover and gently clean the sensor with a dry cloth or compressed air. Once you’ve addressed these environmental factors, you can move on to checking and adjusting the thermostat’s calibration.

Adjusting Thermostat Calibration

Even with perfect placement, smart thermostats can experience calibration drift, which means the sensor starts consistently reading temperatures a few degrees off. A telltale sign is setting your thermostat to 72°F but noticing the room feels noticeably cooler or warmer.

To check for calibration drift, use a reliable, standalone thermometer. Place it near your thermostat (but don’t let them touch) and let both stabilize for about 15 minutes in the same spot, free from drafts, direct sunlight, or nearby heat sources. If the readings differ by more than 1–2°F, you’ll likely need to adjust the calibration. For example, if your thermostat shows 72°F but the thermometer reads 70°F, you’d adjust the thermostat by 2°F.

Most modern smart thermostats have a calibration feature in their settings menu. Check the user manual for specific instructions, as the process varies by brand. Typically, you’ll find options like “Calibration”, “Temperature Offset”, or “Sensor Adjustment” in the menu, either on the thermostat’s display or in the companion app. Adjustments are usually made in small increments, such as 0.5°F or 1°F. After making changes, recheck the accuracy with your thermometer to ensure the issue is resolved.

Before calibrating, it’s a good idea to check the thermostat’s batteries and firmware. Weak batteries or outdated firmware can affect temperature readings. Manufacturers often release updates to improve calibration and fix bugs, so updating the firmware might solve the problem without further adjustments. Once updated, test the readings again to confirm everything is working as it should.

If your thermostat’s readings are consistently off by a small, steady margin (1–3°F), calibration should fix the issue. However, if the readings are erratic or inconsistent, the sensor might be faulty. In this case, professional help may be needed. Companies like Hydrodynamics specialize in HVAC diagnostics and can determine whether the problem lies with the thermostat or the HVAC system itself.

Fixing Heating and Cooling Failures

If your smart thermostat isn’t turning on the heating or cooling system, the issue often lies with wiring, auxiliary heat settings, or compressor delay timeouts. These problems can be frustrating, but many can be resolved with a few troubleshooting steps – no professional help needed.

Fixing Heating Problems

Once you’ve confirmed your thermostat has power and is connected to Wi-Fi, it’s time to address why the heating isn’t working. The usual culprits include wiring issues, incorrect auxiliary heat settings, or compressor delays.

Start by ensuring your thermostat is set to “Heat” mode and that the target temperature is higher than the current room temperature. For example, if the room is at 68°F and you’ve set the thermostat to 72°F but nothing happens, listen for relay clicks. If you don’t hear them, it might indicate a problem with the W-wire.

To check the W-wire, turn off the power at the breaker to avoid any risks. Remove the thermostat cover, locate the W-wire, and make sure it’s securely connected. Document the wiring setup before making changes to avoid mistakes when reconnecting. A loose or improperly connected W-wire can prevent your system from functioning.

If your heating system uses auxiliary heat (common in heat pumps during very cold weather), make sure the auxiliary heat mode is enabled in your thermostat’s settings. Misconfigured auxiliary settings can prevent the system from switching to this backup heating stage when needed.

Another potential issue is the compressor delay timeout. This safety feature prevents rapid cycling and usually lasts 5–10 minutes. Wait at least 10–15 minutes after setting a higher temperature before concluding there’s a problem.

If heating still doesn’t activate, check your HVAC circuit breaker. If it’s off or keeps tripping, there may be an electrical issue with the HVAC system that requires professional attention. Additionally, low or dead thermostat batteries can disrupt communication with the heating system. Replace the batteries if your thermostat uses them, or check the C-wire connection for thermostats that rely on it for power.

Once you’ve tackled heating problems, you can move on to diagnosing cooling failures using similar steps.

Fixing Cooling Problems

Cooling issues often involve the Y-wire, which controls the air conditioning compressor. Follow a similar process to troubleshoot.

First, ensure your thermostat is set to “Cool” mode. If lowering the temperature doesn’t activate the system and you don’t hear relay clicks, inspect the Y-wire connection.

Turn off the power at the breaker, remove the thermostat cover, and locate the Y-wire terminal. Check that the wire is secure and free of damage. If the wire looks worn or bent, carefully remove it, strip about 1/4 inch of clean copper, and reconnect it firmly. This process mirrors the steps for fixing heating issues and helps maintain a balanced HVAC system.

If your system activates heating when you’ve set it to cool (or vice versa), the Y-wire might be connected incorrectly. Refer to your system’s wiring diagram to confirm the proper connections.

Like with heating, the compressor delay feature can prevent immediate activation. Wait 10–15 minutes after adjusting the temperature before continuing to troubleshoot. Also, check your thermostat’s “swing” or “differential” setting, which controls how much the temperature must change before the system activates. A swing setting that’s too high might delay cooling, while a setting that’s too low can cause the system to cycle too frequently.

If none of these steps resolve the issue, consider performing a factory reset. Look for a “Reset” or “Restore Factory Settings” option in the thermostat’s settings menu. Before resetting, take photos or notes of your current settings, schedules, and Wi-Fi information, as these will be erased. After resetting, reconfigure your thermostat and test the cooling function. Persistent issues after a reset might indicate a hardware defect, requiring professional replacement.

Pay attention to warning signs of more serious problems, such as the system not responding to temperature changes, turning on and off unpredictably, or failing to run after troubleshooting. Outdated firmware can also cause issues like missed schedules or connection drops. Check for firmware updates in your thermostat’s app or settings menu, as manufacturers often release updates to address such bugs.

When to Call a Professional

Some thermostat problems go beyond what you can fix on your own and demand professional attention to avoid safety risks and further damage.

Problems That Require Professional Help

Certain issues, like faulty wiring, corroded or loose connections, or persistent wiring error codes, should always be handled by a professional. Attempting DIY electrical repairs could lead to serious risks, including electric shock or further harm to your HVAC system.

If your thermostat experiences repeated power failures even after replacing the batteries and checking the circuit breaker, it might indicate problems like blown fuses or transformer malfunctions. These require expert diagnosis and repair.

Temperature discrepancies of 4–5°F or more, even after recalibrating the thermostat, could point to a faulty sensor or internal hardware issue. You can test this by placing a reliable thermometer near your thermostat for about 15 minutes. If the reading differs by more than 2–3°F, it’s time to call a professional.

Unpredictable behavior from your HVAC system – like turning on or off without reason or failing to respond to proper settings – could signal communication issues between the thermostat and your HVAC equipment. This is especially common in homes with multi-stage or complex systems, which often need specialized expertise to ensure proper integration.

If your thermostat’s touchscreen or buttons become unresponsive after a firmware update, it might indicate hardware failure. When a factory reset doesn’t resolve the issue, professional help is necessary.

For any problems beyond these signs, calling an expert ensures your thermostat and HVAC system function safely and efficiently.

How Hydrodynamics Can Help

When DIY efforts don’t solve the problem, professional service becomes essential. Hydrodynamics Inc., a trusted family-owned HVAC company since 1994, specializes in resolving complex thermostat issues for residential, commercial, and industrial systems.

Their certified technicians can handle a variety of tasks, including diagnosing wiring problems, repositioning thermostats installed in poor locations, updating system integrations, and providing energy-efficient solutions to extend the life of your HVAC system. Whether you have central air, a heat pump, or a ductless mini-split system, they’ve got you covered.

If your thermostat is installed in a problematic spot – like near heat sources, direct sunlight, or drafts – Hydrodynamics can relocate it and recalibrate it to ensure optimal performance. They also focus on energy-saving strategies. For instance, adjusting your thermostat by 7–10°F for 8 hours a day can reduce heating bills by up to 10%. On the flip side, poor ductwork can waste as much as 30% of your HVAC energy, a problem they can help address.

Preventative maintenance is another key service they offer. Regular system checks can keep your thermostat properly calibrated and your HVAC system running efficiently, helping you avoid costly repairs down the line. Professional intervention not only complements your initial DIY efforts but also protects your system from future issues.

When reaching out to Hydrodynamics, it’s a good idea to ask if they have experience with your specific thermostat brand and model. Also, inquire whether they can diagnose the problem before providing a repair estimate and clarify what’s included in their service fee.

While DIY fixes might seem cheaper upfront, professional intervention often proves more cost-effective in the long run. Mistakes in diagnosing or repairing thermostat issues can lead to higher costs and wasted energy over time, making expert help a smart investment.

“They were prompt and knowledgeable and efficient. Very pleased with their work.” – Emma K., Drums, PA

Conclusion: Maintaining Your Smart Thermostat

Key Takeaways

Keeping your smart thermostat in top shape doesn’t have to feel like a daunting task. Many of the most common issues – like Wi-Fi connectivity problems, unresponsive screens, or inaccurate temperature readings – can often be addressed with straightforward DIY fixes.

Start with the basics: check the power supply and battery levels, as low power can disrupt temperature readings and system communication. Make it a habit to inspect your Wi-Fi connection and restart your router periodically for a stable connection. Keeping the firmware up to date is another simple yet effective way to address bugs and improve performance. Beyond these essentials, proper placement and calibration are crucial for accurate operation.

Avoid placing your thermostat near direct sunlight, heat sources, drafts, or vents. If you notice a temperature drift of 4–5°F, it may be time for professional recalibration. Regularly replacing air filters and inspecting ductwork can prevent airflow issues and reduce energy waste. For energy savings, adjusting your thermostat by 7–10°F for at least 8 hours a day can cut heating bills by up to 10%. Also, clean the temperature sensors to remove dust or debris that might skew readings, and inspect wiring connections annually to catch any loose or damaged wires. If your thermostat becomes unresponsive or freezes, try a manual restart by reinserting the batteries or pressing the reset button.

Next Steps for Long-Term Performance

Routine maintenance can significantly reduce the likelihood of expensive repairs – by as much as 70%. Set up a maintenance schedule that includes monthly Wi-Fi checks, quarterly firmware updates, and semi-annual cleaning of sensors. Before the start of each heating or cooling season, test your system to ensure it responds properly to temperature changes.

Keeping a log of maintenance activities can help extend the life of your thermostat to 10–15 years or more, while also avoiding unexpected repair costs. Many smart thermostats come with apps that can track energy usage trends, which can alert you to potential efficiency problems before they escalate.

If DIY efforts aren’t enough, professional HVAC services can provide thorough diagnostics that go beyond what you can handle at home. Professionals can test terminal connections, identify hidden issues, and fine-tune your system for peak efficiency. A professional service call can make a big difference, especially when it comes to advanced tasks like recalibrating your thermostat or addressing wiring concerns.

Combining regular DIY maintenance with periodic professional inspections is the key to keeping your HVAC system running smoothly. Companies like Hydrodynamics Inc. offer comprehensive HVAC services to keep your heating and cooling systems in top condition year-round. Their certified technicians can handle complex tasks like recalibration, wiring corrections, and smart thermostat integration with your HVAC system. Scheduling an annual professional inspection ensures that your thermostat stays optimized for maximum performance and energy savings.

If persistent issues arise that you can’t resolve on your own, it’s time to call in the professionals to maintain the safety and efficiency of your system.

FAQs

Why is my smart thermostat’s screen still blank even after checking the circuit breaker and replacing the batteries?

If your smart thermostat’s screen stays blank even after checking the circuit breaker and replacing the batteries, there might be a few other factors at play. Start by ensuring the thermostat is firmly attached to its base and that all the wiring is secure. Loose or disconnected wires can easily disrupt the power supply.

Another potential issue could stem from your HVAC system’s power source. Take a look at the system’s fuse or transformer to confirm they’re working as they should. If these steps don’t solve the problem, it’s probably a good idea to bring in a professional for a thorough inspection. Companies like Hydrodynamics Inc. specialize in diagnosing and fixing HVAC systems, helping to get your thermostat and system back in working order.

How can I keep my smart thermostat reading temperatures accurately year-round?

To keep your smart thermostat delivering precise temperature readings year-round, start by choosing the right spot for installation. Stay clear of locations exposed to direct sunlight, drafts, or heat sources like ovens and radiators – these can throw off its readings. Placing it in a central area of your home usually ensures the most consistent performance.

Don’t overlook regular upkeep. Clean the sensors and vents every so often to keep dust and debris from affecting accuracy. Also, keep an eye out for software updates – manufacturers frequently release updates to enhance functionality and calibration. If you’re still facing issues, try recalibrating the thermostat according to the manufacturer’s guidelines, or reach out to a professional HVAC technician for expert help.

When should I contact a professional for smart thermostat problems, and what can they help with?

If your smart thermostat problems extend beyond basic fixes like restarting it or verifying the Wi-Fi connection, it’s time to reach out to a professional. Issues such as wiring troubles, repeated error codes, or a thermostat that refuses to connect with your HVAC system typically need expert attention.

Professionals can handle tasks like diagnosing and repairing intricate system failures, safely installing the thermostat, and ensuring it functions efficiently to save energy. They can also assist with routine maintenance to help prevent future problems and keep your HVAC system operating seamlessly.