Ultimate Guide to Multi-Zone HVAC Balancing
Balancing your multi-zone HVAC system ensures efficient performance, protects equipment, and eliminates temperature inconsistencies.
Key takeaways:
- Multi-zone systems allow independent temperature control across areas using multiple thermostats.
- Proper balancing prevents issues like frozen coils, overheated heat exchangers, and high energy bills.
- Tools like balancing hoods, anemometers, and manometers are essential for accurate airflow measurement.
- Following the 35% Rule: The smallest zone must handle at least 35% of total airflow to avoid static pressure problems.
- Balancing reduces energy use by up to 35%, extends equipment life, and improves indoor comfort.
If your system struggles with uneven airflow, high utility costs, or frequent cycling, professional balancing services can help. Start by checking for blockages, adjusting dampers, and ensuring proper system design. For long-term reliability, consider expert evaluation and maintenance.
Flow Hood: How to Properly Balance an HVAC System
sbb-itb-99db659
Tools and Equipment for Balancing
Balancing HVAC systems effectively depends on accurate measurement tools to ensure proper airflow and protect equipment from damage. Today, a wide range of instruments is available, from budget-friendly smartphone-compatible meters to advanced professional systems. Below are the key tools you’ll need for precise airflow measurement in multi-zone HVAC systems.
Balancing Hood
A capture hood, also known as a flow hood, is one of the most straightforward tools for measuring airflow at diffusers and grilles. Simply place the hood over the terminal, and it will display the airflow in cubic feet per minute (CFM).
For diffusers with uneven velocity patterns, applying manufacturer-specific K-factors ensures accurate readings. Entry-level models of capture hoods start at about $494, while professional-grade units can cost up to $3,510.
Anemometers and Manometers
Anemometers are used to measure air velocity at specific points. Rotating vane anemometers require multiple readings to calculate total CFM, whereas thermal anemometers provide high resolution for low-velocity variable air volume (VAV) applications, though they can be sensitive to environmental conditions.
Pressure measurement is equally important. Pitot tube manometers are commonly used to determine total and static pressure within ductwork. By subtracting static pressure from total pressure, you can calculate velocity pressure and determine air velocity using the formula V = 4005 × √VP. For larger rectangular ducts, at least 16 traverse points are needed to ensure accuracy. While this method is ideal for trunk ducts, it’s not suitable for low-velocity scenarios.
Additional Measurement Tools
Digital airflow meters combine several functions – measuring velocity, volume, temperature, pressure, and humidity – in one device. Accessories like the velocity matrix allow for area-averaged, multi-point measurements, making them indispensable for ensuring even airflow distribution across zones.
To confirm fan performance, use tachometers to measure fan RPM and compare it to the manufacturer’s specifications before making damper adjustments. Keep in mind that duct leakage in commercial buildings can reduce delivered airflow by 10%–25%.
How to Balance a Multi-Zone HVAC System
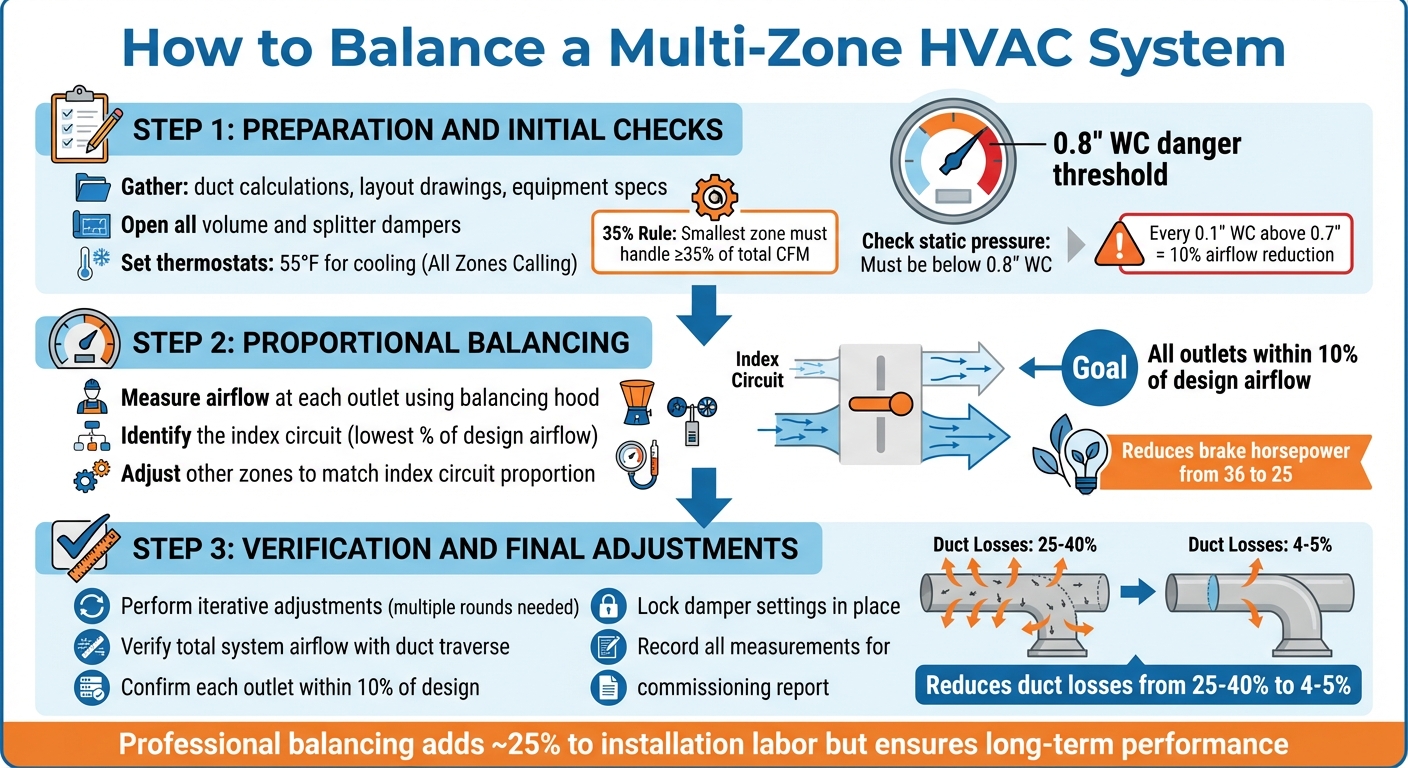
3-Step Multi-Zone HVAC Balancing Process with Key Measurements
Preparation and Initial Checks
Start by gathering key documents like duct calculations, layout drawings, equipment specifications, and control details. If your system is older and lacks documentation, sketch the duct layout, note nameplate data, and create a chart to track design airflow against actual measurements.
Before diving in, ensure all volume and splitter dampers are open, the blower is running at the correct speed, filters are clean, and all accessories are properly installed. For multi-zone systems, set all thermostats to create an “All Zones Calling” condition – typically 55°F for cooling or high heat for heating mode. This setup allows you to measure maximum airflow at each register. Take baseline static pressure readings to confirm your system is below the 0.8″ WC danger threshold, as exceeding this can significantly reduce airflow. For context, every 0.1″ WC increase above 0.7″ cuts airflow (CFM) by about 10%.
“Air balancing is a critical step in HVAC commissioning that often gets overlooked until problems arise.” – Jason Rende, HVAC Designer and Air Balancing Specialist
Keep in mind a crucial rule: with single-stage equipment, the smallest zone must handle at least 35% of the total system CFM to avoid excessive static pressure that could damage the equipment. Also, check that the bypass duct is installed at least 8 feet away from the supply and return plenums, and make sure its balancing damper is accessible for adjustments.
Proportional Balancing Method
Once the system is running at design speed with all dampers open, measure airflow at each outlet using a balancing hood or anemometer. Identify the index circuit, which is the zone receiving the lowest percentage of its design airflow. This zone serves as the benchmark for balancing the rest of the system.
Next, adjust the dampers in other zones to match the index circuit’s airflow proportion. Focus first on outlets delivering significantly more than their design airflow, as reducing their output naturally redirects air to underperforming zones. The aim is to bring all outlets within 10% of their design airflow values. By following this proportional balancing method, you minimize overall system pressure while ensuring all zones are adequately served. This approach can also reduce energy consumption, as seen in typical applications where brake horsepower drops from 36 to 25.
“The task of proportional balancing is the first step to achieving an energy efficient pumping system.” – Chad Edmondson, JMP Equipment Company
After completing proportional adjustments, proceed to verification and fine-tuning.
Verification and Final Adjustments
With the proportional balance established, iterative adjustments will help fine-tune the system. Air balancing is not a one-and-done process – every adjustment affects the entire system, so multiple rounds of measurement and tweaking are often necessary. Once proportional balance is achieved, verify total system airflow with a duct traverse or static pressure reading to ensure both airflow and pressure stay within design limits.
Check that each outlet remains within 10% of its design airflow, and secure all damper settings. Ensure the damper or valve in the most critical zone stays fully open to minimize system resistance. Finally, record all measurements for the commissioning report. Properly balanced airflow not only optimizes performance but also reduces energy losses. In fact, balancing and sealing ducts can lower heating and cooling losses from an average of 25%–40% to just 4%–5%.
Common HVAC Balancing Problems and Solutions
Blockages and Obstructions
A large number of airflow complaints in multi-zone HVAC systems can be traced back to physical blockages. For example, dirty air filters alone account for 20% of airflow issues, while closed vents contribute to 30% of uneven temperatures. A simple test for a clogged filter? Hold it up to a light source – if no light passes through, it’s time for a replacement. Also, walk through your home and ensure all vent dampers are open, with their levers aligned to the airflow direction.
Blockages aren’t always obvious. In attics and crawl spaces, you might find crimped flex-ducts, disconnected sections of ductwork, or ducts with excessive bends – all of which can choke airflow before it even reaches your rooms. Use a flashlight to inspect the ductwork and seal any cracks or gaps to avoid air loss. While the system is running, check for leaks at visible duct joints. Sealing these with duct mastic is a relatively low-cost fix, ranging from $5 to $30 for DIY materials, though professional repairs for extensive damage can cost $300–$800.
Another common culprit? Closed interior doors, which cause 15% of circulation issues. When doors to bedrooms or closets stay shut, conditioned air gets trapped and can’t return to the furnace, creating pressure imbalances. To fix this, keep doors open during peak heating or cooling seasons. Alternatively, you can install transfer grilles ($50–$150) or make door undercuts to ensure steady air circulation.
Once physical obstructions are resolved, fine-tune airflow by adjusting damper settings.
Incorrect Damper Settings
Improper adjustments to dampers often lead to hot and cold spots throughout a home. The key is to identify zones with excessive airflow and restrict them to balance the system. Start by pinpointing which areas receive too much air – these zones typically exceed their design specifications. Adjust their dampers first to redirect airflow to underperforming zones without over-restricting the system.
“Adjust branch dampers until all outlets are within 10% of design airflow values.” – Jason Rende, Air Balancing Specialist
In single-stage zoned systems, the bypass damper is essential for protecting your equipment. When only the smallest zone is calling for air, the bypass damper must relieve excess pressure to keep static pressure below the danger threshold of 0.8″ WC. If the bypass duct is undersized or its damper is misaligned, you risk frozen coils during cooling or overheated heat exchangers in heating mode. Once you’ve determined the correct damper positions, lock them in place to prevent future shifts.
However, even with perfect damper settings, underlying design flaws can still lead to balancing issues.
Design and Installation Problems
Some HVAC balancing problems are rooted in system design flaws that dampers alone can’t fix. For instance, having a thermostat on just one floor of a multi-story home causes about 35% of balancing issues, as it fails to account for temperature variations on other levels. Moving the thermostat to a central location can make a big difference, with professional relocation costing $100–$300.
Another common issue is excessively long duct runs, which lose pressure before air reaches distant rooms. An inline duct booster fan ($150–$300) can temporarily improve airflow in these cases, but it’s not a permanent fix. For more severe issues, like undersized main trunks or excessively long ductwork, a complete redesign may be necessary. This type of professional ductwork overhaul typically costs between $2,000 and $5,000.
Additionally, ensuring the smallest zone handles at least 35% of the total system CFM is critical in single-stage systems. Falling short of this threshold can lead to excessive static pressure and long-term equipment damage. Variable-speed systems offer a more efficient solution – they adjust capacity to match zone demands, often eliminating the need for bypass ducts altogether.
These solutions complement earlier proportional balancing techniques and help ensure a more reliable and efficient HVAC system.
Hydrodynamics Multi-Zone HVAC Balancing Services
Full-Service HVAC Solutions
Since 1994, Hydrodynamics has been a trusted name in Northeastern Pennsylvania, bringing more than three decades of expertise to multi-zone HVAC balancing. Their team of factory-trained technicians holds advanced certifications, such as EPA 609, A.S.S.E Backflow Testing, and Trac Pipe & Gas Tite. This ensures they’re equipped to handle everything from adjusting residential dampers to commissioning large-scale industrial systems.
“We have all your HVAC service needs covered throughout the year, ranging from repairs and replacements to maintenance and installations.”
– Hydrodynamics Inc.
Their services span a wide range of equipment, including central air conditioning, ductless mini-split systems, heat pumps, and specialized HVAC setups for residential, commercial, and industrial spaces. Customers consistently commend Hydrodynamics for their dependable service. This reputation for reliability is matched by their dedication to energy-efficient system solutions.
Energy-Efficient Systems
Hydrodynamics prioritizes eco-friendly practices to maximize resource efficiency. Their services go beyond basic temperature control, addressing combustion pollutants, conducting high-pressure leak tests, and installing variable-speed equipment that adapts to zone-specific demands. This often eliminates the need for bypass ducts.
By performing Manual J calculations for each zone rather than relying on a single whole-house estimate, they can apply diversity factors that cut peak loads by 7%. Their installations also include power dampers with Belimo actuators, which consume 25% less energy than traditional spring-return models. These thoughtful upgrades allow Hydrodynamics to deliver solutions tailored to each client’s unique energy and comfort requirements.
Custom Service Plans
Hydrodynamics designs service plans to meet the specific needs of residential, commercial, and industrial clients across Northeastern Pennsylvania. Industrial clients, in particular, benefit from the expertise of technicians trained to handle complex systems that are beyond the scope of general contractors.
“Our factory trained technicians are available to service all of your industrial needs.”
– Hydrodynamics Inc.
Their year-round maintenance ensures that multi-zone systems stay balanced through seasonal changes. Additionally, integrated services like water conditioning and grinder pump maintenance help optimize overall building performance by aligning HVAC systems with other critical infrastructure needs.
Conclusion
Key Takeaways
Balancing a multi-zone HVAC system is crucial for protecting your equipment and cutting down on energy costs. A key principle to remember is the 35% Rule: the smallest zone should manage at least 35% of the total system CFM. This helps avoid dangerous static pressure issues that can lead to frozen evaporator coils or overheated heat exchangers. For context, every 0.1″ WC increase above 0.7″ reduces airflow by 10%.
Using zone-specific Manual J calculations allows you to factor in diversity, which can reduce peak loads by about 7%. Additionally, variable-speed systems are excellent at adjusting capacity to meet demand, often making bypass ducts unnecessary. While professional commissioning may add approximately 25% to installation labor costs, it ensures your system is properly balanced for long-term performance and equipment protection. As Ben Reed, Principal at Teal Maker Consulting, puts it:
“Zoning isn’t just about adding dampers – it’s about creating a complete system that respects equipment limitations while delivering promised comfort.”
By applying these principles and techniques, you can achieve immediate and effective improvements in your HVAC system’s performance.
Next Steps
If you’re dealing with uneven temperatures, high energy costs, or frequent cycling of your HVAC system, it might be time for professional balancing. Hydrodynamics, with nearly 30 years of expertise, specializes in this area. Their comprehensive services include static pressure monitoring, bypass duct sizing calculations, and detailed Testing, Adjusting, and Balancing (TAB) reports to ensure proper airflow at every register. Contact Hydrodynamics today to schedule an evaluation and optimize your system for better performance, longer equipment life, and compliance with manufacturer specifications.
FAQs
Can I balance my zones without professional tools?
Balancing zones in an HVAC system without the right tools is a risky move. It involves precise tasks like adding dampers or figuring out bypass duct needs – things that demand specialized equipment and expertise. Trying to handle this on your own could result in pressure problems or even damage to your system. To ensure everything runs smoothly and efficiently, it’s best to rely on professional tools and know-how.
How do I know if my system’s static pressure is too high?
To see if your system’s static pressure is too high, use a manometer to measure it. Then, compare the reading to the system’s rated pressure, which is usually between 0.4 to 0.5 inches of water column (in. WC) for most residential systems. If the reading exceeds this range, it could point to problems like dirty filters, blocked ducts, or coil issues. These issues can cause weak airflow, noisy vents, and increased energy consumption.
Do I need a bypass duct with a zoned system?
Whether or not a bypass duct is necessary comes down to the design of your HVAC system. In older or more traditional setups, bypass ducts play a role in controlling static pressure and maintaining proper airflow. However, with advancements in technology, many modern zoning systems now rely on sophisticated dampers and controls, making bypass ducts less common. To figure out what’s right for your system, it’s best to consult an HVAC professional who understands your specific setup.