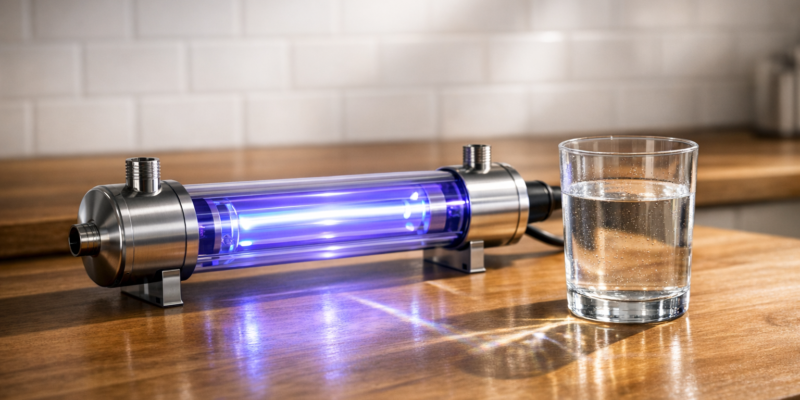
UV light water treatment
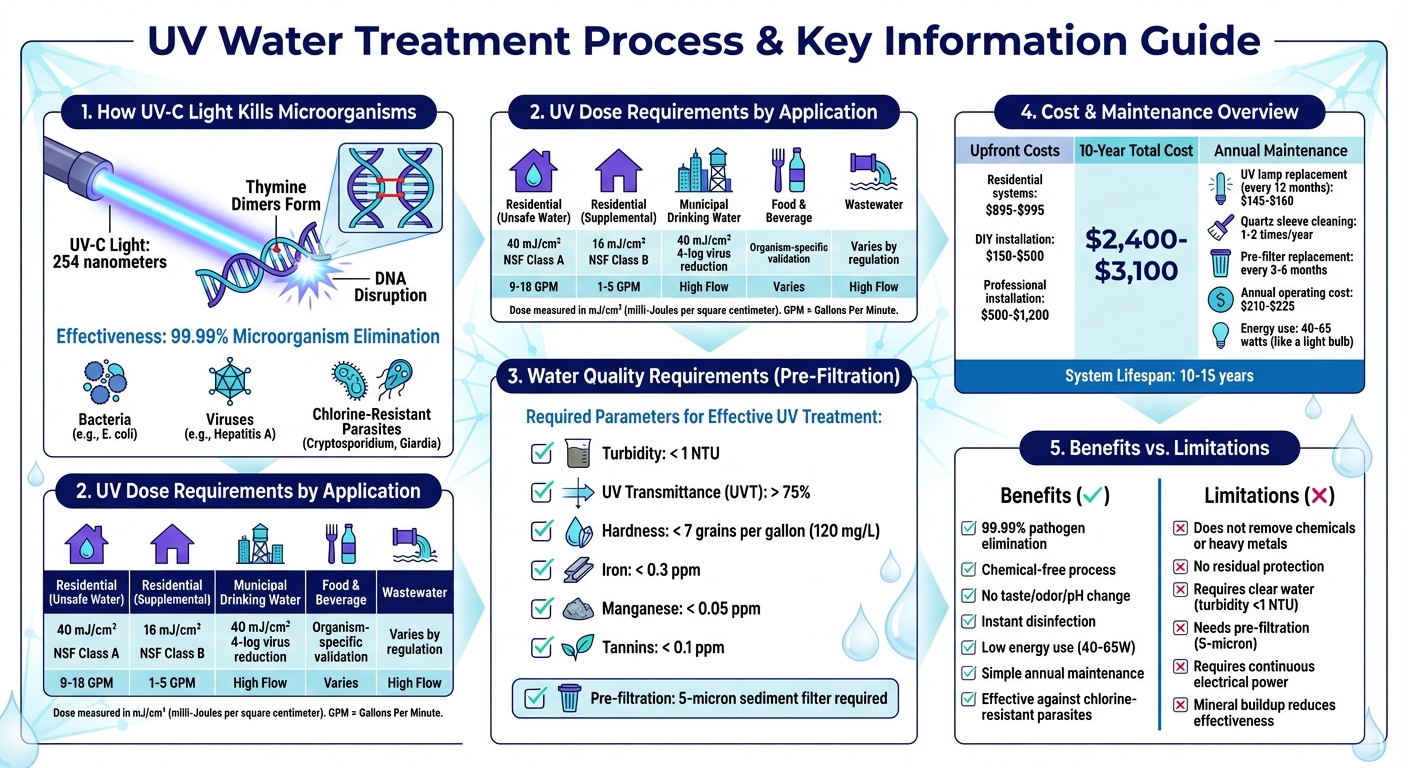
UV light water treatment is a chemical-free method to eliminate 99.99% of harmful microorganisms, including bacteria, viruses, and chlorine-resistant parasites like Cryptosporidium and Giardia. It uses UV-C light at 254 nanometers to disrupt microbial DNA, preventing reproduction and inactivating pathogens. This process is quick, effective, and does not alter water’s taste, odor, or pH.
Key Points:
- How It Works: UV-C light damages microbial DNA, rendering them inactive.
- Applications: Used in homes (well water), industries (food, beverage, aquaculture), and municipal systems.
- Benefits: No chemicals, no taste change, low energy use (40–65 watts), and simple maintenance.
- Limitations: Does not remove dissolved chemicals or metals, requires clear water (turbidity <1 NTU), and pre-filtration.
Cost Overview:
- Residential systems: $895–$995 upfront, $2,400–$3,100 over 10 years.
- Maintenance: Annual lamp replacement ($145–$160) and quartz sleeve cleaning.
Proper installation and maintenance, including pre-filtration and annual lamp replacement, ensure reliable performance for 10–15 years.
How UV Light Water Treatment Works: Complete Process and Requirements
What is UV Disinfection and How Does it Work?
sbb-itb-99db659
How UV Light Kills Microorganisms in Water
UV‑C light, operating within the 200 to 280-nanometer range, is most effective at around 265 nm for killing microorganisms. This wavelength is highly absorbed by the DNA and RNA of microorganisms as water passes through the UV chamber. The low-pressure mercury lamps commonly used in water treatment emit UV light at 253.7 nm, which is very close to this optimal range.
When UV‑C photons hit the genetic material of bacteria, viruses, or protozoa, they disrupt it by causing adjacent pyrimidine bases to bond together, creating dimers. In DNA, these are thymine dimers, while in RNA, they form uracil dimers. This bonding distorts the genetic strand, preventing replication enzymes from properly reading or copying the code. Without the ability to replicate, the microorganism becomes inactive and incapable of causing infection. Since this process doesn’t rely on metabolic pathways, UV treatment is also effective against antibiotic-resistant bacteria.
The dosage required to kill microorganisms varies. For a 90% kill rate, doses between 2,000 and 8,000 μJ/cm² are typically needed. In groundwater systems, achieving a 99.99% virus inactivation rate requires a minimum validated dose of 40 mJ/cm². Microorganisms are especially vulnerable to UV‑C because they haven’t evolved defenses against it – Earth’s ozone layer naturally blocks these wavelengths. This makes UV treatment particularly effective against chlorine-resistant parasites like Cryptosporidium, which needs at least 2,500 μW·s/cm² for a 90% reduction.
The success of UV disinfection also depends on water quality. Turbidity levels should stay below 1 NTU, as suspended particles can shield microorganisms from UV light. Pre-filtration to 5 microns or finer improves light penetration, ensuring thorough exposure. Additional information about system benefits and installation is covered in the next sections.
Benefits and Limitations of UV Water Treatment
Benefits of UV Water Treatment
UV water treatment relies on 254 nm light to disinfect water without using chemicals. This method effectively eliminates pathogens without affecting the water’s taste, odor, pH, or mineral content. The process is nearly instantaneous, occurring as water flows through the UV chamber. It’s particularly effective at neutralizing bacteria, viruses, and protozoa, achieving a 99.99% inactivation rate – even for chlorine-resistant organisms like Cryptosporidium and Giardia.
According to Aidan from Mid Atlantic Water:
UV disinfection is the fastest, most effective, and most affordable way to make well water microbiologically safe: no chemicals added, no taste change, and one straightforward maintenance step per year.
Maintenance is straightforward, involving an annual lamp replacement and occasional cleaning of the quartz sleeve. Energy usage is minimal, comparable to a standard 40–65 watt light bulb. Over 10 years, the total cost for residential systems is estimated at $2,400–$3,100, which includes the unit’s initial cost (around $895–$995) and replacement bulbs.
Limitations of UV Water Treatment
While UV treatment is highly effective against biological contaminants, it does not address dissolved chemicals or heavy metals. It also lacks residual disinfection, meaning treated water can be re-contaminated during storage or distribution. The system’s efficiency depends heavily on water clarity – cloudy water with suspended particles can shield microorganisms from UV light. To counter this, pre-filtration to 5 microns or finer is required, and water must meet specific quality standards (e.g., iron below 0.3 ppm, turbidity below 1 NTU, hardness under 7 grains per gallon, and UV transmittance above 75%).
Mineral buildup on the quartz sleeve can also block UV light, reducing effectiveness. Additionally, the system requires continuous electrical power, making it unusable during outages.
Benefits vs. Limitations Comparison Table
| Feature | Benefits | Limitations |
|---|---|---|
| Contaminant Target | Neutralizes 99.99% of bacteria, viruses, and protozoa | Ineffective against dissolved chemicals and heavy metals |
| Water Chemistry | Maintains taste, odor, and pH of water | Needs high clarity (UVT >75%, turbidity <1 NTU) |
| Chemical Usage | 100% chemical-free; no byproducts | Cannot remove dissolved chemicals |
| Operation | Provides instant disinfection | Lacks residual protection against re-contamination |
| Maintenance | Annual lamp replacement and occasional cleaning | Requires pre-filtration (5-micron) to ensure effectiveness |
| Energy & Power | Low energy use (similar to a 40–65 watt bulb) | Requires uninterrupted electrical power |
Next, we’ll explore the water quality standards necessary for optimal UV system performance.
Where UV Water Treatment is Used
UV water treatment systems play a crucial role across homes, businesses, and municipalities. With its proven ability to disinfect water effectively, these systems can be scaled to handle everything from a single faucet to large industrial operations. This adaptability allows UV treatment to meet the specific demands of residential, industrial, and municipal applications.
Residential Uses
In homes, UV systems are commonly installed to disinfect well water or to enhance the safety of municipal water. These systems can be configured as whole-house setups or as point-of-use (POU) systems, depending on water flow needs. Point-of-entry (POE) systems treat all water entering the home, while POU systems focus on individual faucets.
Private well owners often rely on UV systems to eliminate harmful microorganisms like E. coli, coliform bacteria, and parasites such as Cryptosporidium and Giardia. Even households connected to municipal water systems are turning to UV solutions, especially during boil-water advisories or to address chlorine-resistant pathogens. For instance, Texas issued over 3,000 boil-water notices in 2022 alone, prompting many homeowners to use UV systems as an added layer of protection.
Industrial Uses
Industrial and municipal facilities use UV treatment for a variety of purposes, including process water, wastewater, and drinking water disinfection. In the food and beverage industry, UV systems comply with FDA regulations (21 CFR Part 110/117) and ensure water is disinfected without adding chemicals that could alter product taste or safety. Similarly, aquaculture facilities use UV to protect fish from pathogens in recirculating water systems, avoiding chemical residues that could harm aquatic life.
Municipal water treatment plants also depend on UV technology to meet EPA standards, such as controlling Cryptosporidium in surface water supplies under the Long Term 2 Enhanced Surface Water Treatment Rule. These facilities typically use medium-pressure (MP) or low-pressure high-output (LPHO) UV lamps, which can handle much higher flow rates than residential systems.
UV Dose Requirements by Application
| Application | UV Dose Range | Flow Rate Example |
|---|---|---|
| Residential (Unsafe) | 40 mJ/cm² (NSF Class A) | 9–18 GPM |
| Residential (Supplement) | 16 mJ/cm² (NSF Class B) | 1–5 GPM |
| Municipal Drinking Water | 40 mJ/cm² (4-log virus) | High Flow (Validated) |
| Food & Beverage Process | Organism-specific validation | Varies by facility |
| Wastewater Disinfection | Varies by local regulation | High Flow |
NSF Class A systems, delivering a UV dose of 40 mJ/cm², are designed for water considered microbiologically unsafe. These systems often include features like sensors, alarms, and automatic shut-off mechanisms for added safety. On the other hand, Class B systems, which provide a UV dose of 16 mJ/cm², are intended for supplemental treatment of water already deemed safe.
Pre-Filtration and Water Quality Requirements
For UV disinfection to work properly, the UV rays must have a clear path to target microorganisms. Particles and minerals in the water can block or shield pathogens from the UV light, making pre-filtration a critical step for any UV system. Without proper filtration, these obstructions can significantly reduce the system’s effectiveness.
Suspended particles like sediment, grit, or rust can create shadows that block the UV dose needed to neutralize microorganisms. Minerals such as calcium and magnesium contribute to scaling, while iron and manganese can stain the quartz sleeve, reducing the UV light’s ability to penetrate the water effectively.
As ESP Water Products puts it:
If water is murky or contains ‘floaties,’ UV light cannot effectively reach microorganisms because the rays are blocked by these other particles.
To ensure the UV system operates efficiently, the water must meet specific quality standards before UV exposure. A key metric for assessing water clarity is UV Transmittance (UVT), which measures the percentage of UV light at 254 nanometers that can pass through 1 cm of water. For effective UV disinfection, UVT should be at least 75%, and turbidity (a measure of water cloudiness) should be below 1 NTU.
Here’s a quick look at recommended water quality limits to maintain UV system performance:
| Parameter | Recommended Limit for UV Effectiveness |
|---|---|
| Turbidity | < 1 NTU |
| UV Transmittance (UVT) | > 75% |
| Hardness | < 7 grains per gallon (120 mg/L) |
| Iron | < 0.3 ppm |
| Manganese | < 0.05 ppm |
| Tannins | < 0.1 ppm |
To achieve these standards, install a 5-micron sediment filter directly before the UV system. If the water hardness exceeds 7 grains per gallon, a water softener should also be used to prevent mineral buildup on the quartz sleeve. For private well owners, a complete water analysis is strongly recommended to check for iron, manganese, and tannins, as these contaminants can interfere with UV penetration. Always position UV systems as the final step in the treatment process, following sediment filters and water softeners, to ensure the water is as clear as possible.
How to Install a UV Water Treatment System
Installing a UV water treatment system is a project you can tackle yourself with the right tools and preparation. On average, the equipment costs between $150 and $500 if you’re doing it yourself, or $500 to $1,200 if you decide to hire a professional. Here’s a step-by-step guide to help you set up your system effectively.
Choose the Right Location
The UV chamber needs to be installed indoors to protect it from freezing temperatures and harsh weather. Place it on your main cold water line, after all pre-treatment equipment. As Aidan from Mid Atlantic Water emphasizes:
UV purification must always be the last step in your treatment chain.
Install the chamber vertically to prevent air pockets, which can reduce disinfection efficiency. Make sure there’s at least 24 inches of clearance above or below the unit for easy access when replacing the UV lamp and quartz sleeve during annual maintenance.
Gather the Necessary Materials
Before you start, ensure you have everything you need:
- UV unit (including the stainless steel chamber, UV lamp, quartz sleeve, and ballast)
- 5-micron sediment pre-filter
- Shutoff valves for both sides of the chamber
- Pipe fittings (usually 3/4-inch or 1-inch NPT)
- Thread seal tape
- Silicone lubricant for O-rings
- Mounting bracket
For the electrical connection, you’ll need access to a standard 120V GFCI-protected outlet. Ray P., a verified buyer, offers a key piece of advice:
When you’re installing the UV light, make sure you install copper lines to the light. PEX does not work.
Using copper pipes or fittings ensures a sturdy, leak-proof connection.
Step-by-Step Installation
- Turn Off the Water Supply: Shut off the main water line to avoid any mess during installation.
- Prepare the Mounting Area: If needed, mount a plywood board for added stability.
- Install the Pre-Filter: Attach the 5-micron sediment filter first, as it protects the UV chamber from debris.
- Mount the UV Chamber: Use threaded fittings and seal tape to secure the chamber. Insert the quartz sleeve carefully – never touch it with bare hands, as oils from your skin can create hot spots and damage the glass.
- Insert the UV Lamp: Place the lamp inside the quartz sleeve and connect it to the ballast.
- Set Up the Controller: Mount the controller horizontally above or beside the UV chamber. Create drip loops in the cords to stop water from traveling down to the outlet.
- Power Up and Test: Plug the controller into the GFCI outlet, turn the water back on, and open faucets to bleed air from the lines. Check for leaks at all connections before regular use.
Post-Installation Disinfection
Once the system is installed, disinfect your plumbing with bleach to eliminate any residual bacteria. This final step ensures your water is safe and ready for use immediately.
How to Maintain UV Water Treatment Systems
Once installed, keeping your UV water treatment system in top shape is straightforward but crucial. The key task? Replace the UV lamp every 12 months, even if it still emits visible light. By the end of a year, the UV-C output can drop to just 60–70% of its original strength, reducing its ability to neutralize bacteria and viruses effectively. Replacement lamps usually cost between $145 and $160, depending on the model.
Another important step is cleaning the quartz sleeve. Mineral deposits, iron, and manganese can accumulate on the sleeve over time, blocking the UV-C light. Dr. Elena Brooks, a Smart Hydration Specialist, highlights this as a common issue:
The number one reason a UV system underperforms is surprisingly simple: a dirty or damaged quartz sleeve around the lamp.
Make it a habit to clean the sleeve at least once a year when replacing the lamp. If you’re dealing with hard water or high iron levels, clean it every 3 to 6 months. Use a soft cloth and a cleaning solution like white vinegar, citric acid, or a commercial product such as CLR or Lime-A-Way. Always wear clean gloves during this process – skin oils can create hot spots that crack the glass. Plan to replace the sleeve every 2 to 3 years, as it may become permanently cloudy over time.
Don’t forget about the O-rings and seals. These should be replaced annually during the lamp change to prevent leaks caused by heat-related wear and tear. Additionally, change the 5-micron pre-filter every 3 to 6 months to stop sediment from building up on the sleeve or shielding microbes from the UV light.
To ensure consistent disinfection, run the system continuously rather than turning it on and off. Power cycling can reduce the lamp’s lifespan, so keeping it on 24/7 is optimal. Annual operating costs for a UV system typically range from $210 to $225. By following these maintenance steps, you can keep your system running efficiently and your water safe.
Conclusion
UV water treatment eliminates 99.99% of harmful microorganisms while preserving the water’s natural taste, odor, and pH balance. Whether you’re safeguarding your family from bacteria in well water or ensuring clean water for industrial processes, UV systems provide a dependable and environmentally friendly option. Plus, they operate with minimal energy – comparable to a 40-watt light bulb.
This method is particularly effective against chlorine-resistant parasites like Cryptosporidium and Giardia. From small residential systems to massive municipal facilities handling billions of gallons daily, UV treatment can meet a wide range of water safety demands.
To ensure optimal performance, proper installation and maintenance are key. Position the UV system as the final step in your water treatment process, following sediment and iron filtration. This helps maintain the required water quality, with iron levels below 0.3 ppm, hardness under 7 gpg, and turbidity less than 1 NTU.
Routine upkeep is straightforward. Replace the UV lamp annually and clean the quartz sleeve to keep the system running reliably for 10 to 15 years. Over a decade, the total cost of ownership averages between $2,400 and $3,000 – a reasonable price for consistent and eco-conscious water safety. By following these steps, your UV system can remain a dependable solution for clean, safe water.
FAQs
Do I need a UV system if I’m on city water?
Whether you need a UV system for city water largely depends on your specific circumstances. Municipal water is treated to meet safety standards, but aging infrastructure or rare contamination events can sometimes let microorganisms slip through. Adding a UV system can serve as an extra safeguard, effectively neutralizing harmful pathogens like E. coli and Giardia. It’s a practical way to boost your household’s water safety and enjoy greater peace of mind.
What filters should go before a UV light?
Pre-filters, such as sediment or particle filters, play a crucial role when used before a UV light system. They work by removing larger contaminants and organic matter from the water. This not only improves the efficiency of the UV system but also helps safeguard it, ultimately prolonging its lifespan.
What happens to UV treatment during a power outage?
During a power outage, UV water treatment systems lose their ability to disinfect water because they rely on electricity to function. Once the power comes back, the system will start working again. However, it’s crucial to properly restart and maintain the system to ensure it continues to work effectively.