Fixing HVAC Energy Loss: Common Solutions
When your HVAC system isn’t running efficiently, it can lead to higher energy bills, reduced comfort, and system wear. The good news? Most energy loss stems from a few common, fixable issues:
- Dirty air filters: Block airflow, increase energy use, and strain components.
- Leaky ductwork: Wastes 20–30% of conditioned air, raising costs.
- Dirty coils: Reduce heat transfer, forcing the system to work harder.
- Low refrigerant levels: Cause inefficiency and compressor strain.
- Thermostat issues: Lead to incorrect readings and wasted energy.
Simple fixes like replacing filters, sealing ducts, and cleaning coils can boost efficiency by 15–30%, saving hundreds annually. For persistent problems, professional services ensure long-term performance and savings. Regular maintenance is key to avoiding breakdowns and keeping your HVAC system running smoothly.
Where am I losing energy from my heating and cooling system? (Duct leakage)
sbb-itb-99db659
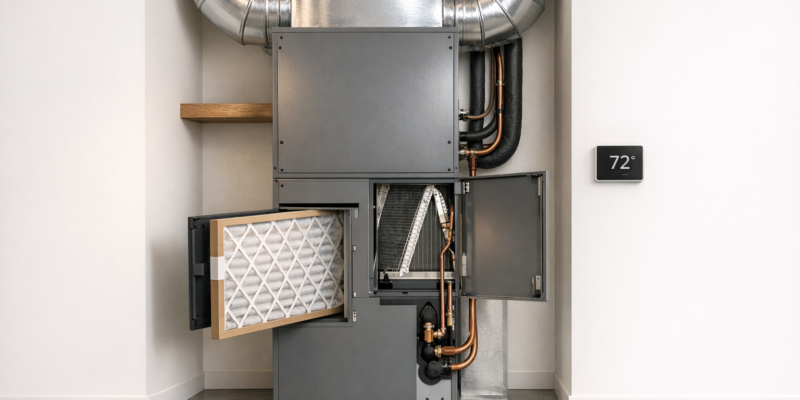
Dirty Air Filters and Restricted Airflow
A dirty air filter might seem like a minor issue, but it can have a big impact on your HVAC system’s performance and energy use. When filters get clogged with dust, your system has to work harder to push air through your home. This extra effort not only drives up energy bills – heating and cooling typically make up almost half of the average household’s $1,900 yearly energy costs – but also puts strain on key components like fans and heat exchangers. Over time, this can lead to costly repairs or even shorten the lifespan of your system. In fact, the leading causes of heating and cooling system failure are dirt and neglect.
“A dirty air filter will cause your heating and cooling system to work harder to distribute air throughout your home. This can increase energy costs and damage your equipment, leading to early failure.” – ENERGY STAR
Signs of Clogged Filters
How can you tell if your air filter needs attention? Look out for these warning signs:
- Higher energy bills without any significant changes in weather or usage.
- Weak or uneven airflow coming from your vents.
- Difficulty maintaining the temperature set on your thermostat.
- More dust building up around registers and grilles than usual.
These clues often point to a filter that’s overdue for cleaning or replacement.
How to Maintain Air Filters
Keeping your air filters in good shape is simpler than you might think. Here’s what to do:
- Check your filters monthly, especially during peak heating or cooling seasons, and replace them every three months – or sooner if they’re visibly dirty.
- When replacing a filter, make sure the arrow on the edge points toward the furnace or blower unit. This ensures proper airflow.
- For safety, always turn off your system at the thermostat or circuit breaker before working on it.
- If you notice gaps around the filter holder, seal them with duct tape to stop unfiltered air from slipping through.
A little regular maintenance can go a long way in keeping your HVAC system running efficiently and saving you money in the long run.
Leaky or Blocked Ductwork
After dealing with air filters, it’s time to look at your ductwork – another key factor in HVAC efficiency. Damaged or poorly sealed ducts can waste 20–30% of conditioned air, letting energy escape into unconditioned areas like attics, crawlspaces, or wall cavities. Shockingly, about 75% of buildings suffer from duct leakage, making it a frequent culprit behind energy loss.
Leaky ducts can cut your system’s efficiency by as much as 20%. For example, if your HVAC costs you $2,500 annually, fixing duct leaks could save you approximately $500 per year. Beyond the monetary impact, leaks force your HVAC system to work harder, which can wear out components faster and shorten its lifespan.
How to Identify Ductwork Problems
Catching duct issues early can help you avoid bigger headaches later. Uneven temperatures – those frustrating hot and cold spots around your home – are often a sign of air escaping through leaks or blockages. Weak airflow from vents or hissing and whistling sounds when the system runs are also telltale signs of escaping air.
Another clue? Excessive dust. If return ducts are leaking in areas like attics or crawlspaces, they can pull in dust, insulation particles, and allergens, spreading them throughout your home. You might also notice musty odors or chemical smells if leaks are drawing air from damp spaces or garages storing items like paint or pesticides. And if your utility bills suddenly spike without a clear reason, your ductwork might be the problem.
For a DIY check, try the smoke test. While your system is running, hold a lit incense stick or smoke pencil near duct joints. If the smoke wavers or gets drawn into a seam, you’ve likely found a leak. You can also visually inspect ducts in accessible areas like attics or crawlspaces for holes, disconnected sections, or crushed flexible ducts. Look for discoloration or loose drywall around air registers – these can signal air escaping behind walls.
Sealing and Insulating Ducts
Once you’ve identified duct problems, sealing and insulating them is essential for restoring efficiency. Start with sealing – insulation won’t help if the ducts are still leaking. Mastic sealant is highly recommended for this job. It’s a paint-on solution that provides a strong, flexible, and permanent seal, making it perfect for joints, curves, and connections.
“Mastic is the undisputed champion. It provides a superior, long-lasting seal that ensures you’re not just patching the problem, but solving it”.
For flat surfaces, foil HVAC tape with acrylic adhesive works well. But avoid using standard cloth-backed “duct tape” – despite its name, it doesn’t hold up under temperature changes and pressure. Before applying any sealant, clean the duct surface with a mild solution to ensure proper adhesion.
After sealing, add insulation to ducts in unconditioned spaces like attics or garages. Fiberglass duct wrap is a popular and budget-friendly option for retrofitting, but be sure to wear safety gear like gloves and a mask when handling it. According to the International Energy Conservation Code, ducts in unconditioned attics need at least R-8 insulation, while those in other unconditioned areas require R-6. DIY materials for this project typically cost between $55 and $170, while hiring professionals for duct sealing and insulation can range from $1,000 to $2,700, depending on the size of your system and how accessible the ducts are.
Fixing duct leaks pairs perfectly with other maintenance tasks, such as replacing air filters, to boost your HVAC system’s performance and energy efficiency.
Dirty Coils and Heat Transfer Problems
Your HVAC system’s coils – the indoor evaporator and outdoor condenser – play a key role in heat transfer. When these coils are covered in dust, pet hair, or grime, your system’s efficiency takes a hit. Even a thin 0.02-inch layer of dust can reduce heat transfer by 15% and airflow by 11%, which may lead to energy consumption spiking by over 30%.
Dirt acts like an insulating layer on the aluminum fins, blocking proper refrigerant heat exchange and limiting airflow. This can force the blower motor to work harder, and as heat transfer becomes less effective, your system has to run longer and more frequently to meet the thermostat setting. This extra strain impacts the compressor significantly. In fact, for every 10% drop in airflow caused by dirt, your system’s efficiency can decline by 6% to 8%. Over time, this wear and tear could shave 3 to 5 years off your HVAC system’s lifespan. Knowing these risks highlights the importance of regular maintenance to keep your system running smoothly.
Signs of Dirty Coils
Dirty coils, like clogged filters or leaky ducts, can severely limit your HVAC system’s energy efficiency. There are several warning signs to watch for. If the air from your vents feels weak or warmer than usual, it might be time to check the coils. Ice forming on the refrigerant lines or the evaporator coil is another indicator. This happens when a dirty coil fails to absorb enough heat, causing refrigerant temperatures to drop too low and condensation to freeze.
You might also notice musty or “dirty sock” odors coming from your ductwork. This smell often points to mold or biofilm growth on the coils, which can lead to microbial counts up to 300 times higher than those found in clean systems. Additionally, rising energy bills can signal trouble. A 10% efficiency loss could add $100 to $150 annually to your energy costs, while a 25% loss might increase expenses by $250 to $400. If your home feels humid even with the AC running, dirty coils are likely behind the problem.
Cleaning and Maintaining Coils
Keeping your coils clean is critical for maintaining efficiency and avoiding expensive repairs. Aim to clean them once a year. However, if you have pets, smokers in the house, or live in a humid coastal area, you may need to clean them every 4 to 6 months. For light maintenance, you can use a no-rinse foaming coil cleaner and a soft brush vacuum attachment. Just remember to turn off the system before starting. For a deeper clean, schedule professional servicing every two years to recover up to 95% of lost heat transfer capacity.
“If your coil can’t breathe, your AC can’t perform – and your wallet will feel it.” – Samantha Reyes, Smart Comfort Specialist
Professional coil cleaning typically costs between $150 and $250 for surface cleaning, or $300 to $450 for a deep chemical clean. While this may seem like an investment, it’s far less expensive than replacing a damaged coil, which can cost $800 to $1,500, or a failed compressor, which ranges from $1,200 to $2,000. Additionally, flushing the condensate drain with vinegar and warm water can help prevent clogs. Combining regular coil cleaning with filter replacement ensures your HVAC system operates efficiently and keeps repair costs at bay.
Low Refrigerant Levels and Compressor Strain
When refrigerant levels drop due to a leak, your HVAC system has to work overtime to maintain cooling, which can increase energy consumption by as much as 30%. This strain doesn’t just affect efficiency – it puts extra pressure on the compressor, the most expensive part of the system. Low refrigerant also disrupts the balance of indoor humidity, leaving your home feeling damp and uncomfortable. Ideally, humidity levels should stay between 30% and 50%.
Refrigerant leaks don’t resolve themselves. Because the refrigerant remains pressurized, it will continue to escape whether the system is running or not, eventually depleting entirely. Common causes include corrosion in the evaporator coil, loose connections, or worn seals. Like clogged filters or leaky ducts, refrigerant leaks interfere with system performance and drive up energy costs. Catching these issues early can help you avoid expensive compressor repairs.
Detecting Refrigerant Issues
Refrigerant problems often show up in noticeable ways. If your vents are blowing warm or room-temperature air, it could be a sign of low refrigerant. Unusual sounds like hissing or whistling may indicate gas leaking under pressure, while bubbling noises suggest liquid refrigerant escaping. Ice forming on the evaporator coils is another red flag – low refrigerant causes moisture in the air to freeze on the coils. Short cycling, where the system frequently turns on and off without reaching the desired temperature, is another symptom. Additionally, an unexplained increase in your energy bill might point to a refrigerant issue.
It’s also important to consider health risks. Leaking refrigerant can lead to symptoms like headaches, dizziness, nausea, and respiratory irritation. In severe cases, exposure might cause seizures or even loss of consciousness.
Recharging Refrigerant and Repairing Leaks
If you suspect a refrigerant leak, turn off your thermostat and circuit breaker right away. This helps prevent further damage to the compressor and reduces the risk of exposure to harmful chemicals. Avoid trying to refill the refrigerant yourself – this is a job for licensed HVAC professionals. They can identify the source of the problem, whether it’s a crack in the lines, corrosion in the evaporator coil, or a worn seal, and then repair or replace the faulty components. Afterward, they’ll recharge the system according to the manufacturer’s guidelines.
Routine maintenance can help prevent refrigerant leaks, just as it does for filter and coil issues. Repairing a refrigerant leak typically costs between $250 and $1,600, while replacing an entire AC unit due to extensive damage can cost anywhere from $3,900 to $8,000. After repairs, keep an eye on your system for recurring issues like higher energy bills or strange noises. Scheduling annual professional maintenance is a smart way to monitor refrigerant levels and spot early signs of wear on critical components like coils.
Thermostat and Control Issues
Once you’ve tackled filters, ductwork, and coils, paying attention to your thermostat setup is the next step to keep your HVAC system running efficiently.
The thermostat is essentially the command center for your HVAC system. If it’s not calibrated or set up correctly, it can lead to wasted energy and higher utility bills. For example, a thermostat reading 72°F when the actual temperature is 75°F may shut the system off too early. This premature shutdown forces the system to restart sooner than necessary, wasting energy and potentially making your home uncomfortable. This issue, known as short cycling, not only increases energy use but also puts extra strain on your system’s components.
Where you place your thermostat matters just as much as how it’s set up. Installing it near heat sources like lamps, ovens, or direct sunlight can result in inaccurate temperature readings. Similarly, placing it near drafty windows or vents can cause false readings, leading to unnecessary shutdowns or longer operating times. Older programmable thermostats can also lose accuracy over time as their sensors drift out of calibration.
Common Thermostat Problems
One of the most noticeable signs of an issue is incorrect temperature readings. To test this, place a reliable thermometer next to your thermostat and wait about 15 minutes. If the readings differ by more than 2°F, your thermostat likely needs recalibration. Dust buildup on internal sensors can also affect accuracy. To fix this, carefully remove the thermostat cover and use compressed air or a soft brush to clean away dust and debris.
Unresponsive controls are another frequent problem. If your thermostat isn’t responding, check the batteries and replace them if necessary – doing this annually is a good habit. Inspect the wiring for any loose connections or signs of corrosion. Also, make sure the thermostat is set to the correct mode. For example, having it on “heat” during summer or “cool” during winter can cause it to malfunction.
How to Optimize Thermostat Settings
For the best performance, install your thermostat on an interior wall, ideally 52–60 inches above the floor. Avoid placing it near windows, doors, or heat sources to ensure it measures the average temperature of your living space instead of localized hot or cold spots.
Programming your thermostat to match your daily schedule is another way to improve efficiency. Set lower or higher temperatures (depending on the season) during times when no one is home, and use the recovery feature to have your home at the desired temperature by the time you return. Avoid constantly overriding the programmed settings, as this can make the system run longer at high-energy levels than necessary.
Remember, most residential air conditioners are designed to maintain a 20°F difference between indoor and outdoor temperatures. Cranking the thermostat lower during a heatwave won’t cool your home faster; it will just push the system to work at full capacity for extended periods. Upgrading to a modern digital or smart thermostat can help reduce HVAC runtime by up to 15%, offering both convenience and energy savings.
Preventative Maintenance for Energy Efficiency
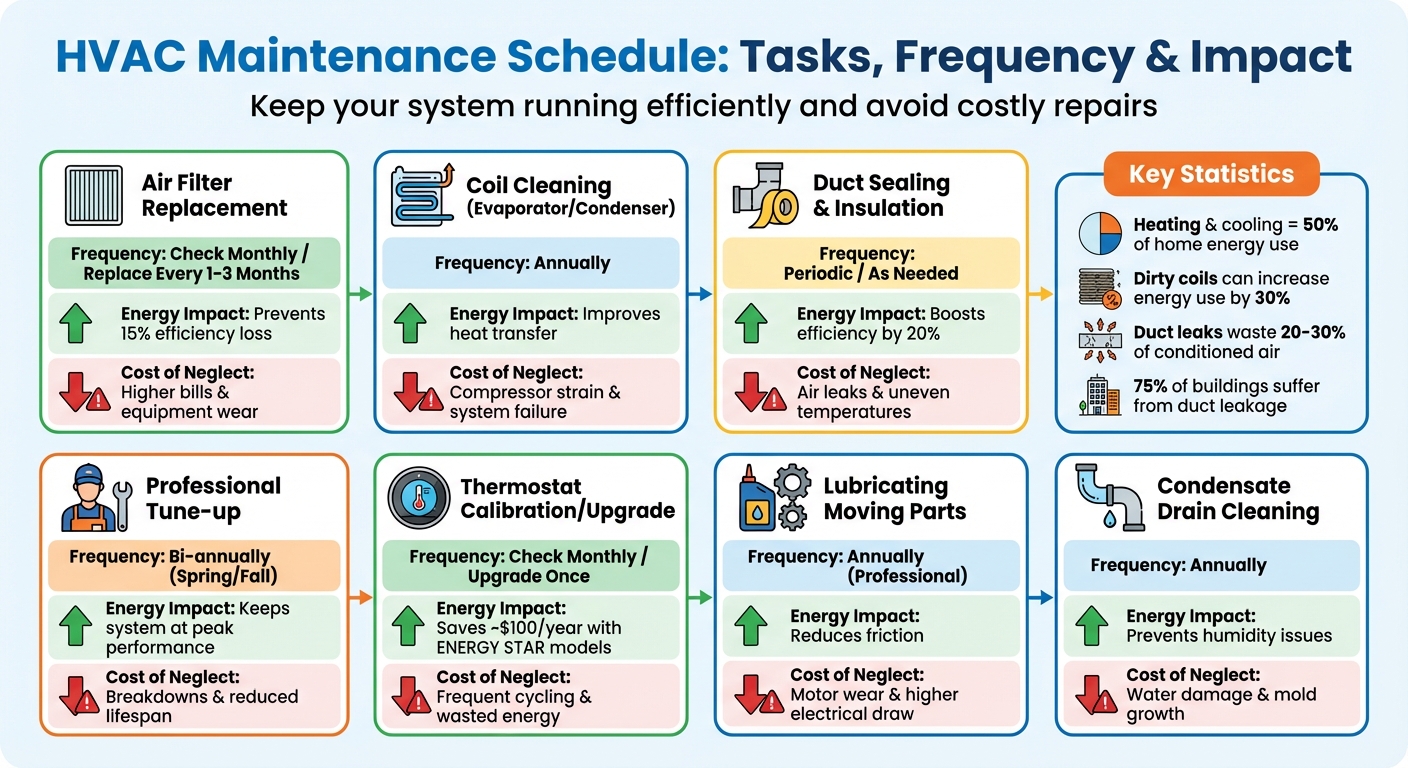
HVAC Maintenance Schedule and Energy Efficiency Impact Guide
Once you’ve tackled thermostats, filters, ductwork, and coils, the next step is sticking to consistent maintenance. Why? Because heating and cooling make up nearly 50% of a typical home’s energy use, which means they play a huge role in your annual energy costs. Skipping regular upkeep can quickly cause those costs to climb.
A good maintenance routine combines simple monthly tasks with professional check-ups twice a year. For example, checking air filters every 30 days and replacing them when dirty can prevent up to a 15% efficiency drop caused by restricted airflow. Scheduling a professional tune-up in the spring for cooling systems and in the fall for heating systems ensures your equipment is ready when you need it most. Plus, contractors are often more available during these off-peak times, making it easier to book an appointment. A well-planned schedule can help you avoid unnecessary energy losses.
Maintenance Schedule Overview
Not all tasks need to be done with the same frequency, but each one plays a direct role in keeping your system efficient. Here’s a quick breakdown of recommended tasks and why they matter:
| Maintenance Task | Frequency | Energy Efficiency Impact | Potential Cost of Neglect |
|---|---|---|---|
| Air Filter Replacement | Monthly (Check) / 1–3 Months (Change) | Prevents 15% loss | Higher costs & equipment wear |
| Coil Cleaning (Evaporator/Condenser) | Annually | Improves heat transfer | Compressor strain; system failure |
| Duct Sealing & Insulation | Periodic / As Needed | Boosts efficiency by 20% | Air leaks; uneven temperatures |
| Professional Tune-up | Bi-annually (Spring/Fall) | Keeps system at peak performance | Breakdowns; reduced lifespan |
| Thermostat Calibration/Upgrade | Monthly (Check) / Once (Upgrade) | Saves ~$100/year with ENERGY STAR models | Frequent cycling; wasted energy |
| Lubricating Moving Parts | Annually (Professional) | Reduces friction | Motor wear; higher electrical draw |
| Condensate Drain Cleaning | Annually | Prevents humidity issues | Water damage; mold growth |
Benefits of Regular Maintenance
Regular maintenance goes beyond quick fixes like cleaning coils or sealing ducts – it strengthens your system’s overall performance. It saves energy, extends the lifespan of your equipment, reduces emergency repair needs, and keeps your home comfortable year-round. For instance, even a thin layer of dust (just 0.042 inches) on an evaporator coil can reduce heat transfer efficiency by up to 21%. That’s a big drop for skipping a simple annual cleaning.
Sealing ductwork can recover 20% to 30% of the air typically lost through leaks. Upgrading to an ENERGY STAR-certified smart thermostat can save you about $100 per year, and replacing outdated equipment might cut your annual bills by nearly $140. Keeping detailed maintenance records is also smart – it helps you spot recurring problems early and ensures your manufacturer warranties remain valid.
Professional Solutions from Hydrodynamics
Some energy efficiency issues call for professional know-how. Since 1994, Hydrodynamics has been a trusted provider in Northeastern Pennsylvania, offering services like duct sealing, coil cleaning, refrigerant management, and energy-efficient installations. Their factory-trained technicians stay up-to-date with the latest HVAC advancements, ensuring systems operate at peak efficiency. This expertise complements DIY efforts, helping maintain long-term energy savings.
These professional services go beyond basic fixes, addressing energy loss with a thorough approach. For instance, Hydrodynamics’ EPA 609 Certified Technicians handle refrigerant management and conduct high-pressure leak tests to ensure both safety and optimal performance. According to the U.S. Department of Energy, properly sealed ducts can significantly reduce energy waste and may even qualify for Federal Tax Credits of up to $1,200.
Hydrodynamics also installs energy-efficient systems, including heat pumps, geothermal units, ductless mini-splits, and high-velocity air handlers. They provide tailored maintenance plans aimed at cutting energy waste and extending equipment lifespan – without pushing unnecessary upgrades. Emma K. from Drums, PA shared her experience:
“They were prompt and knowledgeable and efficient. Very pleased with their work.”
Hydrodynamics echoes this commitment to customer focus:
“Customer satisfaction is always our number one goal.” – Hydrodynamics Inc.
Whether you’re maintaining an older HVAC system or investing in new equipment, Hydrodynamics offers solutions for residential, commercial, and industrial clients. With over 30 years of local experience, they bring a deep understanding of energy-efficient problem-solving to every project.
Conclusion
Tackling HVAC energy loss means addressing the root causes that undermine your system’s efficiency. By combining straightforward DIY measures with professional solutions, you can help your system regain its optimal performance. Ignoring these issues can lead to higher energy bills and unnecessary strain on components, which accelerates wear and tear.
The financial consequences are no small matter. Energy and air losses not only increase costs but can also reduce your HVAC system’s typical lifespan of 10–15 years. Simple tasks like replacing filters monthly and setting your thermostat correctly can make a noticeable difference. This mix of regular upkeep and professional care ensures your system remains efficient and your expenses stay manageable.
That said, some issues – such as refrigerant leaks, duct sealing, or coil cleaning – require the expertise of trained professionals. Partnering with experienced service providers, like Hydrodynamics, can deliver the repairs and upgrades needed for long-term efficiency and savings.
Whether you’re trying to extend the life of an aging system or prevent future breakdowns, the key lies in balancing proactive DIY efforts with regular professional maintenance. This approach not only safeguards your investment but also keeps your home comfortable and your energy costs in check year-round.
FAQs
What HVAC fix saves the most energy first?
Sealing and insulating your ductwork is a smart way to cut down on energy waste. By minimizing air leaks, it boosts the efficiency of your HVAC system and ensures that conditioned air gets where it’s supposed to go. This straightforward upgrade can make a noticeable difference in your system’s performance and help trim your energy bills.
How do I know if my ducts are leaking?
You can spot duct leaks by looking for visible cracks, holes, or disconnected sections in your ductwork. Other clues include uneven heating or cooling, higher-than-usual energy bills, or rooms that are hard to keep at a comfortable temperature. Pay attention to inconsistent airflow throughout your home – this can also signal potential leaks. Regular inspections can help catch these problems early.
When should I call Hydrodynamics for HVAC help?
If your HVAC system isn’t running as it should, routine troubleshooting isn’t solving the problem, or you’re looking for expert maintenance or ways to improve energy efficiency, call Hydrodynamics for help. They can assist with tasks like sealing ducts, cleaning coils, or upgrading your system to enhance performance. Tackling energy loss issues early or scheduling regular maintenance can also help you avoid expensive repairs and keep your system running smoothly.