Ultimate Guide to VFD Pump Control Systems

Ultimate Guide to VFD Pump Control Systems

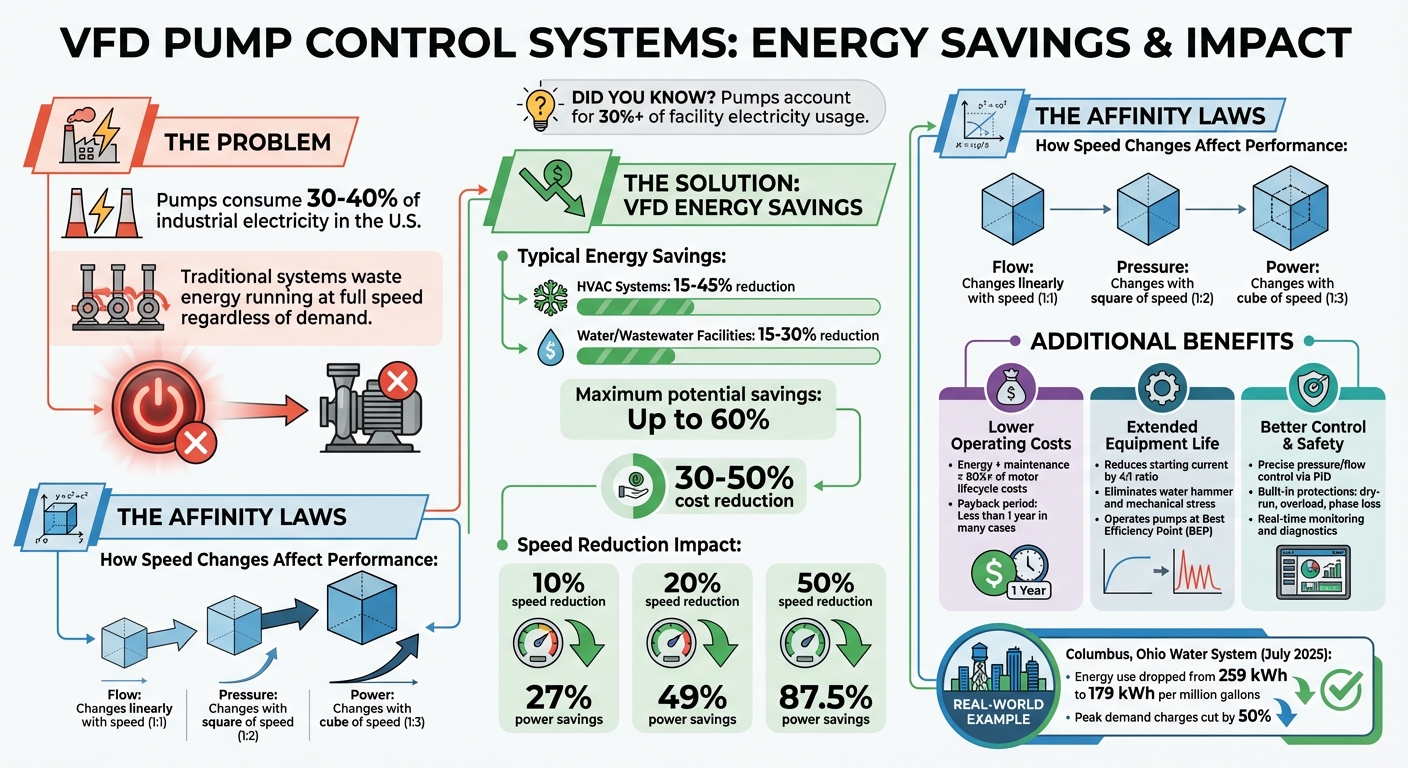
Did you know? Pumps consume over 30% of the electricity in U.S. industries, yet much of this energy is wasted when pumps run at full speed, regardless of demand. Variable Frequency Drives (VFDs) are a game-changer, reducing energy costs by 30-50% by adjusting motor speeds to match real-time needs.

Key Takeaways:

  • What is a VFD? A device that controls motor speed by altering power frequency and voltage, offering precise flow and pressure control.
  • Why it matters: VFDs save energy, reduce wear on equipment, and minimize maintenance costs by avoiding mechanical stress and pressure surges.
  • Applications: HVAC, water systems, irrigation, and industrial processes like chemical dosing and wastewater management.
  • Energy savings: A 10% speed reduction can cut power use by 27%, with potential savings of up to 60%.
  • How it works: Sensors and PID controllers ensure pumps operate efficiently and safely, adjusting speed based on demand.
  • Benefits: Lower energy bills, extended equipment life, and improved system reliability.

By using VFDs, facilities can significantly cut operating costs and improve the longevity of pump systems. Keep reading to learn how they work, where they’re used, and how to choose the right one for your needs.

VFD Energy Savings and Efficiency Statistics for Pump Systems

VFD Energy Savings and Efficiency Statistics for Pump Systems

How Variable Frequency Drives Work in HVAC Systems

How VFD Pump Control Systems Work

Understanding how a Variable Frequency Drive (VFD) operates in pump systems is crucial for optimizing installation, maintenance, and troubleshooting. At its core, a VFD transforms standard AC utility power into a variable-frequency, variable-voltage output, allowing precise control over motor speed. This process unfolds in several stages, with each component playing a specific role. Let’s break it down further.

Main Components of a VFD System

A VFD system includes four primary components that work together seamlessly:

  • Rectifier: Converts the incoming constant-frequency AC power into direct current (DC) power.
  • DC Bus: Filters and smooths the DC power before it moves to the next stage.
  • Inverter: Takes the DC power and converts it back into variable-frequency AC using pulse-width modulation (PWM).
  • Control System: Oversees the entire operation, processing inputs from manual controls (like keypads or dials) and automatic feedback from sensors.
Component Primary Role
Rectifier Converts AC to DC
DC Bus Filters and smooths the DC voltage
Inverter Converts DC to variable-frequency AC using PWM
Control System Processes sensor feedback and regulates output logic

These components form the backbone of a VFD, but the integration of sensor feedback takes its performance to another level.

How Sensors Enable VFD Control

Sensors play a pivotal role by continuously monitoring variables like pressure, flow, and liquid levels. This real-time feedback is processed by an integrated PID (Proportional-Integral-Derivative) controller, which adjusts the pump speed to match system demands. For instance, in a building’s water distribution system, a pressure sensor measures pressure at key points. If demand drops – say, during nighttime hours – the sensor signals the VFD to slow the pump, ensuring consistent pressure without wasting energy.

Jason Vrboncic from WVCC Inc. highlights the importance of this integration:

“VFDs are best used when paired with control systems and operate best when based on a target flow rate measured by a flow sensor.”

Beyond efficiency, sensors also enhance safety by detecting potentially damaging conditions like dry-running. In such cases, the VFD can automatically shut down the pump, protecting equipment and eliminating the need for traditional mechanical throttling valves.

Understanding the Affinity Laws

The Affinity Laws provide the foundation for understanding how VFDs achieve energy savings. These laws explain how changes in motor speed affect centrifugal pump performance – specifically flow, pressure (or head), and power consumption . Here’s a quick summary:

  • Flow changes linearly with speed.
  • Pressure changes with the square of the speed.
  • Power consumption changes with the cube of the speed.

For example, reducing motor speed by 20% results in a 20% decrease in flow, a 36% reduction in pressure, and a 49% drop in power consumption. Tom Neuberger, Product Manager at Eaton, explains:

“The affinity laws can determine the system performance for centrifugal devices, defining both theoretical load requirements and possible energy savings.”

Affinity Law Relationship Mathematical Formula
Flow vs. Speed Q₁ / Q₂ = N₁ / N₂ (linear relationship)
Pressure vs. Speed H₁ / H₂ = (N₁ / N₂)² (square relationship)
Power vs. Speed P₁ / P₂ = (N₁ / N₂)³ (cubic relationship)

This cubic relationship is why VFDs are so effective at reducing energy consumption. For example, cutting motor speed by 50% can slash power demand to just 12.5% of full capacity, resulting in an impressive 87.5% energy savings . These principles make VFDs particularly useful for applications with variable torque loads, such as HVAC systems, water distribution, and centrifugal pumps.

Benefits of Using VFDs in Pump Systems

VFDs (Variable Frequency Drives) offer more than just motor speed adjustments – they bring advantages in energy efficiency, equipment durability, and system control.

Energy Savings and Lower Operating Costs

One of the standout benefits of VFDs is their ability to drastically cut energy consumption. Pumps powered by motors account for 30–40% of industrial motor electricity use. Traditional systems run motors at full speed, wasting energy by restricting flow mechanically. VFDs address this inefficiency, reducing energy costs by as much as 60% in some cases. Typical savings range from 15% to 45% in HVACR systems and 15% to 30% in water and wastewater facilities.

Alex Harvey, Director of AC and DC Drives at Control Techniques – Americas, highlights this:

“In centrifugal pump applications with low head pressures, VFD controllers will typically save more than 50 percent of the energy used.”

Even small adjustments make a big difference – a 10% speed reduction can lower power usage by approximately 27%, with larger reductions leading to even greater savings.

Another benefit is the elimination of power spikes during motor startup. Traditional starting methods can draw up to 600% of the rated current, but VFDs use soft starts to gradually increase voltage and frequency, reducing the starting current by a 4:1 ratio. Since energy and maintenance make up over 80% of a motor’s life cycle costs, these savings directly impact operating expenses.

Longer Equipment Life

VFDs not only save energy but also extend the lifespan of equipment by reducing mechanical stress. Traditional motor starts create high inrush currents and shock loads, which can damage pumps, motors, and piping. VFDs, on the other hand, use S-ramp functions for smooth acceleration and deceleration, preventing mechanical shock and avoiding issues like water hammer – pressure surges caused by abrupt flow changes.

Operating pumps at their Best Efficiency Point (BEP) further reduces vibration, which is a major cause of wear. Alex Harvey explains:

“Variable speed control operates the pump at its BEP to greatly reduce vibration when compared to other process control methods. This reduction in vibration significantly extends the life of the pump seals.”

Additional features like skip frequencies help avoid speeds that trigger natural resonances, while sleep mode halts the pump during low-flow conditions to minimize wear. For pumps already spinning from backpressure, the flying start feature allows VFDs to safely regain control without stressing the impellers.

Better System Control and Safety

VFDs also enhance precision and safety, thanks to integrated control features. Closed-loop control systems can directly connect sensors for pressure, flow, or temperature to the drive’s PID controller. This setup allows the motor to adjust speed automatically, maintaining exact setpoints even when demand fluctuates. Such precision is critical for applications like chemical dosing, filtration, and water supply in high-rise buildings.

Torben Poulsen, Business Development Manager at ABB, underscores this benefit:

“Process control is about getting what is needed at any point in time. The user might need a certain pressure independent of the flow… Using a VFD and the right sensors makes it possible for the user to control the process in the way they want.”

Modern VFDs also come equipped with safety features that protect both equipment and operators. They monitor electrical and thermal conditions, detecting issues like short circuits, phase loss, ground faults, overloads, and voltage irregularities. Dry-run protection shuts down the pump when no fluid is detected, safeguarding seals and motors from damage. Advanced drives can even ride through temporary power losses, ensuring uninterrupted operation. Additionally, integrated communication protocols like Modbus and Ethernet, along with HMI panels, provide real-time data on energy use and performance, allowing for proactive maintenance.

How to Select the Right VFD

Once you understand how Variable Frequency Drives (VFDs) work and their advantages, the next step is choosing the right one for your application. This decision goes beyond just horsepower ratings – it requires careful consideration of motor specs, operating conditions, and the specific demands of your pump system.

Matching VFDs to Pump and Motor Specifications

To start, ensure the VFD’s output current and voltage align with your motor’s Full Load Amperage (FLA) and nameplate details. For demanding applications like deep well pumps, it’s smart to add a 10–20% safety margin to the motor’s FLA for additional reliability.

The type of pump you’re using also affects the VFD requirements. Centrifugal pumps, which are variable torque loads, typically need VFDs rated for 110–120% overload for up to 60 seconds. On the other hand, positive displacement pumps require constant torque and higher starting power, meaning you’ll need a VFD that can handle 150% overload. If your motor operates on a 480V system, confirm that it’s “inverter-duty” rated, meeting NEMA MG1 Part 31 standards, to handle voltage spikes effectively.

Another factor to consider is cable length. When the distance between the VFD and motor exceeds 200 feet – common in well pump setups – you should use output filters like load reactors or sine wave filters. These prevent reflected wave issues that can damage motor insulation.

Environmental and Operating Conditions

The environment where the VFD operates can significantly impact its performance and lifespan. Most drives are designed for ambient temperatures up to 40°C or 50°C. If temperatures exceed these levels, derating the VFD by around 1% per degree Celsius is necessary. Raj L. Narayanan, Product Manager at Eaton, highlights the importance of environmental factors:

“As with many electronic devices, environmental conditions can be a key factor in life span and reliability; temperature, humidity, shock and vibration, sun load, air cleanliness and quality are all factors that can affect the expected life span of VFDs.”

Choosing the right enclosure is also critical. For clean, indoor environments, an IP20 enclosure works well. For areas with light dust or humidity, opt for IP54/IP55-rated enclosures. Outdoor or harsh environments, such as those exposed to water or corrosive chemicals, require IP66/IP68 or NEMA 4X-rated enclosures.

In especially corrosive environments, like wastewater treatment plants or chemical facilities, adding a conformal coating to the VFD’s circuit boards can protect against harmful airborne chemicals like hydrogen sulfide or chlorine. If the VFD is installed outdoors, consider solar heat gain. White enclosures absorb less heat (with a heat gain coefficient of about 0.15) compared to black ones (0.97). Using sun shields or orienting the enclosure to reduce direct sunlight can also help.

Load and Performance Requirements

Understanding your pump’s performance needs is crucial for selecting the right VFD. For basic speed control in centrifugal pumps, the traditional V/Hz (Volts per Hertz) mode is usually sufficient and straightforward to set up. However, if you need precise control over flow or pressure – or if high starting torque is required in deep well systems – sensorless vector control can provide better low-speed torque and speed accuracy.

Sizing the VFD correctly is another key step. Oversizing wastes energy and efficiency, while undersizing can lead to overheating or early equipment failure. Even minor speed adjustments can noticeably reduce power consumption, making proper sizing essential for both performance and energy savings.

Finally, don’t overlook pump-specific protection features. For instance, dry-run protection is critical for well pumps to avoid motor damage when water levels drop. Similarly, sleep/wake logic in booster systems can save energy by shutting down the pump during periods of low demand.

Installation and Maintenance Guidelines

Ensuring proper setup and upkeep of a VFD (Variable Frequency Drive) is key to keeping it running efficiently.

Proper Installation Procedures

Start by confirming that the motor is “inverter duty” rated and complies with NEMA MG-1 Part 31 standards, which ensure it can handle VFD peak voltages. Check the cable insulation resistance – it should exceed 1 megohm at 68°F.

Mount the VFD on a flat, stable surface, free from vibrations, and leave at least 6 inches of clearance around it. Sean Gaffney, Senior Product Manager at VACON, emphasizes the importance of proper ventilation:

“Drives, like people, keep cool by ‘breathing.’ Failure to follow the instructions will result in a drive that does not operate properly, repeatedly trips on over-temperature faults and fails prematurely.”

When wiring, keep power cables and control cables in separate conduits to minimize electromagnetic interference. If they must cross paths, ensure they do so at a 90-degree angle. Use shielded cables for motor connections, and always connect both the VFD and motor to a robust earth ground. Additionally, install the manufacturer-recommended fuses on the incoming line side. As Gaffney points out, “A drive measures and monitors itself and its motor outputs, but a drive does little to protect itself against incoming voltage or current spikes”.

Before powering up, torque all terminal connections according to the manufacturer’s specifications. On initial startup, use the “jog” function to check motor rotation. If the direction is incorrect, swap two output connections. Once the motor is correctly aligned, run the drive’s auto-tune or motor-identification function. This step ensures the VFD can create an accurate motor profile, enhancing control and protection.

Once installation is complete, the focus shifts to ongoing maintenance to keep the VFD performing at its best.

Regular Maintenance Tasks

While VFDs are designed to operate for five to ten years without major intervention, regular inspections are essential. Annually, check for condensation, corrosion, dust, and insects. Clean heatsinks, fans, and filters to prevent blocked airflow, which can lead to overheating and early failures.

Power connections can loosen over time due to temperature fluctuations. Jason Wellnitz, Product Marketing Manager at Yaskawa America, Inc., highlights the risks:

“Power connections can loosen with heating and cooling cycles. Loose connections can overheat and cause VFD faults, tripped branch circuit protection, or premature failure.”

Use a torque wrench annually to ensure all connections meet OEM specifications. A thermal imaging camera can also help identify hot spots in wiring during peak operation, allowing you to address potential problems early.

If a VFD remains unused for over six months – whether in storage or during a seasonal shutdown – perform capacitor reforming. This involves gradually applying voltage through a variac to prevent damage to the capacitor’s dielectric material. Additionally, always keep a backup of the VFD’s parameter file on a memory card or cloud storage. This makes restoring settings quick and hassle-free if the drive fails.

Routine inspections and resolving faults promptly are crucial for extending the drive’s lifespan.

Performance Monitoring and Diagnostics

After maintenance, continuous monitoring helps catch issues before they escalate. Modern VFDs monitor their internal health, tracking parameters like power module and heatsink temperatures, capacitor conditions, and DC bus voltage ripple. Pay attention to fault codes – they can indicate whether the problem is electrical (e.g., overvoltage, undervoltage, phase loss) or mechanical (e.g., pump blockage or overload).

Set up SMS or email alerts for fault events to address issues quickly and avoid downtime. If you notice unusual vibrations or noise, gradually adjust the pump speed to identify problematic frequencies. Noise disappearing at lower speeds often points to cavitation.

For critical systems, don’t rely solely on the VFD’s internal flow calculations. Use a physical flow meter, such as a magnetic or ultrasonic type, for precise closed-loop PID control. As Jason IP P.E., a Professional Engineer at Industrial Monitor Direct, advises:

“You cannot control what you do not measure”.

Export trend data quarterly and log parameter changes to identify inefficiencies early.

VFD Optimization Techniques

Fine-tuning your Variable Frequency Drive (VFD) settings can significantly improve energy efficiency and system performance. When combined with proper installation and maintenance, these adjustments can lower energy costs and enhance system reliability.

Closed-Loop Control with Sensors

Using real-time sensor feedback to configure your VFD ensures optimal pump performance. Rather than running at a constant speed and relying on valves to regulate flow, closed-loop control adjusts motor speed based on actual demand. Sensors like pressure transducers, flow meters, or level sensors provide continuous feedback to the VFD, which maintains the desired setpoint with precision.

When setting up PID parameters, start with conservative gains and gradually increase the integral time. This approach minimizes “hunting” – the oscillations around the setpoint that waste energy and strain equipment.

Closed-loop systems also support sleep mode, where the VFD shuts off the pump during zero-demand periods. In constant pressure systems, a pressurized tank (hydrophore) maintains pressure while the pump rests, avoiding inefficiencies from running against a closed valve. As Torben Poulsen, Business Development Manager at ABB, explains:

Just a small decrease in speed will decrease the power consumption considerably. It is known from the affinity laws that a 10% reduction in speed will lead to a 27% reduction in power.

For systems with multiple pumps, optimizing how they work together can further improve efficiency.

Multi-Pump Staging and Load Sharing

In setups with multiple pumps, automated staging ensures pumps operate near their most efficient point. Additional pumps are activated only when demand surpasses the lead pump’s capacity and are turned off as demand decreases. This method keeps each pump closer to its Best Efficiency Point (BEP), avoiding inefficiencies caused by running oversized pumps at low speeds.

There are two common configurations for multi-pump systems: one VFD controlling a single variable-speed pump with fixed-speed auxiliaries, or multiple VFDs where a master drive coordinates all follower drives. Ideally, each pump should have its own VFD for better performance and redundancy. Ranbir (Ron) Ghotra, Lead Application and Systems Engineer at Eaton, highlights the benefits:

Achieving this degree of control and automation by just using the VFD cuts down the installation and commissioning time for the pumping system and improves the overall return on investment (ROI).

To evenly distribute wear across equipment, program VFDs to rotate the lead pump based on runtime. For periods of low demand, consider adding a smaller jockey pump with its own VFD instead of running a large pump inefficiently. Rebekah Macko from Geiger Pump & Equipment explains:

A small pump with its own VFD for low demand can offer better efficiency and overall system reliability than a large pump sized for peak demand operating back on its curve.

In wastewater systems, always maintain a minimum speed high enough to keep self-cleaning velocity in pipes, preventing solids from settling.

Once pump operations are coordinated, refining control parameters can lead to even greater energy savings.

Programming for Maximum Energy Efficiency

Properly programming VFD parameters can unlock significant energy savings. Set acceleration and deceleration ramps to around 10 seconds to minimize inrush current and reduce mechanical stress on components like couplings, bearings, and seals. A minimum speed between 30% and 50% of nominal ensures the pump remains above its minimum continuous stable flow while still achieving energy savings.

With closed-loop control in place, mechanical throttling can often be reduced or eliminated. As Rebekah Macko notes:

VFDs often allow control valves to be more open than constant speed systems because the pump can be slowed down to achieve the same flow rate with less throttling, leading to energy savings.

In some cases, minimum flow orifices can be removed entirely.

For tank-fed systems, program the VFD to slow the pump when supply tank levels drop. This prevents cavitation when Net Positive Suction Head available (NPSHa) is limited and reduces wasted energy. Additionally, use the VFD’s internal data logs to monitor energy use, starts, and operating hours. This data can help identify opportunities to refine setpoints and schedules even further. Typical energy savings from these programming strategies range from 15% to 45% in HVAC systems and 15% to 30% in water and wastewater applications.

Conclusion

VFD pump control systems offer a powerful way to lower energy expenses and extend the lifespan of equipment. For instance, reducing pump speed by just 10% can decrease power consumption by 27%. Some facilities have even reported energy savings of up to 60%, with payback periods of less than a year. Considering that pumps often account for over 30% of a facility’s total electricity usage, the potential for significant annual savings is clear.

By combining advanced components, precise controls, and smart optimization strategies, VFD systems bring numerous advantages. Soft starts help avoid the damage caused by high inrush currents and water hammer, protecting seals, bearings, and pipes. Real-time speed adjustments ensure pumps operate under ideal conditions, preventing issues like cavitation. Additionally, built-in diagnostics can identify problems early, reducing both downtime and maintenance costs.

The versatility of this technology is evident across various applications. HVAC systems, for example, have achieved energy savings ranging from 15% to 45%. Municipal water systems also showcase its effectiveness – take Columbus, Ohio’s July 2025 retrofit as an example. After implementing VFDs, specific energy consumption dropped from 259 kWh to 179 kWh per million gallons, and peak demand charges were cut in half.

With tangible benefits like lower utility bills, reduced maintenance, and enhanced process control, VFD pump control systems deliver quick returns on investment. They’ve become an indispensable part of modern pumping solutions.

FAQs

How do I know if my pump is a good fit for a VFD?

To figure out if your pump works well with a VFD, start by assessing its operating conditions. Pumps that deal with variable load demands, energy inefficiencies, or frequent on-off cycles are prime candidates. Applications like water supply, HVAC systems, or irrigation often involve fluctuating demand, making them a good match for VFDs. Centrifugal pumps, in particular, pair well when you need precise flow control and better energy savings. Just make sure your pump is designed to handle variable speed control for the best performance.

What sensors are needed for closed-loop VFD pump control?

Closed-loop VFD pump control relies heavily on flow meters to measure flow rate (in GPM) and pressure sensors to track system pressure. These two components feed crucial data into the VFD’s control algorithms, such as PID controllers, allowing for real-time adjustments to pump speed. While additional sensors – like those for temperature or motor current – can help monitor overall system health, the flow meters and pressure sensors remain the core elements for maintaining efficient operation.

When should I add output filters for long motor cable runs?

When motor cables are particularly long, it’s important to include output filters. Why? Extended cables can lead to voltage spikes, ringing, and even insulation breakdown, all caused by impedance mismatches. These longer cables tend to amplify overshoot peak voltage, which could harm both the motor and the VFD. By adding output filters, you can help safeguard the system, ensuring smoother operation and reducing the risk of damage.

Role of HVAC Maintenance in Combustion Pollutant Control

Role of HVAC Maintenance in Combustion Pollutant Control

Indoor air can be 2 to 5 times more polluted than outdoor air, posing serious health risks. Combustion pollutants like carbon monoxide (CO) and nitrogen dioxide (NO₂) come from everyday appliances like furnaces, stoves, and fireplaces. Poor maintenance can worsen these risks, leading to toxic gases leaking into your home. Regular HVAC maintenance is critical to managing these pollutants and protecting your health.

Key Takeaways:

  • Health Risks: CO poisoning causes 400 deaths and 15,000 hospital visits annually in the U.S.
  • Pollutant Sources: Gas appliances, smoking, and unvented equipment are common culprits.
  • HVAC Role: Proper ventilation, filtration, and pressure management reduce pollutants.
  • Maintenance Tips:
    • Replace air filters every 1–3 months.
    • Schedule annual professional inspections to check for leaks and ensure proper exhaust.
    • Use sealed-combustion appliances to prevent backdrafting.

HVAC systems help remove pollutants, but they have limits. While filters handle particles, ventilation is essential for gases like CO. Pairing maintenance with carbon monoxide detectors and proper appliance use ensures cleaner, safer air indoors.

HVAC Maintenance Impact on Indoor Air Quality and Combustion Pollutant Control

HVAC Maintenance Impact on Indoor Air Quality and Combustion Pollutant Control

Gas Furnace Combustion Analysis Training with Tyler Nelson!

What Are Combustion Pollutants and Why They Matter

Combustion pollutants are created when fuels are burned. According to the California Air Resources Board, these pollutants come from burning materials like wood, natural gas, and other fuels. Key examples include carbon monoxide (CO), nitrogen dioxide (NO₂), particulate matter (PM), sulfur dioxide (SO₂), formaldehyde, and polycyclic aromatic hydrocarbons (PAHs).

What makes these pollutants especially hazardous is how easily they can go unnoticed. Take carbon monoxide, for example – it’s a colorless, odorless gas that disrupts oxygen delivery in the body. Nitrogen dioxide, on the other hand, is a reddish-brown gas that irritates the respiratory system, while particulate matter consists of microscopic particles that can penetrate deep into the lungs.

The health effects of these pollutants can vary widely, from mild to severe. Short-term exposure might mimic flu symptoms, such as headaches, dizziness, fatigue, nausea, and confusion. Over time, however, the risks escalate significantly. Long-term exposure has been linked to chronic respiratory issues like asthma and emphysema, cardiovascular disease, permanent damage to the brain and heart, and even cancers affecting the lungs, stomach, and bladder. Some groups – like infants, the elderly, those with pre-existing conditions, and even unborn children – are particularly vulnerable to these risks. Understanding these dangers is essential to addressing the everyday sources of combustion pollutants in indoor spaces.

Common Indoor Sources of Combustion Pollutants

Combustion pollutants can originate from a surprising number of everyday household appliances and activities. Gas-fired furnaces, water heaters, woodstoves, fireplaces, gas ranges, ovens, and kerosene space heaters are all common culprits. While these appliances emit pollutants as part of their normal operation, faulty equipment or poor maintenance can dramatically increase the risks.

Beyond appliances, daily habits can contribute to indoor pollution. Smoking tobacco, running gas-powered tools like lawnmowers or generators, idling cars in attached garages, and even hobbies like welding or soldering release combustion byproducts. Cooking on a gas stove – especially when frying or grilling at high heat – can also generate nitrogen dioxide and particulate matter.

The problem intensifies when pollutants seep into living areas due to unvented appliances, malfunctioning equipment with cracked heat exchangers, or backdrafting. Backdrafting occurs when pressure imbalances pull exhaust gases, like carbon monoxide, back into the home instead of venting them outside. Shockingly, over two-thirds of carbon monoxide poisoning deaths have been traced to gas-fueled appliances like furnaces and water heaters.

Health Effects and Air Quality Concerns

The numbers surrounding indoor air pollution are staggering. Around 4.3 million people worldwide die annually from indoor air pollution – 600,000 more than those who die from outdoor pollution. Of these deaths, roughly 60% are linked to heart issues, while 40% stem from lung-related conditions. In developing countries, where biomass fuels are often used for cooking and heating, indoor air pollution causes an estimated 1.6 million premature deaths each year.

Each pollutant has its own way of harming the body. Carbon monoxide deprives vital organs of oxygen, nitrogen dioxide damages mucous membranes and hampers breathing, and PM2.5 – a particularly tiny form of particulate matter – can enter the bloodstream or carry carcinogens like radon deep into the lungs. Children are especially at risk, with indoor air pollution contributing to half of all pneumonia-related deaths in kids under five.

Additionally, combustion processes release water vapor, which can raise indoor humidity levels. This creates a breeding ground for mold and dust mites, further exacerbating air quality issues. Recognizing these risks underscores how proper HVAC system maintenance can play a critical role in reducing exposure to these harmful pollutants.

How HVAC Systems Reduce Combustion Pollutants

HVAC systems do much more than regulate your home’s temperature – they actively help reduce harmful combustion pollutants in your indoor air. The process begins as the system pulls in air, filters it, and redistributes it throughout your home. When properly maintained, this cycle ensures cleaner, healthier air. However, neglecting maintenance can turn your HVAC system into a source of indoor air issues, spreading dust, allergens, and even mold spores. This initial filtration is just the starting point for more advanced pollutant reduction strategies.

One of the most effective ways HVAC systems combat pollutants is through mechanical ventilation. By exchanging stale indoor air with fresh outdoor air, your system dilutes dangerous levels of carbon monoxide, nitrogen dioxide, and other combustion byproducts. This continuous airflow prevents pollutants from accumulating in stagnant areas, which can pose serious health risks. Without proper ventilation, even minor amounts of combustion gases can build up over time, leading to hazardous conditions. Both filtration and ventilation are integral to maintaining a safe indoor environment.

Another critical factor is pressure management. HVAC systems must maintain balanced air pressure throughout your home to avoid backdrafting – a condition where combustion gases are drawn back into your living areas instead of being vented outside. Pressure imbalances, often caused by exhaust fans or air leaks, can reverse the normal flow of air in chimneys or flues, creating significant safety risks.

Air Filtration and Airflow Management

Not all air filters are created equally. Standard fiberglass filters are primarily designed to protect HVAC equipment from large debris, not to improve air quality. Filters with higher MERV (Minimum Efficiency Reporting Value) ratings, however, can trap smaller particles like smoke and fine dust from combustion sources. For even better results, HEPA filters and activated carbon filters go a step further, capturing microscopic particles and absorbing chemical pollutants like volatile organic compounds (VOCs).

Advanced filtration systems take things up a notch by actively purifying air as it circulates. These systems neutralize odors from cooking or smoke and capture allergens that basic filters may miss. However, their effectiveness depends on clean filters and unobstructed airflow. Clogged filters not only reduce a system’s efficiency but also allow pollutants to bypass the filtration process entirely. Ensuring proper airflow is crucial for evenly distributing filtered air throughout your home, preventing pollutant buildup in areas with poor ventilation.

While filtration is a vital component, comprehensive pollutant control also requires effective ventilation strategies to manage air exchange across your entire home.

Ventilation and Safe Combustion Appliance Operation

Ventilation is your home’s first defense against combustion pollutants. HVAC systems manage this by removing contaminated air, introducing fresh air, or balancing both processes to dilute pollutant concentrations effectively.

“Proper ventilation does more than circulate air; it removes contaminants and controls humidity, ensuring that your living spaces remain comfortable throughout the year.” – Chris Roe, Owner, Precision Heating & Air

Regular HVAC inspections play a crucial role in ensuring the safe operation of combustion appliances. Annual maintenance should include combustion analysis, where technicians check that fuel-fired appliances receive the correct mix of fuel and air to minimize carbon monoxide production. Inspections should also cover heat exchangers for cracks – an often-invisible hazard that can allow combustion byproducts to leak into your home’s air – and verify that exhaust systems properly vent gases outdoors rather than back into your living space.

“Annual service needs to include combustion analysis during which the HVAC professional checks that the appliance is getting the correct mix of fuel and air in the combustion process.” – National Carbon Monoxide Awareness Association (NCOAA)

When upgrading your system, consider sealed-combustion appliances as a safer option. These units draw combustion air directly from outside through a dedicated pipe and expel exhaust through a separate sealed pipe, eliminating the risk of backdrafting and ensuring combustion gases stay out of your indoor air. These measures are key to maintaining air quality and minimizing the risks associated with combustion pollutants.

HVAC Maintenance Tasks for Controlling Combustion Pollutants

Keeping up with HVAC maintenance is a critical step in managing combustion pollutants in your home. One of the simplest yet most effective tasks is replacing air filters regularly – every 1 to 3 months. This helps maintain proper airflow and prevents particles from recirculating. If you have pets, smokers, or family members with respiratory issues, swapping out filters monthly is a smart move for better air quality. A quick visual check can also guide you – if the filter looks gray or clogged, it’s time for a change, even if it’s ahead of schedule. These small efforts go a long way in ensuring your indoor air stays clean and safe.

Annual professional tune-ups are just as important. Technicians conduct combustion analyses to make sure fuel-fired appliances are running with the right fuel-to-air ratio, which reduces carbon monoxide emissions. They also inspect critical components like the heat exchanger for cracks – a potential source of dangerous carbon monoxide leaks. Additionally, they check venting systems and flues to confirm exhaust gases are being properly expelled outdoors. These inspections are essential for keeping your HVAC system effective at managing combustion pollutants.

Filter Replacement Schedules

Replacing air filters regularly is a key part of maintaining both air quality and system efficiency. Clogged filters make your HVAC system work harder, increasing energy use. In fact, swapping out a dirty filter can boost energy efficiency by up to 15%. Clean filters also trap dust, pollen, and pet dander, while preventing mold growth that can occur in damp, dirty filters. The general recommendation is to replace filters every 1–3 months, but during peak heating or cooling seasons, checking them monthly is wise. Before replacing a filter, always turn off the HVAC unit to avoid pulling in unfiltered air and debris. Signs like higher energy bills, weaker airflow from vents, or visible dust around registers often indicate it’s time for a replacement.

Duct Cleaning and Equipment Inspections

While filters handle daily particle removal, duct cleaning tackles the buildup that filters might miss. An average 1,500-square-foot home can accumulate about 40 pounds of dust annually, much of which ends up in ductwork. Hiring professionals to clean ducts every 3–5 years can remove stubborn debris, soot, and allergens. The cost typically ranges from $450 to $1,000, depending on the size of your home and the level of contamination.

Equipment inspections are another vital step for combustion safety. Technicians clean burners to remove soot and debris that can cause incomplete combustion and lead to carbon monoxide production. They also inspect duct joints for leaks, which can allow unfiltered air or pollutants from areas like garages or crawlspaces to enter the system.

“HVAC professionals serve as an essential barrier between homeowners and the dangers of carbon monoxide poisoning.” – National Carbon Monoxide Awareness Association (NCOAA)

To ensure you’re in good hands, verify that technicians have certifications in carbon monoxide safety and combustion analysis, such as NCI, NATE, or COSA.

System Adjustments and Performance Tuning

Fine-tuning your HVAC system not only boosts efficiency but also enhances safety. For example, thermostat calibration helps prevent short-cycling – when the system turns on and off too often – which improves combustion efficiency and reduces wear on components. Adjusting your thermostat to lower temperatures by 7–10°F for eight hours a day can cut energy costs by up to 10%. Technicians also check refrigerant levels, as even a 10% low charge can increase annual energy costs by as much as 20%.

Other performance-tuning tasks include cleaning the blower motor, flame sensors, and igniters to prevent shutdowns and ensure proper airflow and combustion. To stop air leaks and keep pollutants out, sealing duct gaps with mastic sealant or metal-backed foil tape is far more effective than standard duct tape. Lastly, maintaining at least three feet of clearance around your furnace and keeping flammable items away ensures safe airflow and reduces fire risks.

Limitations of HVAC Systems in Pollutant Control

HVAC systems are great at managing many pollutants, but they fall short when dealing with certain gaseous contaminants. Knowing these limitations is crucial for setting realistic expectations and recognizing when extra measures may be needed. For instance, regular maintenance alone often isn’t enough to tackle invisible gaseous pollutants.

Differences Between Particulate and Gaseous Pollutant Control

HVAC systems approach solid particles and gases in completely different ways. Standard filters, including high-efficiency HEPA filters, are excellent at capturing physical particles like dust, soot, and pollen through mechanical straining. They can remove 99.97% or more of submicron particles. However, when it comes to gaseous pollutants like carbon monoxide, nitrogen dioxide, and volatile organic compounds (VOCs), these filters just don’t work.

“Air cleaning for carbon monoxide and radon is challenging because these compounds have a low reactivity.”
– Lawrence Berkeley National Laboratory

Even advanced filters with activated carbon, which aim to adsorb VOCs, face hurdles. A study conducted by Aarhus University in March 2022 tested eight high-end air cleaners (costing $900–$5,000) in a 100 m³ (roughly 3,500 ft³) classroom. Seven of the eight units showed much lower VOC removal rates compared to their ability to remove particles. Alarmingly, one PECO-based cleaner even emitted harmful by-products, releasing 350 μg/h of formaldehyde and 200 μg/h of methacrolein during operation. Saturated carbon filters can also release trapped VOCs back into the air, emphasizing the importance of supplemental ventilation.

Pollutant Type HVAC Control Method Major Limitation
Particulate Matter Mechanical Filtration (HEPA/MERV) Only works when the system is running
VOCs (Gaseous) Adsorption (Activated Carbon) Filter saturation and re-emission
VOCs (Gaseous) Oxidation (PCO/PECO) Produces toxic by-products like formaldehyde
CO / Radon Ventilation / Dilution Low reactivity makes removal difficult

These challenges underline why HVAC systems need to be paired with other strategies to effectively manage indoor air quality. Since they only clean air while running, short operating times may not be enough to keep up with high pollutant levels.

Balancing Cost and Energy Use

Advanced filtration options come with trade-offs, particularly in energy use and costs. Upgrading to high-efficiency filters like MERV 13 or higher improves particle capture – they can trap at least 50% of particles in the 0.3–1.0 micron range. However, these filters also increase static pressure in the ductwork, making HVAC systems work harder. This can lead to higher energy bills and potentially shorten the lifespan of the equipment.

While better filters can improve air quality, they also come with added costs. In many cases, controlling pollutants at their source is more economical than filtering them after they’ve been released. For example, ensuring proper venting of combustion appliances or using sealed combustion units is often more effective than relying solely on filtration. Maintaining indoor humidity between 30–50% also helps because high humidity can reduce the effectiveness of carbon filters by making water vapor compete with VOCs for adsorption sites.

“Technologies based on adsorption do not permanently remove VOCs, but merely retain them temporarily at varying degree.”
– Anders Feilberg and Kasper Kristensen, ScienceDirect

For gaseous pollutants that HVAC systems can’t handle, mechanical ventilation systems like Energy Recovery Ventilators (ERVs) can bring in fresh outdoor air to dilute indoor contaminants. While this does increase energy use, it’s often the most practical solution for gases that standard filters can’t capture. The key lies in striking the right balance between pollutant control, energy efficiency, and operating costs based on your specific air quality needs. This highlights the importance of regular HVAC maintenance and making informed choices about your equipment to maintain a healthier indoor environment.

Conclusion

Keeping up with regular HVAC maintenance is a key step in protecting your home or business from harmful combustion pollutants. By scheduling professional service at least once a year, you safeguard both your equipment and the people inside. Technicians play a crucial role – they ensure proper combustion, check flues and heat exchangers, and identify potential carbon monoxide leaks.

“HVAC professionals serve as an essential barrier between homeowners and the dangers of carbon monoxide poisoning.”
– National Carbon Monoxide Awareness Association (NCOAA)

Routine maintenance goes beyond just addressing carbon monoxide risks. It also manages particulate pollutants by focusing on tasks like replacing filters and cleaning ducts. Swapping out filters every one to three months helps keep soot, allergens, and mold spores from circulating back into the air. Plus, a well-maintained system helps maintain indoor humidity levels between 30–50%, reducing the chances of mold and mildew.

On top of health benefits, regular upkeep improves system efficiency. A properly maintained HVAC setup uses less energy, which translates to lower utility bills and a smaller carbon footprint. It can also extend the life of your equipment, saving you from the cost of an early replacement.

When arranging maintenance, make sure your technician is certified by organizations like the National Comfort Institute (NCI) or North American Technician Excellence (NATE) for gas furnace service. Combine these professional inspections with carbon monoxide detectors, and check your air filters monthly – especially if you have pets, smokers, or family members with allergies.

FAQs

Can my HVAC system remove carbon monoxide?

Your HVAC system isn’t designed to directly remove or filter out carbon monoxide. However, keeping up with regular maintenance and inspections can play a big role in preventing carbon monoxide buildup. By ensuring proper ventilation and the safe operation of combustion systems, you can reduce risks and help maintain both indoor air quality and overall safety.

How do I know if my home is backdrafting exhaust gases?

Look out for warning signs such as soot or dark residue near your water heater, strange odors, or persistent dampness around vents. To check for backdrafting, hold a small flame near the draft diverter – if the flame wavers or isn’t drawn into the vent, there could be a problem. Using a carbon monoxide detector can also help identify issues. If you suspect backdrafting, it’s best to reach out to a professional HVAC technician for thorough testing and to ensure your safety.

What should an annual HVAC combustion safety check include?

An annual HVAC combustion safety check is essential for keeping your system running safely and efficiently. This process should include a combustion analysis, which evaluates the fuel-to-air ratio, checks exhaust gases, and ensures fuel-burning appliances are operating correctly. Along with this, venting systems must be inspected to identify any leaks or blockages that could compromise safety or air quality.

How to Test for High-Pressure System Leaks

How to Test for High-Pressure System Leaks

Testing for leaks in high-pressure systems is critical to maintaining safety and performance in industries like oil and gas, manufacturing, and aerospace. Even small leaks can lead to serious risks and costly failures. Here’s a quick summary of the process and tools needed:

  • Tools Required:
    • Digital pressure gauges (rated for 2–4x the system pressure).
    • Soap solution for bubble testing (1–30 psi range).
    • Stainless steel test manifolds and fittings for durability.
  • Testing Methods:
    • Bubble Testing: Apply a soap solution and look for bubbles at suspected leak points.
    • Pressure Decay Testing: Monitor pressure changes over time in an isolated system (5–150 psi range).
    • Tracer Gas Testing: Use a gas detector to pinpoint leaks in pressurized sections.
    • Ultrasonic Detection: Noninvasive option for hard-to-access systems.
  • Preparation:
    • Depressurize the system and inspect for visible damage.
    • Use OSHA-compliant Lockout/Tagout (LOTO) procedures to ensure safety.
  • Safety Tips:
    • Always wear PPE, including goggles, gloves, and protective footwear.
    • Inspect gear for damage before use.
    • Be cautious of hazards like flying debris or chemical exposure.

Testing ensures systems are safe, efficient, and compliant with standards like ASME and ISO. Regular inspections help catch issues early, reducing downtime and repair costs.

Leak testing on high pressure reactors

Required Tools and Equipment for Leak Testing

When it comes to high-pressure leak testing, having the right tools is non-negotiable. These instruments must be designed to handle elevated pressures safely and deliver accurate results. Here’s a breakdown of the essential tools, their specifications, and the compliance measures required for effective leak testing.

Essential Tools for Leak Detection

  • Digital Pressure Gauges: Opt for gauges that can measure pressures 2–4 times higher than the system’s operating requirements. This ensures both safety and precision.
  • Bubble Immersion Testing: Use a soap solution to visually detect leaks. This method works best at pressures ranging from 1 to 30 psi.
  • Test Manifolds and Fittings: Choose components rated to withstand pressures above the testing range. Stainless steel is a preferred material for its durability and reliability under high-pressure conditions.

Standards and Compliance for Accurate Measurements

  • Calibration: All equipment must be calibrated to U.S. standards, recording pressure in psi and temperature in °F. Adhere to NIST calibration standards to maintain accuracy and compliance.
  • Pressure Ranges: Different methods have specific pressure requirements. For example, Pressure Decay Testing operates effectively between 5 and 150 psi, while Bubble Immersion Testing is optimal at 1 to 30 psi.
  • Material Selection: Metallic components like stainless steel or aluminum are better suited for high-pressure applications compared to polymer-based options. Seal materials, such as Viton or Buna-N, must be compatible with the test fluids and capable of maintaining integrity under pressure.
  • Regulatory Standards: Always follow manufacturer-recommended pressure limits and comply with regulatory standards like ASME, ISO, and ASTM. Testing equipment should include built-in safety factors and clearly marked burst ratings to prevent failures.

Step-by-Step Leak Detection Process

Conducting a leak test requires careful planning and a detail-oriented approach. The process is broken down into several key phases to ensure accurate results while prioritizing safety.

System Preparation and Isolation

Start by fully depressurizing the system using relief valves or venting points. Give the system time to stabilize, allowing pressure and temperature to reach equilibrium.

Next, perform a visual inspection to spot obvious issues like corrosion, loose fittings, or signs of previous leaks. Pay close attention to joints and connectors, as these are common trouble spots.

Implement OSHA-approved Lockout/Tagout (LOTO) procedures. This includes tagging isolation valves, posting warnings, and documenting the test boundaries. Be sure to highlight any sections that remain energized.

To define the testing area and prevent interference, use temporary isolation points such as blind flanges or valve caps rated for the system’s specifications.

Selecting the Right Testing Method

The choice of testing method depends on the system’s pressure and specific needs. For low-pressure systems, visual techniques like bubble immersion or soap solution testing are effective for spotting leaks. For moderate-pressure systems, pressure decay testing is often the go-to method, where any drop in pressure over time is carefully monitored.

For situations requiring greater sensitivity, tracer gas testing is a reliable option. If depressurizing the system isn’t feasible, noninvasive methods like ultrasonic detection can be used as an initial screening tool. Once the method is chosen, proceed to the testing phase.

Performing the Leak Test

For soap solution or bubble testing, prepare the solution and apply it to areas where leaks are suspected. Pressurize the system to the test level and watch for bubble formation, which indicates escaping gas. The size and frequency of the bubbles can help gauge the severity of the leak.

In pressure decay testing, pressurize the test section and isolate it. Use calibrated gauges to monitor the pressure over a set period, noting any drops. Keep track of ambient conditions, as temperature changes can affect the readings.

For tracer gas testing, evacuate the section to be tested, then fill it with the tracer gas to the required pressure. Use a calibrated leak detector to scan the area systematically. If using ultrasonic detection, follow the manufacturer’s instructions for adjusting sensitivity and positioning the device near potential leak points.

Recording and Evaluating Results

Thorough documentation is critical. Record key details such as test pressure, ambient temperature, test duration, and the locations of any leaks. Use calibrated gauges for accuracy, and standardized forms can help maintain consistency and streamline future repairs.

If needed, calculate the leak rate based on industry standards. Compare the results to acceptable thresholds for the application to determine whether repairs or additional maintenance are required. Depending on the findings, follow up with further testing or repair work to address any issues uncovered during the initial test.

Safety Measures and Best Practices

Once the detailed leak detection process is complete, implementing strict safety measures is essential to ensure testing is conducted securely. High-pressure leak testing can be hazardous, making adherence to safety protocols non-negotiable.

Personal Protective Equipment (PPE)

Personal protective equipment (PPE) serves as the first line of defense during high-pressure leak testing. Before entering the test area, all personnel must be equipped with the appropriate gear.

“Always wear appropriate PPE, including safety goggles, gloves, and protective footwear. Additional PPE, like face shields or protective suits, might be necessary depending on the test medium and the system.”

Essential PPE includes safety goggles, steel-toed boots, and work gloves. Depending on the testing environment, additional gear like face shields, hard hats, or hearing protection may also be required to shield against flying debris, sharp edges, or potential chemical exposure.

To ensure effectiveness, PPE should be regularly inspected and maintained. Before each use, check for damage – such as cracks in goggles, worn-out gloves, or compromised boot soles – and replace any defective items immediately.

The risks at pressure testing sites are real. Common injuries include eye damage, skin ruptures, lacerations, fractures, concussions, and contusions. In more severe cases, hazards like asphyxiation from inert gases or electrocution in electrically active areas can occur. Proper PPE and vigilance are critical to mitigating these dangers.

Summary and Service Overview

High-pressure leak testing plays a critical role in protecting both equipment and personnel. By focusing on proper system isolation, choosing the right testing methods, and maintaining thorough documentation, this process ensures systems are safe and reliable.

Regular testing helps identify weak points early on, reducing the risk of expensive repairs and improving energy efficiency. Safety measures are not just best practices – they are essential for preventing serious injuries and meeting regulatory requirements.

Investing in routine professional maintenance often offsets its cost by avoiding system failures and enhancing energy performance. If you’re looking for expert help to maintain these standards, keep reading to discover what our services can offer.

Hydrodynamics Inc. has been a trusted provider of high-pressure system maintenance since 1994. Serving residential, commercial, and industrial clients, they offer comprehensive leak detection services, preventative maintenance programs, and emergency repairs. Their skilled technicians are equipped to handle everything from straightforward leak detection to advanced testing for HVAC, plumbing, refrigeration, and industrial heating systems.

Whether it’s a residential heat pump, commercial rooftop HVAC unit, or industrial heating system, professional leak testing ensures your high-pressure systems run safely and efficiently.

FAQs

What are the common signs of a leak in a high-pressure system?

Leaks in high-pressure systems often make themselves known through unexpected sounds like banging, hissing, or gurgling. These noises can signal escaping air or imbalances in water pressure. You might also spot visible clues, such as water stains, mold growth, damp patches on walls or ceilings, or even an unusually high water bill – any of which could be a red flag for a potential leak.

Catching these signs early is key to avoiding further damage or reduced efficiency in your system.

How often should I test high-pressure systems for leaks to stay safe and compliant?

High-pressure systems need leak testing at least twice a year. However, for systems that are critical or operate in high-risk environments, testing should be done more frequently to ensure safety and meet regulatory requirements.

Routine inspections are key to catching problems early, maintaining system performance, and avoiding expensive repairs down the line. Be sure to stick to manufacturer recommendations and industry standards when it comes to testing schedules and procedures.

What steps should I take if I discover a leak during a high-pressure system test, and how can I avoid leaks in the future?

If you notice a leak during a high-pressure system test, shut down the system immediately. This step is critical to avoid further damage or putting safety at risk. To locate the leak, rely on tools like ultrasonic detectors, infrared cameras, or acoustic devices. Once you’ve identified the source, resolve the issue by tightening loose fittings, replacing any damaged parts, or applying the appropriate sealants.

To reduce the chances of leaks in the future, focus on regular maintenance and inspections. Use durable, high-quality seals, fittings, and materials specifically designed for high-pressure systems. Make leak detection a routine practice by conducting pressure tests and visual inspections. Staying consistent with upkeep is key to ensuring the system runs safely and efficiently.

R-454B vs. R-32: Comparing Energy Efficiency

R-454B vs. R-32: Comparing Energy Efficiency

R-32 and R-454B are two leading refrigerants replacing R-410A in HVAC systems due to environmental regulations. Here’s what you need to know:

  • R-32: Offers higher energy efficiency (107% of R-410A baseline) and requires up to 40% less refrigerant. It’s widely used in ductless and mini-split systems and costs less at approximately $4.11 per pound. However, it has a higher Global Warming Potential (GWP) of 675.
  • R-454B: Preferred for central residential systems by U.S. manufacturers like Carrier and Lennox. It has a lower GWP of 466, reducing direct emissions further but is less efficient (102% of R-410A baseline) and more expensive at $12.89 per pound.

Quick Comparison

Feature R-32 R-454B
Efficiency 107% of R-410A baseline 102% of R-410A baseline
Refrigerant Usage Up to 40% less About 10% less
GWP 675 466
Cost per Pound $4.11 $12.89
Best Use Case Ductless systems Central air systems

R-32 is ideal for maximizing energy savings, while R-454B is a better choice for those prioritizing lower GWP in central air systems.

R-454B vs R-32 Refrigerant Comparison Chart

R-454B vs R-32 Refrigerant Comparison Chart

A2L Refrigerants. 454B vs R32 – Which is Better?

Technical Specifications and Properties of R-454B and R-32

As the push for energy efficiency reshapes refrigerant choices, it’s important to understand the technical differences between R-454B and R-32. R-32 is composed entirely of difluoromethane, while R-454B is a zeotropic blend made up of 68.9% R-32 and 31.1% R-1234yf. This compositional difference impacts how these refrigerants behave in systems, especially during charging and maintenance.

One key distinction lies in temperature glide. R-32 has no temperature glide, making it straightforward to handle. On the other hand, R-454B has a glide of 1.0–1.3 K, which demands precise liquid-phase charging. If an R-454B system develops a leak, the components may escape unevenly, often necessitating a complete recharge instead of just topping off. This is not typically an issue with R-32 systems. These characteristics underline the need for a deeper technical comparison.

Technical Comparison of R-454B and R-32

Although both refrigerants share the same critical temperature of 78.1°F (172.6°F), their operational traits differ. R-32 operates at pressures similar to R-410A and provides around 20% better heat transfer efficiency. Meanwhile, R-454B’s slightly reduced operating pressures ease compressor strain and make it a closer match for R-410A systems.

These performance differences are reflected in efficiency and capacity. R-32 systems achieve efficiency ratings over 107% compared to R-410A, with a capacity boost exceeding 110%. In contrast, R-454B systems typically reach about 102% efficiency and a capacity increase of 97%. Additionally, R-32 systems require up to 40% less refrigerant than R-410A systems, while R-454B systems need about 10% less.

Environmental Impact of Both Refrigerants

The environmental performance of these refrigerants is another critical factor. Both meet the EPA AIM Act’s GWP (Global Warming Potential) limit of 750, but R-454B has a GWP of 466, which is roughly 31% lower than R-32’s GWP of 675. This translates into significant reductions in direct emissions: R-454B cuts climate impact by 81.6% compared to R-410A, while R-32 achieves a 73.6% reduction. Both refrigerants also have an Ozone Depletion Potential (ODP) of zero, ensuring they don’t harm the ozone layer.

However, the broader environmental impact extends beyond direct emissions. Indirect emissions from energy usage make up 70% to 80% of an HVAC system’s total carbon footprint, while refrigerant emissions account for less than 20%. As Daikin explains:

R-32 refrigerant’s increased efficiency helps OEM engineers design systems with low electricity consumption over the system’s life, compensating for Direct Emissions.

Energy Efficiency Performance of R-454B and R-32

When comparing R-32 and R-454B, R-32 generally comes out ahead in energy efficiency. Lab tests conducted under identical conditions show that R-32 systems deliver 5–10% higher SEER ratings than R-454B systems. This translates into noticeable savings on electricity bills over the lifespan of an HVAC system. Considering that energy consumption makes up 70–80% of an HVAC system’s total carbon footprint, the efficiency edge of R-32 carries significant weight. Let’s break down how these refrigerants stack up in terms of energy performance.

R-32: High Heat Transfer Efficiency

R-32 owes its strong performance to its thermodynamic properties, which improve heat transfer by around 20% compared to R-410A. This advantage becomes even more critical during heat waves, as R-32 systems tend to maintain consistent performance better than R-454B systems. This reliability during peak grid demand makes R-32 an attractive choice for extreme temperature conditions.

In practical applications, the efficiency of R-32 is clear. For example, commercial R-32 VRF (Variable Refrigerant Flow) and rooftop systems can achieve up to 12% energy savings in large-scale environments like retail stores and office buildings. Additionally, its higher volumetric capacity allows for more compact system designs. As of May 2025, the average cost for installing a 3-ton R-32 mini-split system was approximately $3,500, compared to $4,000 for a 3-ton R-454B central air system. These factors make R-32 a compelling option for maximizing energy efficiency and reducing costs.

R-454B: Balancing Efficiency and Environmental Goals

R-454B, while slightly less efficient than R-32, offers its own set of benefits, including a low Global Warming Potential (GWP) of 466. Its lower operating pressures help reduce strain on the compressor, potentially extending the lifespan of equipment.

“R-454B bridges the gap between ‘regulatory compliance’ and ‘performance utility,’ laying the foundation for the next decade of HVAC development.”

In 2025, homeowners using Carrier’s R-454B-optimized Infinity systems reported cutting their electricity bills by about 15% compared to older units. R-454B also showed strong performance in the U.S. Department of Energy‘s Cold Climate Heat Pump Challenge, where it excelled in extreme heating scenarios. For residential central air systems replacing R-410A units, R-454B offers a practical upgrade with measurable energy and environmental benefits.

Case Study: Residential vs. Commercial Energy Savings

The market adoption of these refrigerants highlights their unique strengths. R-32 is a top choice for ductless systems, thanks to its efficiency and compact design. On the other hand, R-454B is better suited for central air systems, as it works seamlessly with scroll compressors and closely matches the operating characteristics of R-410A.

Leading U.S. manufacturers like Carrier, Lennox, and Bryant have leaned toward R-454B for residential central air systems. Meanwhile, international brands such as Daikin and Mitsubishi have favored R-32 for their products. Daikin, for instance, has deployed over 160 million R-32 units worldwide as of 2024, proving its long-term effectiveness and reliability across a variety of climates. These trends underscore the importance of choosing the right refrigerant for the specific application to achieve the best energy efficiency and cost savings.

Choosing Between R-454B and R-32 for Your HVAC System

Picking the right refrigerant for your HVAC system depends on several factors, including your system type, the expertise of local contractors, and your maintenance priorities. Both R-32 and R-454B meet modern efficiency standards, but they excel in different scenarios. Knowing where each refrigerant fits best can help you save money and reduce maintenance headaches.

Availability and Market Adoption

R-32 has an extensive global presence, with over 160 million units installed worldwide by 2026. It’s particularly dominant in ductless mini-split and VRF (Variable Refrigerant Flow) markets, with brands like Daikin, Mitsubishi, and LG leading the charge. On the other hand, R-454B has gained traction among major U.S. manufacturers such as Carrier, Lennox, and Trane for central residential systems.

A 2025 survey revealed that 63% of U.S. contractors prefer R-454B for whole-home systems, while 70% favor R-32 for ductless setups. One notable distinction is that R-32 is widely available and produced by multiple manufacturers, whereas R-454B is a proprietary blend. If you’re considering R-32 for a central system, ensure your local HVAC contractors are certified to handle A2L refrigerants.

Beyond market trends, system compatibility is a critical factor when deciding between these refrigerants.

System Compatibility and Maintenance

Neither R-32 nor R-454B can replace older refrigerants like R-410A or R-22 directly. Both require systems specifically designed for A2L refrigerants, which are mildly flammable. These systems must also include safety sensors and use synthetic POE oil.

R-32’s single-component design makes recharging simpler, while R-454B’s blend requires careful liquid-phase charging to prevent fractionation. If you plan to reuse copper piping from an older system, a professional flush is essential to remove residual mineral oil.

It’s also worth noting the difference in compressors: R-454B systems are often paired with scroll compressors, common in U.S. central air systems, while R-32 systems typically use rotary compressors.

Cost Implications and Long-Term Benefits

R-32 systems generally come with lower upfront costs and achieve higher SEER (Seasonal Energy Efficiency Ratio) ratings. Meanwhile, R-454B’s lower GWP (Global Warming Potential) might justify its higher price tag for some users. R-32 systems require up to 40% less refrigerant compared to R-410A systems, while R-454B systems use about 10% less. Additionally, R-32 systems typically achieve 5% to 10% higher SEER ratings, which translates to reduced electricity bills over time.

“R-32 refrigerant’s increased efficiency helps OEM engineers design systems with low electricity consumption over the system’s life, compensating for Direct Emissions.”

For ductless systems, R-32 often delivers the best efficiency-per-dollar and easier long-term maintenance. In contrast, R-454B is better suited for central air replacements, offering compatibility with standard U.S. residential setups and easier servicing in areas with stricter safety regulations. These considerations play a key role in determining which refrigerant is the right fit for your HVAC needs.

Conclusion: Selecting the Right Refrigerant for Energy Efficiency

Main Differences in Energy Efficiency

Choosing between R-32 and R-454B often comes down to balancing energy efficiency with environmental priorities. R-32 stands out for its energy performance, achieving over 107% efficiency compared to R-410A, while R-454B reaches over 102% efficiency. This translates to 5% to 10% higher SEER ratings in tests. Additionally, R-32’s single-component design avoids temperature glide, making it easier to service and preventing changes in composition during leaks. On the other hand, R-454B offers a lower GWP of 466, compared to R-32’s 675, making it more aligned with tightening environmental regulations.

Cost is another factor to weigh. R-32 is priced at about $4.11 per pound, significantly less than R-454B’s $12.89 per pound. R-32’s efficiency can also result in lower electricity costs over 15 to 20 years, and it typically requires up to 40% less refrigerant, compared to R-454B’s 10% reduction. These distinctions can help determine the best refrigerant for specific needs.

Recommendations for HVAC Applications

For ductless mini-splits and VRF systems, R-32 is the top choice. It delivers superior efficiency, straightforward maintenance, and excels in high-temperature climates above 110°F. This makes it ideal for areas like inland California or Texas, where heat transfer efficiency is especially critical.

For central residential air conditioning, R-454B is a strong contender, particularly for systems from manufacturers like Carrier, Trane, or Lennox, which are optimized for this refrigerant. Its lower discharge temperatures also make it a solid option for large commercial systems, extending compressor life.

If long-term energy savings and maintenance simplicity are your priorities, R-32 is the better fit. However, if achieving the lowest possible GWP is your main goal, R-454B provides a regulatory advantage, though it comes with higher upfront costs and slightly lower efficiency. For tailored advice on the best refrigerant for your HVAC system, certified contractors at Hydrodynamics can offer expert guidance based on your specific requirements, climate, and efficiency objectives.

FAQs

Which refrigerant will lower my electric bill more?

R-32 can help lower your electric bill thanks to its higher energy efficiency and superior cooling capacity when compared to R-454B. This means HVAC systems using R-32 consume less energy while delivering better overall performance.

Can I retrofit my R-410A system to use R-32 or R-454B?

Retrofitting an R-410A system to use R-32 or R-454B isn’t a simple switch. These refrigerants have different pressure levels, chemical compositions, and compatibility requirements, meaning the system may need specific alterations to function correctly. It’s essential to work with a professional who can evaluate whether the retrofit is possible and make the necessary adjustments safely and effectively.

How does A2L flammability affect installation and servicing?

A2L refrigerants, such as R-454B and R-32, are classified as mildly flammable. This means they require extra care during installation and servicing to ensure safety. Technicians working with these refrigerants must stick to strict safety measures, including:

  • Ensuring proper ventilation in the work area.
  • Keeping all ignition sources far from the refrigerant.
  • Wearing appropriate personal protective equipment (PPE).

Performing thorough leak checks and strictly following the manufacturer’s guidelines are key steps to reducing fire risks. While these refrigerants are known for their environmental advantages, their flammable nature means specialized training and precautions are non-negotiable for safe operation.

How to Maintain an HRV System

How to Maintain an HRV System

Maintaining an HRV (Heat Recovery Ventilation) system ensures clean air, energy efficiency, and a longer lifespan. Here’s a quick breakdown of key maintenance tasks:

  • Clean filters every 2–3 months: Vacuum and wash with mild soap. Replace filters 1–2 times a year if needed.
  • Inspect and clean the heat recovery core annually: Vacuum, wash with soap and water, and air dry before reinstalling.
  • Check the condensate drain every 6 months: Ensure water flows freely to prevent clogs or mold.
  • Clean ventilation grilles and ductwork every 6–12 months: Remove blockages like dirt, leaves, or snow.
  • Inspect fans and controls annually: Clean fan blades, test settings, and ensure the system operates smoothly.

For more complex tasks like balancing airflow, cleaning blower wheels, or addressing motor issues, schedule professional servicing yearly. Proper maintenance keeps your HRV system running efficiently for 10–15 years at an average cost of $75 per year.

HRV System Maintenance Schedule and Task Frequency Guide

HRV System Maintenance Schedule and Task Frequency Guide

HRV Maintenance: How to use and maintain a heat recovery ventilation system

Safety Precautions Before Starting Maintenance

Before diving into any maintenance on your HRV system, it’s crucial to take steps to avoid electrical shocks or mechanical injuries. These safety measures are non-negotiable, whether you’re cleaning filters or checking the heat exchange core.

Turn Off Power and Unplug the System

Start by switching off your HRV using the main control switch or wall controller, and unplug it entirely to eliminate any risk of accidental activation or electrical hazards.

“For safety’s sake, turn the HRV off and unplug it before starting any work on it.” – Canada Mortgage and Housing Corporation (CMHC)

Even seemingly simple tasks, like replacing filters, can become dangerous if the system unexpectedly powers on. Make sure all components are completely dry before you plug it back in and restore power.

Also, take a moment to review your owner’s manual for guidance specific to your HRV model before moving forward.

Consult the Owner’s Manual

Your owner’s manual is your go-to resource for detailed instructions on accessing panels, caring for filters, and cleaning the heat exchanger. Following these model-specific guidelines helps you avoid unnecessary damage and keeps your system working efficiently.

“Every model is different, so you’ll need to consult the manual for instructions on how to maintain your specific HRV system’s heat exchange core.” – Team Harding

Routine Cleaning and Maintenance Tasks

Once safety measures are in place, it’s time to tackle these essential maintenance tasks. All you’ll need are a few basic household items: a vacuum, mild soap, and water.

Clean or Replace Air Filters

Your HRV’s air filters are critical for keeping dust, pollen, and other particles out of your home’s air supply. To keep your system running smoothly and ensure good air quality, clean these filters every two months. Start by opening the front access door and sliding the filters out.

Use a vacuum to remove loose dust, insects, and debris from the filter surface. After vacuuming, soak the filters in warm, soapy water, rinse them thoroughly, and let them air dry completely before putting them back. Reinstalling damp filters can lead to mold growth or damage the system.

“Dirty or clogged filters can lower the HRV’s efficiency and pollute the air cycling back into your home.” – Lincolnberg

If the filters still look grimy after cleaning or show signs of wear, it’s time to replace them. Homes with pets or those in dusty areas may need more frequent filter cleaning. Otherwise, plan to replace filters once or twice a year.

Task Frequency Method
Filter Cleaning Every 2–3 months Vacuum and wash with mild soap and warm water
Filter Replacement Every 6–12 months Replace with manufacturer-approved filters

Once the filters are clean, move on to inspecting the heat recovery core.

Inspect and Clean the Heat Recovery Core

The heat recovery core is the centerpiece of your HRV system, responsible for transferring warmth between incoming and outgoing air. To keep it functioning properly, inspect and clean it annually – spring or fall is ideal when the system isn’t under heavy use. Follow your manual’s instructions to carefully remove the core.

Begin by vacuuming dust, dirt, and cobwebs from the core and the surrounding cabinet. Next, soak the core in warm, soapy water, rinse it thoroughly, and let it air dry completely before reinstalling. Handle the core with care to avoid damage.

“Vacuuming the core and washing it with soap and water will reduce dust that can build up inside the core.” – CMHC

While the core is out, take the opportunity to wipe down the inside of the HRV cabinet. This is also a good time to pour about 2 liters of warm water into the drain pan to ensure the condensate drain is clear.

Check and Clean the Condensate Drain

As your HRV operates, it generates condensation that collects in a drain pan and exits through a plastic tube or pipe. To avoid clogs that could cause water backups, system damage, or mold, inspect the drain at least once a year.

Locate the drain tube and pour about 2 liters of warm water into the drain pan. Check the external drain exit to ensure the water flows freely. If there’s a blockage, use a pipe cleaner or a mix of baking soda and vinegar to clear it. Finally, wipe down the drain tray to remove any dirt or debris before closing the unit.

Inspect Ventilation and Mechanical Components

Taking care of your system goes beyond just changing filters or maintaining the core. It’s equally important to pay attention to ventilation pathways and mechanical controls. Regularly inspecting grilles, ductwork, and fans ensures that air can flow freely, bringing in fresh air and expelling stale air. Blockages or mechanical problems in these areas can reduce the system’s efficiency. Aim to check these components every 6 to 12 months. Afterward, focus on servicing mechanical parts to keep the entire system running smoothly.

Clean Ventilation Grilles and Ductwork

Start by checking outdoor intake and exhaust hoods for blockages like leaves, nests, or snow. During the winter, these checks should happen more frequently since snow and ice can quickly build up and obstruct airflow.

Inside your home, remove ventilation grilles and clean them by vacuuming or washing with mild soapy water if needed. While the grilles are off, vacuum as far into the duct openings as you can to clear out debris. If you encounter stubborn blockages, professional cleaning might be necessary.

Keep an ear out for unusual sounds that may signal mechanical issues. Also, check the airflow at the vents while the system is running to ensure both intake and exhaust functions are operating correctly.

Inspect and Service Fans and Controls

Once you’ve cleaned the visible parts, it’s time to focus on the mechanical components. Turn off the power and carefully clean dust from the fan blades to help maintain proper airflow. While most modern HRV fans don’t require lubrication, older models might have oil intakes that need a few drops of motor lubricating oil each year. Check your owner’s manual to confirm this step.

Test the control settings, timers, and humidity sensors to make sure they’re responding as they should. If the air in your home feels stale or overly humid even with the system running, the humidity sensor might need adjustment or calibration. For more advanced maintenance – like inspecting belts, adjusting tension, cleaning blower wheels, or lubricating bearings – schedule a professional service appointment during your annual system checkup.

Component Maintenance Action Recommended Frequency
Outdoor Hoods Check for leaves, nests, snow, and debris Every 6 months/Seasonally
Interior Grilles Vacuum and wipe clean Every 6–12 months
Ductwork Inspect ends and vacuum internal debris Annually
Fans Brush blades and listen for unusual noise Annually
Controls/Sensors Test settings and humidity sensors Every 6–12 months

Create a Maintenance Schedule

Once you’ve tackled routine cleaning and inspections, setting up a structured maintenance schedule is key to keeping your HRV system running smoothly over the long haul.

A consistent schedule helps you stay on top of tasks that, if neglected, can impact both air quality and system performance. As R.S. Andrews explains, “Regular maintenance means your HRV system can keep swapping out that old indoor air for fresh outdoor air without a hitch, ensuring your home stays comfortable and healthy”.

To make things manageable, split tasks into two categories: frequent DIY jobs (like cleaning filters and vents every 2–3 months) and annual deep-cleaning tasks (such as servicing the heat recovery core and fans before the heating season). This ensures your system is ready to handle the increased workload during the colder months.

You should also adapt your schedule based on your local environment. For example, homes in dusty areas or with pets may need more frequent maintenance. Similarly, during winter, outdoor vents should be checked weekly instead of every three months, especially in areas prone to heavy snow or frost.

Task Frequency Responsibility
Clean Air Filters Every 2–3 months Homeowner
Inspect Outdoor Vents Every 3 months (weekly in winter) Homeowner
Clean Indoor Grilles Every 6–12 months Homeowner
Replace Air Filters 1–2 times per year Homeowner
Clean Heat Recovery Core Annually (spring or fall) Homeowner/Professional
Check Condensate Drain Every 6 months Homeowner
Clean Fan Blades Annually Homeowner/Professional
Professional Inspection Annually (before heating season) Professional

Don’t forget to keep your owner’s manual within reach – it’s your go-to guide for model-specific cleaning instructions, recommended filter types, and any unique requirements. To stay organized, mark these tasks on your calendar so nothing slips through the cracks.

When to Contact Hydrodynamics for Professional Service

Hydrodynamics

Taking care of routine maintenance at home is a good start, but there are times when calling in the pros at Hydrodynamics is the smarter move. Knowing when to get expert help can prevent expensive repairs and keep your system running smoothly.

Strange noises coming from your HRV are a big warning sign. If you hear rattling, banging, or whistling, it could mean loose parts, blockages, or motor issues that need professional attention. Likewise, if the air inside your home feels constantly stale or humid – even after cleaning the filters – or if you spot excess condensation or mold near vents, it’s a sign your system isn’t handling moisture as it should.

Sometimes, DIY efforts just aren’t enough. More complex tasks, like balancing the system, adjusting belt tension, cleaning blower wheels, or ensuring electrical connections are secure, require skilled hands. Hydrodynamics’ technicians are equipped to handle these challenges. As R.S. Andrews explains, “Annual or semi-annual servicing by a qualified technician can help tackle more complex maintenance tasks, such as checking and cleaning the fans and motors, verifying system balance, and addressing technical issues”.

Aim for professional maintenance at least once a year, ideally before the heating season kicks in, to catch potential problems early. Hydrodynamics’ team offers advanced diagnostics, airflow tests, deep duct cleaning, and performance checks to spot issues like motor wear or core degradation that might go unnoticed during routine upkeep.

For households in dusty areas, with pets, or where residents have respiratory sensitivities, more frequent inspections are a good idea. With proper care, HRV systems can last 10 to 15 years. Regular professional service not only extends the life of your system but also ensures it continues recovering 70% to 80% of heat from exhaust air.

Conclusion

Maintaining your HRV system doesn’t take much effort, but it can make a big difference in both air quality and energy savings. Simple tasks like cleaning filters, checking vents, and cleaning the heat recovery core can go a long way in keeping your system efficient. These steps help your HRV recover 70% to 80% of heat from exhaust air, protecting your investment and ensuring your home stays comfortable throughout the year.

Some parts of the system need extra attention. For instance, check the condensate drain regularly to make sure it’s flowing properly – this helps prevent mold growth. Also, inspecting ventilation grilles and fan blades can stop dust buildup before it impacts performance. As R.S. Andrews puts it, “Proper maintenance of your HRV system is crucial for ensuring it continues to provide fresh, clean air while keeping energy costs low”.

For more complex tasks, annual professional servicing is essential. Companies like Hydrodynamics can handle detailed work such as balancing airflow, checking motor health, adjusting belt tension, and verifying electrical connections. This kind of expert care can extend your system’s life to 10–15 years while keeping operating costs around $75 per year. Pairing professional checkups with regular maintenance ensures your system runs efficiently for the long haul.

FAQs

How often should I get my HRV system professionally serviced?

It’s a good idea to have your HRV (Heat Recovery Ventilation) system professionally serviced once a year. This helps the system run efficiently, extends its lifespan, and keeps the air quality in your home or building at its best.

During a maintenance visit, a technician will clean the filters, check all components, and fix any potential problems to ensure everything is working properly. Annual servicing is particularly crucial if your HRV system operates continuously or if you live in a region with harsh weather conditions.

What safety steps should I take before maintaining my HRV system?

Before diving into maintenance for your heat recovery ventilator (HRV) system, it’s crucial to take a few safety measures to protect both yourself and the equipment. Here’s what you need to do:

  • Turn off the power: Start by switching off the HRV at its control panel or thermostat. Then, shut off the dedicated circuit breaker. Double-check that the fan has completely stopped spinning before you begin.
  • Secure the power source: If you can, use a lock-out tag on the breaker or power switch. This ensures no one accidentally restores power while you’re working.
  • Wear protective gear: Safety glasses and gloves are a must. They’ll shield you from dust, debris, or sharp edges that might be exposed during maintenance.
  • Clear the workspace: Make sure the area around the intake and exhaust vents is clear of loose objects, leaves, or snow. Also, ensure your work area is dry and well-lit to avoid slips or other accidents.

If you’re not confident about handling parts like the heat-exchange core or blower motor, don’t hesitate to call a qualified HVAC technician. Following these steps will help you steer clear of electrical hazards, injuries, and potential damage to your HRV system.

Why should I clean the heat recovery core in my HRV system regularly?

Keeping the heat recovery core in your HRV system clean is key to ensuring it works efficiently. As dust and debris build up on the heat-exchange plates over time, the system’s ability to transfer heat diminishes. This not only leads to higher energy use and increased utility costs but can also put extra strain on the system.

A clean core also plays an important role in maintaining good indoor air quality. Without regular cleaning, contaminants can circulate throughout your home. By taking care of the core, you keep your HRV system running smoothly, delivering fresh, clean air while helping you save on energy.

What Happens During an HVAC Energy Audit?

What Happens During an HVAC Energy Audit?

An HVAC energy audit evaluates your home’s heating, cooling, and ventilation systems to identify energy waste and recommend cost-saving improvements. Here’s what to expect:

  • Initial Consultation: Review utility bills, discuss comfort issues, and set goals.
  • System Inspection: Check HVAC components like furnaces, air filters, ductwork, and thermostats for inefficiencies or safety concerns.
  • Leak and Insulation Testing: Use tools like blower doors and infrared cameras to locate air leaks and insulation gaps.
  • Performance Testing: Measure airflow, duct pressure, and HVAC efficiency.
  • Audit Report: Receive a detailed report with recommendations, cost estimates, and potential savings.

Audits typically last 2–4 hours, cost $200–$700, and can qualify for a federal tax credit of up to $150.

HVAC Energy Audit Process: 4 Main Steps from Consultation to Report

HVAC Energy Audit Process: 4 Main Steps from Consultation to Report

Main Steps in the HVAC Energy Audit Process

Initial Consultation and Information Gathering

Before diving into the technical aspects, the process kicks off with a conversation. The auditor will review your home’s energy usage over the past year, analyzing utility bills to identify trends and seasonal spikes in consumption . This step helps establish a baseline and provides insight into how your energy use fluctuates throughout the year.

During this consultation, you’ll also have a chance to share any concerns about your home’s comfort. Maybe you’ve noticed drafty rooms, windows fogging up with condensation, or areas that never seem to stay comfortable no matter the season . The auditor will also ask about your goals – whether you’re looking to cut energy costs, improve indoor air quality, or make targeted upgrades within a specific budget .

“A professional energy assessment can provide an expertly designed roadmap to saving money and improving the comfort of your home.” – U.S. Department of Energy

Pro tip: Gather your utility bills and jot down any comfort issues ahead of time. This preparation ensures you won’t forget to mention anything important and helps the auditor work more efficiently .

Once this discussion wraps up, the auditor moves on to a detailed inspection of your HVAC system.

Physical Inspection of HVAC Components

Next comes a hands-on examination of your heating and cooling equipment. The auditor will inspect the age of your system and check burners for signs of trouble, such as soot, rust, or debris. These issues often hint at reduced efficiency or potential safety risks .

They’ll also inspect blower wheels and air filters, as dust accumulation can choke airflow and drag down efficiency. Ductwork gets a close look too. Dirt streaks near seams often signal air leaks, and in unconditioned spaces like attics, they’ll check whether ducts are properly insulated. Lastly, they’ll test thermostats and safety controls to ensure your system cycles on and off correctly.

With the HVAC system reviewed, the focus shifts to the building’s insulation and air tightness.

Testing for Air Leaks and Insulation Problems

To identify where your home may be losing energy, the auditor uses a blower door test. This involves placing a fan in an exterior doorway to lower indoor air pressure, making leaks easier to detect. Infrared cameras are then used to scan walls, floors, and ceilings, highlighting areas where heat escapes or where insulation is lacking .

They may also perform duct pressure tests to pinpoint leaks within the ductwork. These leaks can waste a surprising amount of energy, making them critical to address. Together, these diagnostic tools provide a clear picture of where improvements are most needed.

Once leaks and insulation issues are identified, the auditor moves on to evaluate your system’s overall performance.

System Performance Testing

Performance testing is where the auditor measures how well your HVAC system is functioning. Using furnace efficiency meters, they’ll analyze flue gas composition and temperature to ensure combustion safety. They’ll also check airflow rates, duct pressure, and temperature differences to determine how efficiently your system distributes conditioned air.

Additional tools, like surface thermometers and smoke pens, help detect drafts or subtle heat losses within the system. These tests reveal whether your HVAC equipment is performing as expected or if factors like poor maintenance, incorrect installation, or age are holding it back.

The results from these tests are compiled into a detailed audit report, which outlines specific recommendations for improving your home’s energy efficiency.

How to Perform a Whole-House Energy Audit | Ask This Old House

Ask This Old House

Types of HVAC Energy Audits

Energy audits come in various forms, each tailored to different needs and budgets. The American Society of Heating, Refrigeration and Air-Conditioning Engineers (ASHRAE) outlines three distinct levels of audits, ranging from quick assessments to detailed studies. These levels help you choose the right approach based on your goals and financial considerations.

Level 1: Basic Walkthrough Audit

A Level 1 audit is the most straightforward and cost-effective option, typically costing about $0.12 per square foot. It involves a quick walkthrough of your home, a review of utility bills, and a discussion about any noticeable comfort issues. The focus is on identifying obvious problems and simple, cost-effective fixes – often referred to as “low-hanging fruit.”

This type of audit provides a preliminary assessment, offering rough estimates for costs and potential savings. It’s a great starting point to decide if a more detailed audit is worth pursuing. As a general guideline, the total cost of an energy audit should not exceed 10% of your annual utility expenses.

Level 2: Detailed Energy Analysis

For a deeper dive, a Level 2 audit offers a more thorough evaluation, priced at approximately $0.20 per square foot. This option includes detailed energy usage breakdowns and diagnostic tests, such as airflow measurements and leak detection. The auditor may suggest operational adjustments, like optimizing thermostat settings, and more significant upgrades, such as improving insulation or replacing outdated equipment.

“If a Level 1 audit is about examining an HVAC system’s current performance, then a Level 2 audit is about improving that performance for sustainability’s sake.” – Air Comfort

This level is ideal for homeowners who are ready to act on specific recommendations. It delivers actionable insights with clear cost-benefit analyses, making it easier to prioritize efficiency upgrades.

Level 3: Advanced Engineering Study

The most comprehensive option, a Level 3 audit, costs around $0.50 per square foot. Known as an investment-grade audit, this approach includes advanced techniques like detailed modeling, hourly energy simulations, and life-cycle cost analysis. It’s designed to provide precise return on investment (ROI) estimates, helping justify major system upgrades or overhauls.

“A Level 3 audit is a refined analysis and expands to include additional measurements, testing, modeling, and life-cycle cost analysis to inform decision making.” – ASHRAE

While this level of detail is generally unnecessary for most homeowners, it’s invaluable for those planning significant HVAC system investments. For standard residential needs, Level 1 or Level 2 audits typically offer sufficient insights for making informed efficiency improvements.

What You Receive: The Audit Report

What’s Included in the Report

After the on-site inspection and testing, the auditor compiles all findings into a comprehensive report. This report highlights your home’s potential for energy savings and includes key details like building characteristics – square footage, wall area, window types, and insulation status. It also features an energy consumption analysis, reviewing your utility bills to pinpoint when and where energy is being wasted.

You’ll find documentation of problem areas, such as thermographic images that reveal heat loss and blower door test results showing air leaks. Additionally, the report addresses any health and safety concerns, including issues like moisture, mold, or carbon monoxide. In some cases, the report may also provide a Home Energy Score, which rates your home’s energy efficiency.

“A home energy assessment helps you learn how you use energy, determine where it’s being wasted, and prioritize efficiency upgrades.” – Energy Saver

These findings are based directly on the inspections and tests conducted during the audit.

Using the audit results, the report provides a clear plan of action to improve your home’s energy efficiency. Each recommendation is prioritized and comes with a cost-benefit analysis. Whether it’s air sealing, duct insulation, or upgrading your HVAC system, the report includes estimated costs, projected energy savings, and payback periods. This helps you identify the upgrades that offer the best return on investment.

Making these improvements can lead to savings of 5% to 30% on your monthly energy bills. The report also highlights available utility rebates, tax credits, and financing options to help reduce the upfront costs of upgrades. Federal tax credits may also apply, as outlined in the report . Air sealing and insulation are often recommended as top priorities since they deliver immediate comfort and significant energy savings with a relatively low initial cost.

Next Steps After Your Audit

With your audit report in hand, it’s time to roll up your sleeves and put the plan into action. Think of your report as a personalized guide, highlighting where energy is being wasted and which upgrades will give you the best bang for your buck. The real magic happens when you use that roadmap to make changes. As Energy Saver points out, “Making the recommended energy efficiency upgrades is what leads to energy savings”.

Start with safety. If your audit flagged any health or safety concerns – like carbon monoxide leaks, moisture problems, or mold – these should be your top priority. Addressing these issues promptly ensures your home is safe before moving on to efficiency improvements. Once safety is taken care of, tackle the simpler fixes first. Air sealing and adding insulation are great starting points. These upgrades often bring immediate improvements in comfort and energy savings without requiring a hefty investment.

For more complex tasks – like sealing ducts, resizing systems, or replacing an HVAC unit – it’s wise to bring in a professional. A qualified HVAC expert, such as Hydrodynamics, can ensure the work is done correctly and meets industry standards. This not only boosts the performance of your system but also helps extend its lifespan, aligning with the recommendations from your audit.

Don’t forget about financial incentives. You might be eligible for a federal tax credit of up to $150 just for the audit itself. On top of that, there are often utility rebates or tax credits for specific upgrades, like installing energy-efficient HVAC systems or improving insulation. These programs can make a big dent in your upfront costs, making it easier to invest in long-term savings.

Ready to take the next step? Contact Hydrodynamics to schedule your HVAC energy audit and start making your home more efficient today.

FAQs

What are the benefits of an HVAC energy audit?

An HVAC energy audit pinpoints areas where your heating and cooling system may be wasting energy and offers practical solutions to boost efficiency. By evaluating factors like air leaks, insulation, and overall system performance, the audit can reveal issues that inflate utility bills. In fact, addressing these problems can lead to energy savings of 5–30%. Recommendations often include sealing ducts, adding programmable thermostats, or upgrading to energy-efficient equipment – all steps that can improve comfort while lowering expenses.

But it’s not just about saving money. An energy audit can also enhance indoor air quality and safety. Using tools like infrared cameras and blower-door tests, professionals can uncover hidden problems such as air leaks, moisture issues, or even carbon monoxide risks. This process not only extends the lifespan of your HVAC system but can also make you eligible for utility rebates or tax credits, helping offset the cost of upgrades.

Hydrodynamics specializes in HVAC energy audits designed to reduce energy consumption, increase comfort, and cut costs. Scheduling an audit is a great way to take the first step toward a more efficient and comfortable home.

How should I get ready for an HVAC energy audit?

Preparing for an HVAC energy audit can make the process smoother and more effective. Start by gathering your utility bills from the past 2–3 months. These will give the auditor a clear picture of your energy usage patterns. Next, ensure there’s easy access to your HVAC equipment by clearing away any obstructions around air handlers, ductwork, and outdoor units.

Set your thermostat to “auto” and take note of any issues you’ve noticed, such as uneven temperatures, strange noises, or unexpectedly high energy bills. It’s also a good idea to jot down specific concerns or areas in your home that you think might need attention. These simple preparations can help the auditor pinpoint ways to boost your system’s efficiency and possibly lower your energy costs.

What steps should I take after receiving my HVAC energy audit report?

After receiving your HVAC energy audit report, take the time to go through it thoroughly. Look for specific issues like air leaks, gaps in insulation, or inefficiencies in your HVAC system. Make sure to note the recommendations tied to each problem.

Once you understand the findings, prioritize the upgrades based on factors like potential energy savings, cost, and how they’ll improve your comfort. High-priority tasks often include sealing air leaks, adding or upgrading insulation, or replacing old HVAC systems. Reach out to a professional contractor – Hydrodynamics is one option – to get estimates for these upgrades. Also, explore rebates, tax credits, or financing programs that could help reduce your out-of-pocket costs.

When you’ve mapped out your plan, schedule the upgrades and get the work done. Smaller tasks, like sealing minor leaks, can often be tackled as DIY projects. However, larger jobs, such as replacing an HVAC system or improving insulation, should be left to licensed professionals. After completing the updates, keep an eye on your energy bills and how comfortable your home feels to ensure the changes are making a difference. For extra reassurance, you might want to schedule a follow-up inspection to confirm everything is working as it should.

Common Duct Design Mistakes and Fixes

Common Duct Design Mistakes and Fixes

Duct design mistakes can lead to uneven temperatures, weak airflow, noisy systems, and higher energy bills. Common issues include poorly sized ducts, bad layouts, inadequate insulation, leaky connections, and unbalanced ventilation. These problems often strain HVAC systems, reduce comfort, and waste energy.

Key Solutions:

  • Proper Sizing: Use precise calculations (e.g., ACCA Manual D) to ensure ducts deliver the correct airflow.
  • Improved Layouts: Minimize long runs, sharp bends, and poorly placed vents.
  • Better Insulation: Use R-6 to R-8 insulation in unconditioned spaces to prevent heat loss/gain.
  • Seal Leaks: Apply mastic or foil tape to prevent air loss and improve efficiency.
  • Balance Airflow: Add dampers and return vents to eliminate pressure imbalances.

Professional assessments can identify hidden issues and optimize your duct system for better comfort and lower energy costs. Fixing these problems not only improves performance but also extends your HVAC system’s lifespan.

(Podcast) Common Duct Design Mistakes w/ Jack Rise

Common Duct Design Mistakes

Duct design errors can make a building feel uncomfortable, no matter how often you adjust the thermostat. These problems often arise when contractors bypass detailed calculations and rely on guesswork or outdated methods. The result? A system that might look fine but struggles to perform from the start. Knowing these common pitfalls is the first step toward fixing airflow issues.

Incorrect Duct Sizing

One of the most frequent culprits behind HVAC complaints is undersized ducts. Even when the furnace or air conditioner is correctly sized, undersized ducts can create high static pressure, leading to weak airflow, uneven temperatures, noisy vents, and faster wear on equipment. Homeowners often blame their HVAC unit for being “too weak”, but the real problem lies in the ductwork failing to deliver air efficiently.

On the flip side, oversized main trunks paired with undersized branches can reduce air velocity, causing uneven airflow and temperature inconsistencies.

These sizing mistakes often happen when contractors base duct dimensions on equipment tonnage instead of performing precise room-by-room calculations, such as those outlined in ACCA Manual D. Without these calculations, critical factors like building layout, duct length, and friction losses from fittings are overlooked, leading to performance issues.

Poor Layout and Placement

The way ducts are routed can make or break system performance. Long duct runs and sharp bends increase friction, limiting airflow to distant rooms. For example, placing a sharp elbow right above the air handler fan disrupts airflow and amplifies noise, even if the rest of the system is properly sized. Best practices recommend keeping a straight section off the fan before adding any turns.

Register placement is another common issue. Supply vents that blow into walls or furniture fail to distribute air properly, while return grilles located only in central hallways can’t evenly pull air from all rooms. In colder climates, placing supply registers near ceilings can be problematic; warm air rises, leaving the lower part of the room cooler and less comfortable for occupants.

Inadequate Insulation

Ducts running through unconditioned spaces, like attics or crawlspaces, can lose or gain heat quickly if they lack proper insulation. This leads to inefficient HVAC operation and higher energy costs. Common mistakes include bare ducts, insulation with a low R-value for the local climate, or gaps and tears in the vapor barrier.

Many building codes now require better duct insulation in unconditioned areas, as it’s a straightforward way to cut energy costs. Still, when insulation is overlooked or poorly installed, it compromises the system’s ability to deliver consistent temperatures.

Leaky Ductwork

Air leaks in duct systems can waste 20–30% of conditioned air, driving up energy bills and reducing comfort levels. These leaks often occur at joints, take-offs, boots, and anywhere ducts connect to walls, ceilings, or equipment.

When air escapes into unoccupied spaces like attics or wall cavities, it leaves rooms under-conditioned while forcing the HVAC system to work harder. Leaks on the return side can also pull in unfiltered air from crawlspaces, garages, or attics, spreading dust, odors, and allergens throughout the building. This not only affects comfort but can also worsen respiratory issues and lower indoor air quality. Concentrated leaks near the air handler or trunk lines can raise static pressure, reducing airflow at vents and lowering the system’s efficiency compared to its rated SEER or AFUE values.

Unbalanced Ventilation

A lack of return vents or poorly placed ones can throw off the system’s balance, causing drafts, uneven temperatures, and even door slamming. Many homes rely on a single central return in a hallway, which creates problems when bedroom doors are closed. This setup starves those rooms of return airflow, causing pressure imbalances. Positive pressure forces air out through cracks and windows, while negative pressure pulls in unconditioned air, making it harder to maintain consistent indoor temperatures.

Without balancing dampers in the duct branches, contractors can’t fine-tune airflow to each room. Closing supply vents to redirect air isn’t a solution – it increases static pressure and can damage equipment. Proper balancing involves measuring airflow, adjusting dampers, and ensuring each room gets the right amount of air based on its heating and cooling needs.

Mistake Category Typical Cause or Symptom Impact on Comfort and Energy
Incorrect duct sizing Ducts too small for required airflow (CFM) Weak airflow, noisy vents, longer HVAC cycles, higher bills
Poor layout and placement Long runs, sharp bends, bad vent locations Uneven temperatures, energy waste, poor airflow in some rooms
Inadequate insulation Bare or low-R insulation in unconditioned spaces Heat loss/gain, discomfort, higher energy costs
Leaky ductwork Unsealed joints, disconnected sections Air loss, poor comfort, higher bills, reduced air quality
Unbalanced ventilation Few returns, no dampers, closed doors Pressure issues, drafts, uneven temperatures, inefficiency

Understanding these common errors lays the groundwork for solutions that improve airflow, boost efficiency, and ensure HVAC systems meet professional standards.

Solutions to Fix Duct Design Mistakes

Addressing duct design mistakes doesn’t always require replacing the entire system. Instead, focusing on specific improvements – like resizing ducts, sealing leaks, upgrading insulation, and balancing airflow – can resolve many issues, restoring efficiency and comfort.

Correct Duct Sizing

Undersized ducts can cause uneven airflow and strain your HVAC system. To fix this, start with precise calculations using industry standards such as ACCA Manual J, S, and D. These calculations help determine the heating and cooling loads for each room, ensuring the ductwork delivers the correct airflow, measured in cubic feet per minute (CFM). Factors like room size, insulation, window area, climate, and duct friction losses all play a role.

Avoid relying on generic rules tied to equipment tonnage. For example, a small bedroom might only need 75–150 CFM, served by a 6–8 inch round duct, while a larger living room might require 200–400 CFM, needing an 8–10 inch duct or larger. Open-plan spaces could demand even more airflow, requiring larger ducts or multiple supply branches.

When retrofitting, focus on problem areas first – like rooms that are consistently too hot or cold. Measuring the total external static pressure at the air handler can reveal if undersized ducts are overworking the blower motor, which can shorten its lifespan and increase energy consumption.

Better Duct Layouts

Poor duct layouts often create airflow issues. Efficient designs minimize friction and pressure drops by keeping duct runs short and straight. Long runs and sharp bends add resistance, reducing airflow to distant rooms and making the fan work harder.

A trunk-and-branch layout is a practical solution, with short, direct runs to each room. Supply registers should be placed near exterior walls or windows, while return vents should be located on interior walls or ceilings to promote even air distribution.

Avoid sharp bends by using long-radius elbows or flexible transitions, and include a straight section before any turns. Renovating to eliminate overly long runs or multiple sharp bends can significantly improve both comfort and system performance.

Better Insulation

Ducts running through unconditioned spaces – like attics, garages, or crawlspaces – can lose or gain heat quickly without proper insulation. This forces the HVAC system to work harder, leading to higher energy bills. Building codes in many U.S. regions now require at least R-6 insulation for ducts in unconditioned areas, with R-8 recommended in extreme climates.

Fiberglass duct wrap or pre-insulated flex ducts are common solutions. Ensure that insulation fully covers all duct surfaces without gaps or compression, as this reduces effectiveness. Seams should be tightly sealed with tape or mastic to prevent air leaks, and exposed metal parts, like joints and boots, should be wrapped to reduce thermal bridging and condensation risks.

Studies show that sealing and insulating ducts in existing homes can cut heating and cooling energy use by 10–20%, depending on the climate, duct location, and initial leakage levels.

Sealing Duct Leaks

Leaky ducts waste energy and reduce system performance. Common leak points include joints, seams, take-offs, and connections. You can locate leaks visually or use tools like a smoke pencil or incense stick to detect escaping air. For a more precise approach, professional duct leakage testing, such as using a duct blaster, can identify problem areas.

For sealing, apply water-based mastic with a brush or gloved hand for durable results. UL-listed foil tape is also effective, especially on seams and joints, but avoid standard cloth “duct tape”, as it fails over time in hot environments.

Professional duct sealing, which may include advanced aerosol sealing, typically costs a few hundred to $1,500 for a single-family home, depending on the system’s size and complexity. While the upfront cost may seem high, the investment pays off through lower utility bills and improved comfort within a few years.

Balancing Airflow

Unbalanced airflow can create hot and cold spots throughout your home. To fix this, install balancing dampers on branch ducts for precise adjustments. Partially close dampers to over-conditioned areas and open them fully in under-conditioned spaces. Adjusting registers can also help, but avoid closing them completely, as this increases static pressure and risks damaging the system.

Many homes rely on a single central return vent, which can cause problems when bedroom doors are closed. Adding return vents or transfer grilles in these rooms prevents pressure imbalances and improves overall airflow. Ideally, every major room should have a return path, either through a dedicated grille or undercut doors. Homes with insufficient returns often experience temperature differences of several degrees between rooms and floors.

For larger systems, professional testing ensures accurate CFM distribution. Technicians use specialized instruments to measure airflow and pressure in each branch, adjusting fan speed, dampers, and duct sizing to achieve even distribution without overworking the fan. This method is far more effective than trial and error.

Professional services, like those offered by Hydrodynamics, can conduct detailed assessments that include load calculations, duct modeling, and leakage testing. With their expertise, they can redesign layouts, resize ducts, upgrade insulation, seal leaks, and balance systems to improve comfort, reduce noise, and lower energy costs.

The Role of Professional Services in Duct Design

When it comes to duct design, professional services play a critical role in ensuring everything – from sizing to layout – is done right. While minor issues might be manageable with DIY solutions, professional HVAC services bring the expertise, tools, and industry know-how needed to optimize duct systems for peak performance. Inefficient ductwork not only wastes energy but also costs more in the long run, making professional intervention a smart investment.

Benefits of Professional Assessment

Professional assessments go far beyond a simple visual inspection. Certified technicians use specialized tools to uncover hidden problems, measuring airflow, static pressure, and duct leakage with a level of accuracy that’s impossible to achieve through observation alone. For instance, duct leakage testing involves calibrated instruments to pinpoint how much conditioned air is escaping through leaks.

These evaluations often reveal issues you might not notice right away, like leaks hidden behind walls, undersized return ducts, or poorly balanced branch runs. Left unchecked, these problems can lead to higher energy bills, uneven comfort, and even premature equipment breakdowns. By addressing these inefficiencies early, professionals help you avoid costly repairs down the road.

Another major advantage is compliance with industry standards. Professionals ensure your duct system is tailored to your building’s heating and cooling needs while meeting local building codes for insulation and design. This attention to detail prevents common mistakes, such as improper duct sizing, inadequate sealing, or poorly planned layouts.

Take Hydrodynamics Inc., founded in 1994, as an example. Their EPA 609 Certified Technicians perform detailed duct assessments for residential, commercial, and industrial properties. Their expertise ensures systems not only comply with current standards but also deliver long-term efficiency. As Emma K. from Drums, PA, shared:

“They were prompt, knowledgeable, and efficient. Very pleased with their work.”

Custom Solutions for Residential, Commercial, and Industrial Needs

Duct design isn’t a one-size-fits-all process. Residential properties often need targeted upgrades, like adding return vents to balance airflow or improving insulation to cut energy loss, ensuring consistent comfort in every room. Commercial buildings, on the other hand, require more complex solutions, such as multi-zone systems or variable air volume setups, to handle fluctuating occupancy levels and stricter energy regulations. Meanwhile, industrial facilities, such as warehouses or manufacturing plants, demand high-capacity ductwork capable of managing large airflow volumes while meeting safety standards.

Hydrodynamics tailors its HVAC services to meet the unique demands of each sector, ensuring every project gets a solution that fits its specific needs.

Energy Efficiency and Cost Savings

Investing in professional duct services translates into tangible savings through better energy efficiency and reduced wear on HVAC equipment. Sealing leaks and upgrading insulation not only lower energy consumption but also cut operating costs and extend the lifespan of your system.

Well-maintained ductwork prevents your HVAC system from overworking, which can otherwise lead to higher energy bills and faster equipment wear. Tackling duct issues early minimizes operating costs and reduces the risk of premature equipment replacements. Regular inspections catch small problems before they escalate into expensive failures.

Hydrodynamics prioritizes preventative maintenance as a cornerstone of their services. In November 2025, the company published an article titled “How to Ensure Ductwork Meets Retrofit Standards”, noting that inefficient ductwork can waste up to 30% of HVAC energy. Another article from December 2025, “Duct Leakage Testing for Retrofit Projects”, emphasized the importance of professional testing in identifying leaks and improving overall efficiency.

For retrofit projects, professional assessments help modernize older duct systems, aligning them with today’s efficiency standards. This not only cuts energy use but also enhances overall comfort, making it a worthwhile upgrade for any property.

Conclusion

Mistakes in duct design can lead to a trifecta of problems: discomfort, higher energy bills, and reduced HVAC efficiency. Issues like incorrect sizing that choke airflow or leaky ductwork that wastes energy can quickly snowball into bigger headaches. The good news? These problems are often fixable with the right strategies.

The first step to solving these issues is identifying them. Problems such as poor sizing, ineffective layouts, inadequate insulation, and improper ventilation all chip away at your system’s performance. Each misstep contributes to inefficiencies that impact your comfort and wallet.

Once the issues are clear, the fixes are fairly straightforward. For example, using Manual D calculations ensures your ducts are sized correctly, delivering the right amount of airflow throughout your space. Reducing sharp bends, keeping duct runs short, and insulating ducts in unconditioned spaces with R-6 to R-8 insulation can slash energy use by as much as 20%. Sealing leaks with mastic or metal tape and balancing airflow using dampers can eliminate those annoying hot and cold spots while cutting down on energy waste.

For a more precise approach, professional assessments are invaluable. Certified technicians can locate leaks, measure airflow, and ensure your system meets industry standards. This attention to detail not only prevents costly errors but also ensures long-term savings. Companies like Hydrodynamics Inc., staffed with EPA 609 Certified Technicians, offer comprehensive duct evaluations and tailor-made solutions for residential, commercial, and industrial needs. Their expertise ensures your system operates at peak efficiency.

Fixing duct design flaws doesn’t just improve comfort – it boosts efficiency and enhances indoor air quality. Whether you’re upgrading an older system or planning a new one, investing in proper duct design pays off in the form of lower energy bills, longer equipment life, and consistent comfort. A well-thought-out duct system ensures you enjoy immediate benefits while safeguarding future savings and performance.

FAQs

How can I tell if my ductwork is the wrong size, and what can I do to fix it?

Improperly sized ductwork can cause a host of problems, including weak airflow, inconsistent room temperatures, louder-than-normal HVAC operation, and even higher energy costs. You might notice rooms that are always too hot or too cold, vents with barely any airflow, or an unusually noisy system – these are all red flags that your ductwork might not be the right size for your home.

If these issues sound familiar, it’s a good idea to call in a professional HVAC technician. They can assess your system by performing a load calculation and checking for any design flaws in your ductwork. Depending on what they find, solutions might involve resizing the ducts, sealing leaks, or installing dampers to better control airflow. Fixing these issues can make your home more comfortable, cut down on noise, and help lower your energy bills.

Why should I hire professionals for duct design and maintenance instead of attempting DIY solutions?

Hiring professionals for duct design and maintenance is a smart move if you want your system to deliver consistent airflow, lower energy costs, and dependable performance over time. These experts come equipped with the right tools and expertise to size and install ducts correctly, which helps avoid problems like uneven temperatures, noisy systems, and wasted energy.

Attempting DIY solutions might seem tempting, but they often fall short when it comes to the precision ductwork requires. This can lead to expensive repairs or increased utility bills down the road. Opting for professional services not only saves you time and effort but also ensures your HVAC system runs efficiently and reliably.

How can using dampers and adding return vents improve my HVAC system’s airflow and efficiency?

Balancing airflow with dampers and adding extra return vents can make a noticeable difference in how well your HVAC system works. Dampers give you control over how much air flows into different areas, ensuring every room gets the right level of heating or cooling. This can help get rid of uncomfortable hot or cold spots while also easing the workload on your system.

Installing additional return vents enhances air circulation by allowing conditioned air to return to the HVAC unit more effectively. This not only prevents energy waste but also helps keep temperatures consistent throughout your home, potentially lowering your energy bills. Together, these changes fine-tune your system’s performance, making your home more comfortable and energy-efficient.

Commercial Leak Response: Best Practices

Commercial Leak Response: Best Practices

Leaks in commercial spaces can lead to expensive damage if not addressed promptly. Here’s what you need to know:

  • Two main options: Businesses can rely on professional services or in-house maintenance teams.
  • Key factors to consider: Response speed, expertise, cost, and minimizing disruptions.
  • Best approach: A mix of in-house teams for quick action and professionals for complex repairs often works best.

Professional services like Hydrodynamics Inc. are equipped for advanced diagnostics and permanent solutions, while in-house teams excel at immediate response and routine maintenance. Preparation – like training staff, maintaining equipment, and building partnerships with repair companies – is critical to reducing risks and costs.

Takeaway: Combine quick on-site action with expert assistance to protect your property and operations.

Commercial Water Loss & Emergency Response Plan

1. Hydrodynamics

Hydrodynamics Inc., a family-run business since 1994, specializes in addressing a wide range of leak-related issues throughout Pennsylvania. From fixing small faucet drips to tackling major water line failures, they provide dedicated plumbing services tailored to commercial clients.

Response Speed

In a water emergency, every second matters. A fast response can be the difference between a quick fix and extensive, costly damage. Hydrodynamics prioritizes rapid action as a cornerstone of their service, fully aware of the urgency required when water is actively damaging a commercial property.

“We are dedicated to provide prompt repairs, expert installation services, and satisfaction to our valued customers.” – Hydrodynamics Inc.

Customers frequently commend their swift emergency response. Establishing a relationship with Hydrodynamics ahead of time ensures an even faster turnaround, eliminating the stress of scrambling to find a reliable contractor during a crisis.

Damage Mitigation Effectiveness

Handling water damage effectively requires more than just plumbing know-how – it calls for a broad skill set and a thorough approach. Hydrodynamics combines expertise in plumbing, HVAC, refrigeration, and water conditioning to tackle leaks that may stem from various systems. Leaks can originate from unexpected sources, such as HVAC condensate lines or refrigeration units, making accurate diagnosis essential. Their technicians are equipped to locate and resolve the issue quickly, no matter the source. Additionally, their preventive maintenance services help identify potential weak points before they escalate into major problems, saving clients from future headaches.

Expertise and Scalability

Commercial leak response isn’t a one-size-fits-all job. It demands specialized knowledge and the ability to adapt to different types of buildings and systems. Hydrodynamics brings a wealth of experience across residential, commercial, and industrial settings, allowing them to scale their services to fit the unique needs of each client. Whether it’s managing complex HVAC systems or addressing specialized plumbing setups, their team understands how interconnected systems function and where vulnerabilities may arise. For businesses operating multiple locations or with intricate infrastructures, this integrated expertise is invaluable. Their water conditioning services, including softeners and UV systems, also play a crucial role in reducing wear and tear on plumbing systems, helping to prevent corrosion and extend the lifespan of essential infrastructure.

Cost Efficiency

The financial impact of a leak goes beyond repair bills. Business interruptions, equipment damage, and escalating water exposure costs can quickly add up. Hydrodynamics’ focus on prompt repairs helps minimize these hidden expenses, as studies show that prolonged water exposure significantly increases both damage and repair costs. For businesses managing multiple properties, working with a single service provider for plumbing, HVAC, and related systems simplifies billing and reduces administrative complexity. Their familiarity with modern plumbing technologies, such as corrosion-resistant PEX piping, allows them to recommend cost-effective upgrades that reduce maintenance needs and lower the risk of future leaks. Over time, these proactive measures often save clients money, with many seeing returns on their investment within the first year through reduced emergency calls and avoided damage.

2. In-House Maintenance Teams

Many commercial properties depend on their own maintenance staff to address water leaks and other facility issues. These teams offer distinct advantages, particularly in terms of their availability and familiarity with the building’s systems. However, their success hinges on proper training, the right tools, and well-established protocols.

Response Speed

One of the biggest strengths of in-house maintenance teams is their ability to act quickly. Since they’re already on-site or can be mobilized without delay, they can respond faster than external contractors. This rapid action is crucial when water is actively leaking, as every minute of delay increases the risk of damage.

To make the most of this advantage, building managers should set up clear communication protocols. For example, maintenance staff should know exactly where the main water shut-off valves are located and be trained to act immediately. When occupants report leaks through a designated system, these teams can often respond in minutes rather than hours. This quick reaction is especially helpful during nights or weekends when external contractors might take longer to arrive or charge higher rates. Regular training – at least once a year – on emergency procedures, valve locations, and water detection systems ensures teams stay prepared, even when building infrastructure changes.

This readiness lays the groundwork for effective damage control, which is explored further in the next section.

Damage Mitigation Effectiveness

In-house teams are well-suited for immediate damage control. They can quickly shut off water, deploy absorbent materials, and start drying surfaces before mold has a chance to develop. To support these efforts, buildings should have spill control kits readily available. These kits, stocked with absorbent materials, barriers, and basic tools, allow teams to act swiftly.

The key to effective damage mitigation lies in the team’s understanding of the building’s systems. Regular inspections help staff identify vulnerabilities before they become major issues. For instance, monthly checks of boiler rooms and sprinkler systems, quarterly reviews of HVAC drain lines, and bi-annual inspections of water storage tanks can catch problems early.

Water detection sensors placed near high-risk areas like water heaters, HVAC units, and plumbing connections provide real-time alerts. Some advanced systems even feature sensor-activated shut-off valves that can stop water flow automatically when a leak is detected, reducing damage before maintenance staff even arrive.

Additionally, teams can monitor water usage patterns to flag unusual activity that might signal hidden leaks. After a water incident, it’s important to measure moisture levels in affected areas using tools like moisture meters. If materials are wet, industrial fans and dehumidifiers should be deployed immediately to prevent further damage.

Expertise and Scalability

While in-house teams excel at quick responses and routine maintenance, they may face challenges with more complex issues. For example, diagnosing hidden leaks, handling advanced HVAC systems, or addressing structural water damage often requires specialized skills that general maintenance staff might not have.

For larger properties with extensive infrastructure, scalability can also be a concern. A single team may struggle to cover multiple buildings or expansive systems effectively. Appointing a water damage coordinator to oversee response efforts can improve coordination during incidents.

To bridge these gaps, building managers should establish relationships with reliable external contractors. These experts can handle complex repairs and restoration, addressing not just the leak but also any structural or cosmetic damage caused by water. In this setup, in-house teams focus on prevention and immediate action, while external partners tackle more advanced challenges.

Cost Efficiency

A well-trained in-house maintenance team can save money in the long run by preventing damage and minimizing repair costs. Routine maintenance – like replacing plumbing hoses every five years or water heaters every ten years – helps avoid costly failures.

However, maintaining an in-house team comes with its own expenses, including salaries, training, equipment, and system upgrades. For smaller buildings, these costs might outweigh the benefits, making outsourcing a more affordable option. On the other hand, larger facilities with complex systems typically benefit from dedicated in-house teams that provide consistent monitoring and upkeep. To manage costs, building managers can start by focusing on high-risk areas and gradually expanding coverage.

Keeping detailed records of leak incidents also contributes to cost efficiency. Maintenance teams should document each incident with notes and photos, which not only support insurance claims but also help identify recurring issues or seasonal patterns. By analyzing this data, teams can refine inspection schedules and prioritize maintenance tasks based on actual experience, ensuring resources are used effectively.

Advantages and Disadvantages

Expanding on earlier discussions about individual strategies, this section dives into a comparison of the strengths and challenges associated with professional services, like Hydrodynamics, and in-house maintenance teams. Each brings distinct advantages and faces unique limitations, making them suited to different situations.

Comparing Core Capabilities

The primary difference lies in immediate local response versus specialized diagnostic expertise. In-house teams can act almost instantly since they’re already on-site, a critical advantage when dealing with active leaks. On the other hand, professional services excel in advanced diagnostics, addressing the root cause rather than just the immediate issue.

Professional leak response providers work to minimize disruptions to daily operations by adhering to efficient timelines and offering complete remediation solutions. Meanwhile, in-house teams boast intimate knowledge of their building’s quirks and history. They know which pipes are prone to issues, how various systems interact, and can navigate the facility with ease. This kind of institutional knowledge is hard for external providers to replicate, even with detailed documentation.

Technology and Equipment Differences

Professional services often utilize real-time monitoring systems that track water usage and detect unusual patterns signaling leaks. These systems have proven to save businesses significant amounts of money by preventing leaks before they escalate. Whether a company chooses in-house or outsourced solutions, investing in this technology is a smart move.

Additionally, professional services provide detailed documentation, including photographic evidence of repairs and preventive measures. This documentation is invaluable for insurance claims and tracking recurring issues. While in-house teams may also document incidents, the consistency and quality of their records can vary, depending on staff training and available time.

Cost Structures and Financial Considerations

Maintaining an in-house team involves ongoing costs, including salaries (ranging from $35,000 to $65,000 annually per employee), benefits, training, equipment upkeep, and technology investments. These expenses are fixed, regardless of how often leaks occur. In contrast, professional services like Hydrodynamics charge $150–$300+ per hour for emergency response, along with additional fees for specialized repairs and water damage remediation. While these per-incident costs may seem high, they only apply when services are needed.

The financial advantage of professional services lies in their ability to prevent exponentially greater damage costs. For example, a leak left unaddressed for 24 hours can result in damages costing $10,000–$50,000 or more. In this context, the cost of a professional response becomes minor compared to potential losses. Their comprehensive remediation services also help reduce long-term expenses by addressing structural and aesthetic damage, preventing recurrence.

Scalability and Resource Constraints

In-house teams may struggle to handle multiple buildings or large-scale incidents requiring significant resources. During widespread weather events, for instance, they can quickly become overwhelmed.

Professional services, however, are equipped to scale efficiently. They can deploy additional personnel as needed and manage multiple properties simultaneously. For businesses with properties spread across different locations, professional services ensure consistent quality and availability, which would be costly to replicate with in-house teams alone.

That said, relying on external vendors has its challenges. Availability during peak seasons can become an issue, especially when many clients need assistance at the same time. Establishing relationships with professional providers before emergencies arise can help mitigate this risk.

Training and Expertise Requirements

In-house teams require regular training on emergency procedures, valve locations, shut-off protocols, and incident response. This training demands ongoing time and financial investment. Additionally, staff turnover can result in the loss of institutional knowledge, necessitating repeated training for new hires.

Professional services maintain their expertise through certifications and frequent exposure to a wide range of leak scenarios. Their experience with diverse and complex situations allows them to identify issues that less experienced in-house staff might overlook. However, external providers need time to familiarize themselves with the unique characteristics of each building. In contrast, in-house teams already know the trouble spots, such as a problematic bathroom on the third floor or an HVAC unit prone to condensate line issues.

Performance Comparison

Aspect Professional Services (Hydrodynamics) In-House Maintenance Teams
Response Time Scheduled (varies by location/availability) Immediate (on-site staff)
Specialized Expertise Advanced diagnostics and root cause analysis Basic troubleshooting, building-specific knowledge
Technology Access Advanced detection tools, 24/7 monitoring Limited to installed systems, manual monitoring
Cost Structure Per-incident fees ($150–$300+ per hour) Fixed salaries, benefits, training, equipment
Documentation Quality Detailed with photographic evidence Varies based on staff training
Remediation Scope Complete structural and aesthetic repairs Immediate stoppage, basic mitigation
Scalability Efficiently handles multiple properties Limited by team size and availability
Preventative Approach Proactive recommendations based on experience Reactive focus on known issues
Training Requirements Certifications maintained internally Annual updates required
Business Disruption Minimized through efficient timelines Varies with team capability

Making the Right Choice

A hybrid solution – combining in-house teams for quick responses with professional services for complex repairs – often provides the best balance. In-house teams can handle routine inspections, immediate damage control, and minor repairs. Professional services, meanwhile, bring specialized expertise and comprehensive remediation capabilities for larger or more complex issues.

Building managers should establish relationships with dependable professional providers well in advance of emergencies. This ensures rapid deployment when incidents exceed the capabilities of in-house teams. The ideal approach depends on factors like building size, infrastructure complexity, budget constraints, and risk tolerance. Larger facilities with extensive systems may benefit from dedicated in-house teams supported by professional services, while smaller properties might find outsourcing most leak management needs more cost-effective.

Conclusion

Choosing the right leak response strategy hinges on your facility’s specific needs and budget. For smaller businesses with straightforward, modern plumbing systems, a trained in-house team supported by annual professional inspections strikes a good balance between cost control and effective protection.

As businesses grow, their plumbing needs become more complex. Mid-sized companies often benefit from a hybrid approach – combining in-house responsiveness with periodic professional evaluations. This setup ensures proper oversight and access to specialized expertise without incurring excessive costs.

For larger facilities, especially those in high-risk industries like food service or manufacturing, professional services with continuous monitoring become a necessity. For example, restaurants need fast response systems to meet health regulations and avoid operational downtime, making real-time alert systems critical. Similarly, manufacturing facilities can save significant costs by employing continuous sensor-based monitoring to detect and prevent leaks before they escalate.

The age and complexity of your building also play a major role in determining the right strategy. Older buildings with aging infrastructure often require more frequent professional inspections and advanced detection tools like tracer gas detection or moisture mapping. On the other hand, newer buildings with modern plumbing can often rely more heavily on in-house monitoring, supplemented by occasional professional assessments.

Regardless of the strategy, proactive maintenance and quick response are non-negotiable. All commercial buildings should have clearly labeled shut-off valves, accessible spill control kits, sensor-activated shut-off systems in high-risk areas, and documented emergency protocols. Regular staff training on emergency procedures, valve locations, and response measures ensures everyone is prepared.

The best approach combines proactive upkeep, staff preparedness, and a tailored response plan that aligns with your building’s specific features and operational demands. Establishing partnerships with professional service providers ahead of time is also crucial, particularly during peak seasons when their availability may be limited.

Financially, investing in professional services can save you from exponentially higher costs down the line. By accurately pinpointing leaks and addressing them comprehensively, professional responses help prevent extensive damage and costly repairs.

Ultimately, your decision should consider four key factors: the building’s age, plumbing system complexity, history of leaks, and budget constraints. By carefully evaluating these elements and understanding your risk tolerance, you can adopt a strategy that protects your property, minimizes disruptions, and delivers measurable savings through reduced water waste and lower utility bills.

FAQs

What are the benefits of combining your in-house maintenance team with professional services for managing commercial water leaks?

Combining the strengths of your in-house maintenance team with professional services can greatly improve how you handle commercial water leaks. Your internal team offers quick, on-site support and an in-depth understanding of your facility. Meanwhile, professional services contribute specialized skills, advanced equipment, and customized solutions for more challenging problems.

This collaboration allows for quicker leak detection, reduces downtime, and helps avoid expensive damage. Additionally, professional services can offer advice on long-term prevention, like energy-efficient upgrades or routine system maintenance, ensuring your operations remain steady and efficient.

What are the best ways to train in-house maintenance teams to handle water leaks and reduce potential damage?

Effectively preparing your in-house maintenance team to handle water leaks requires a mix of preparation, education, and consistent practice. Start by establishing clear, step-by-step protocols for identifying and addressing leaks quickly. This includes instructions on shutting off water sources and assessing the situation to minimize damage. Providing hands-on training with essential tools like moisture detectors and pipe repair kits can also boost confidence and ensure your team feels ready to act.

It’s equally important to tailor training to the specific needs of your business or industry, as response strategies can differ depending on the environment. Regularly scheduled drills and workshops are a great way to reinforce these skills and keep the team sharp for emergencies. For added expertise, consider reaching out to professionals, such as Hydrodynamics Inc., to deliver specialized training on leak prevention and repair methods designed for your facility.

What should businesses consider when choosing between in-house teams and professional services for managing water leaks?

When deciding whether to rely on in-house teams or bring in professional services for water leak management, businesses need to weigh several important factors.

Expertise plays a major role. While an in-house team might be able to tackle smaller issues, professional services often come with specialized knowledge and advanced tools that can handle more complicated leaks with greater efficiency.

Cost-efficiency is another key factor. Although in-house teams might seem like the cheaper option upfront, professional services can often save money in the long run by preventing extensive damage and reducing downtime through quicker, more accurate solutions.

The scope and urgency of the problem should also guide your decision. When dealing with large-scale leaks or situations that require immediate attention, professional services are typically better prepared to act quickly and keep disruptions to a minimum.

Finally, think about long-term maintenance. Professional providers can offer ongoing support and energy-efficient strategies to help avoid future issues, which can ultimately save both time and money over the years.

How to Spot HVAC Energy Waste

How to Spot HVAC Energy Waste

Your HVAC system could be wasting energy – and money – without you realizing it. Common issues like dirty filters, leaky ducts, and aging equipment can drive up energy bills by as much as 20%–40%. Heating and cooling account for nearly 50% of home energy use, making efficiency crucial for your comfort and wallet.

Here’s how to spot energy waste quickly:

  • Check your utility bills: Compare costs month-to-month and year-to-year for unexplained increases.
  • Inspect airflow and temperatures: Weak airflow, uneven room temperatures, or blocked vents signal inefficiencies.
  • Listen and smell for warning signs: Unusual noises or odors often point to mechanical or electrical problems.
  • Review the system’s age: Units older than 10–15 years lose efficiency and cost more to run.
  • Maintain filters: Replace clogged filters every 1–3 months to avoid overworking your system.

Simple fixes like sealing ducts can improve efficiency by up to 20%, while upgrading to ENERGY STAR-certified equipment could save $140 annually. Regular maintenance and professional inspections can reduce energy waste and extend your system’s lifespan. Keep your HVAC system efficient to cut costs and stay comfortable year-round.

HVAC Energy Waste Statistics and Savings Opportunities

HVAC Energy Waste Statistics and Savings Opportunities

5 BIGGEST HVAC Energy Wasters Homeowners Don’t Know!

Review Energy Bills for Unusual Increases

Your utility bill can be a goldmine of clues when it comes to spotting HVAC energy waste. The trick is knowing how to examine it and what patterns to look for.

How to Review Monthly Utility Statements

Start by pulling together your utility bills from the past 12 months. Compare each month’s bill to the same month from the previous year – like January 2026 against January 2025, or July 2025 versus July 2024. This approach accounts for seasonal differences in weather.

Pay close attention to high-demand months, such as winter and summer. Look for unexplained spikes in your bill that don’t align with changes in weather or usage. For example, if your January bill jumped from $180 last year to $245 this year, but your energy habits and the weather stayed consistent, it’s worth investigating.

Many utility companies now offer online tools or downloadable resources to help you track and analyze your energy usage over time. These tools can simplify spotting trends and irregularities. Considering that the average household spends about $1,900 annually on energy bills, even a modest 10% increase could mean nearly $200 in wasted energy each year.

If you notice unexplained increases, it’s time to dig deeper into potential issues with your HVAC system.

Common Signs of HVAC Energy Waste

When your bills rise unexpectedly, it’s often due to specific HVAC system problems. For instance, leaky ductwork can waste 20% to 30% of airflow, and clogged filters can restrict air circulation, forcing your system to work harder and consume more energy.

“A dirty filter will slow down air flow and make the system work harder to keep you warm or cool – wasting energy.” – ENERGY STAR

Another culprit could be improper installation of new equipment, which can reduce efficiency by up to 30%. Even if your system is brand-new, poor installation can lead to higher bills. Additionally, as HVAC systems age – typically beyond 10 to 15 years – their components naturally wear out, reducing efficiency and driving up energy costs. If you notice your bills creeping up year after year during the same seasons, it’s a sign your system might be struggling to keep up.

Check for Temperature and Airflow Problems

Uneven temperatures and weak airflow are clear signs your HVAC system might be wasting energy. If some rooms feel like a sauna while others are freezing, or if barely any air comes out of the vents, your system is likely overworking to compensate – pushing up your energy bills in the process.

These issues often point to duct leakage or pressure imbalances that disrupt air distribution. In fact, airflow problems alone can reduce your HVAC system’s efficiency by as much as 15%. The good news? You can spot these problems yourself with a few simple checks.

Measure Temperature Differences Between Rooms

Grab a digital thermometer and check the temperature in every room of your home. Jot down the readings and compare them to your thermostat’s setting. If you notice a difference of more than 3–5°F, you’ve likely uncovered an energy efficiency issue. Fixing these imbalances not only makes your home more comfortable but also helps cut down on wasted energy.

Large temperature differences often signal duct leaks or improper system sizing. An HVAC system that’s too large will cycle on and off frequently, failing to evenly distribute air. On the other hand, an undersized unit will struggle to maintain comfortable temperatures, running constantly without ever catching up.

For another quick test, place a glass thermometer next to your thermostat and leave it there for 15 minutes. If the readings differ by more than one degree, your thermostat might need recalibration. This could mean your system is kicking on unnecessarily, wasting energy every time it runs.

Test Airflow at Vents

Airflow testing is straightforward. Turn on your HVAC system, ensure all vents are open, and hold a piece of paper near each supply vent. The paper should flutter noticeably. If it barely moves – or doesn’t move at all – you’ve found an airflow problem.

Weak airflow can stem from several issues: a clogged air filter restricting circulation, dirty evaporator coils blocking airflow, or a failing blower motor struggling to push air effectively. These problems force your system to work overtime, wasting energy and wearing down components faster – which could lead to expensive repairs and a shorter system lifespan.

Here’s a quick breakdown of common symptoms, their causes, and how they impact energy use:

Symptom Potential Cause Impact on Energy
Hot/Cold Spots Leaky Ducts or Poor Insulation High: Conditioned air escapes to unconditioned spaces
Weak Airflow Clogged Filter or Failing Blower Medium: System runs longer to reach the target temperature
Frequent Cycling Oversized HVAC Unit High: Increased wear and inefficient operation
Rattling Doors Pressure Imbalance Low/Medium: Air struggles to circulate properly

Keep all vents open in every room. Closing vents might seem like a way to save energy, but it actually increases internal pressure in the system, making your HVAC work harder and less efficiently. Also, make sure vents are free from obstructions like furniture or curtains to allow air to circulate properly.

Identify HVAC Warning Signs

When it comes to spotting HVAC inefficiencies, don’t just rely on your bills or indoor temperatures. Pay close attention to what you can hear and smell – strange sounds and odors often hint at underlying issues that force your system to work harder than necessary. Unusual noises and odd smells are often early indicators of mechanical problems. Addressing these promptly can stop small issues from escalating into costly repairs.

“If you notice unusual sounds, schedule an inspection immediately.”

Taking preventive steps when these warning signs appear can improve your system’s performance by up to 45%. That’s not just a boost in efficiency – it’s also a noticeable decrease in your monthly energy costs.

Strange Noises from Your System

Every unusual sound your HVAC system makes tells a story, and unfortunately, it’s rarely a good one. Each type of noise often points to a specific problem that wastes energy. For example, whistling or wheezing could mean leaky ductwork or a clogged air filter, both of which restrict airflow. On the other hand, hissing often signals refrigerant leaks, which force the system to run longer to maintain desired temperatures. It’s worth noting that 20% to 30% of conditioned air is typically lost in homes due to duct issues.

Other sounds can indicate mechanical or electrical issues. Rattling or banging might mean loose parts like fan blades or motor mounts, or debris caught inside the system – problems that increase resistance and wear. Buzzing is often tied to electrical faults, such as failing contactors or loose wiring, which disrupt power flow and cause inefficiencies. Screeching or grinding may point to worn motor bearings or a slipping belt, both of which increase friction and energy consumption. Ignoring these issues can lead to expensive repairs, with AC motor fixes ranging from $300 to $600, and compressor replacements averaging $1,200.

If you hear a sharp, continuous squeal from your outdoor unit, it’s time to act fast. This could indicate dangerously high compressor pressure – turn the system off immediately. For noises like whistling or thumping, start by checking your air filter (refer to the air filter section for more details).

Noise Type Potential Mechanical Problem Impact on Energy/Efficiency
Whistling Leaky ducts, clogged filters High energy waste
Hissing Refrigerant or valve leak Prolonged operation; increased waste
Screeching Worn fan belt or motor bearings Higher friction and power consumption
Buzzing Electrical issues or failing fan Inefficient power usage
Banging Loose motor mounts or broken parts Severe inefficiency; risk of failure

Odd Smells from Vents

Unusual smells are just as telling as strange noises when it comes to spotting HVAC problems. For example, musty odors often mean mold caused by moisture buildup, which restricts airflow and increases energy use. Poor maintenance can lead to a 5-20% increase in energy consumption annually.

Burning smells are a red flag for electrical or overheating issues. These could stem from worn components or internal friction within motors, both of which drive up energy use and risk complete system failure. If you catch a burning smell, turn off the power at the breaker immediately to avoid potential electrical fires.

A sweet or chloroform-like scent might indicate a refrigerant leak. Since refrigerant is essential for heat transfer, even a small leak can force your system to run longer cycles, wasting significant energy. If this smell comes with hissing or bubbling noises, shut off the unit to prevent compressor damage.

“If the air is ten degrees or more warmer than normal and the filter is clean, refrigerant loss is likely.” – John Williams, Chief Executive Officer, Stan’s Heating, Air, Plumbing & Electrical

If smells seem to come from specific vents, there may be blockages or leaks in the ductwork trapping moisture. For musty odors, consider having your evaporator coils and ducts professionally cleaned. This service usually costs between $150 and $780, but it can eliminate mold, restore proper airflow, and improve dehumidification – helping your system run more efficiently and saving you money in the long run.

Inspect and Replace Air Filters

The air filter plays a crucial role in keeping your HVAC system running efficiently. When filters get clogged with dust, pet hair, and other debris, they restrict airflow. This forces your system to work harder, which can spike energy use by as much as 15%. Not only does this increase your utility bills, but it also puts unnecessary strain on your system.

“A dirty filter will slow down air flow and make the system work harder to keep you warm or cool – wasting energy.” – Energy Star

A clogged filter can also lead to short cycling and cause dust to build up on internal components, further reducing performance. Since dirt and neglect are leading causes of HVAC system failure, keeping your air filter clean is a simple yet essential step to maintain efficiency and extend the life of your system. Here’s how you can check and manage your air filter to keep everything running smoothly.

How to Check Air Filter Condition

Regular maintenance not only cuts down on wasted energy but also helps your system last longer. Checking your air filter is quick and can save you money in the long run. Start by locating the filter slot, which is usually found in the air handler or behind a return air grill. Before handling the filter, make sure to turn off your HVAC system at the thermostat to avoid any injuries or debris being pulled into the system.

Next, remove the filter and hold it up to a light source. If little to no light passes through, it’s time to replace it. Even if the filter doesn’t appear completely clogged, a gray or brown tint means enough buildup has occurred to restrict airflow and waste energy. While the filter is out, take a moment to check for dust around the surrounding area. Excess dust can quickly clog a new filter.

How Often to Replace Filters

Inspect your filter monthly and aim to replace it at least every three months. However, certain household factors might require more frequent replacements. Homes with shedding pets, wood-burning fireplaces, or those located in high-pollution areas may need filter changes every 60 days. During peak heating or cooling seasons, when your system is running constantly, filters could clog as quickly as 30 days.

The type of filter you use also determines its lifespan:

  • Flat or fiberglass filters: Replace every 30 days
  • Pleated filters: Last 90 days to 4 months
  • HEPA filters: Replace annually
  • Washable filters: Clean monthly

When installing a new filter, make sure the arrows on the frame point toward the blower motor to ensure proper airflow. If your filter slot doesn’t have a cover, seal any gaps with duct tape or a magnetic cover to prevent air leaks.

For professional HVAC maintenance and energy-saving solutions, contact Hydrodynamics. They can help keep your system running efficiently year-round.

Review System Age and Repair Records

Taking a closer look at your HVAC system’s age and repair history can reveal inefficiencies that might be draining your wallet.

If your system is more than 10–15 years old, it’s likely missing modern energy-saving technology. Air conditioners and heat pumps generally last 10–12 years, while furnaces can operate for 15–20 years. Once these systems surpass their expected lifespans, their efficiency tends to drop significantly.

Switching to an ENERGY STAR certified unit could help you save up to 20% on heating and cooling costs compared to a heat pump or air conditioner that’s a decade old. Additionally, older systems often suffer from component wear, which can lead to energy-wasting issues like short-cycling and even damage critical parts like the compressor.

Check Your System’s Age

You can find the installation date on the manufacturer’s label located on your indoor or outdoor unit. If your air conditioner or heat pump is over 10 years old, or if your furnace or boiler is older than 15 years, it’s time to have it inspected by a professional.

Older systems may also lack features like variable-speed motors and smart controls that help optimize energy use. If your system still uses R-22 refrigerant (commonly known as Freon), it’s a good idea to replace it. R-22 is being phased out, making repairs not only more difficult but also increasingly expensive.

Review Repair History and Costs

Take a moment to review your repair records. Frequent breakdowns and rising energy bills are clear indicators of a system losing its efficiency. A helpful guideline is the “$5,000 Rule”: multiply your system’s age by the cost of a repair. If the result exceeds $5,000, replacing the system is typically the smarter financial decision.

For example, if a 12-year-old air conditioner requires a $500 repair, the total ($6,000) suggests replacement is the better option. Another rule to consider is the “50% rule”: if a single repair costs 50% or more of what a new system would cost, replacement is usually the way to go.

Keep an eye out for signs like uneven temperatures, unusual noises, or rapid on-and-off cycling. These issues often point to deeper problems and should be addressed by a professional. For expert advice on your system’s condition, reach out to Hydrodynamics.

When to Contact a Professional

While you might be able to identify some energy inefficiencies on your own, many problems stay hidden without the help of certified technicians equipped with specialized tools. After addressing visible issues, professionals can uncover deeper problems that aren’t immediately apparent.

Professional Testing for Hidden Problems

HVAC technicians use tools like manometers and flow hoods to measure air pressure and airflow at vents. These tools help detect blockages, undersized ducts, or loose joints that can lead to uneven temperatures in your home.

Duct leaks are another frequent source of energy loss that often go unnoticed without a professional inspection. These leaks can waste 20%–30% of conditioned air, especially in unconditioned areas like attics or basements. Experts address these leaks with long-lasting solutions, such as mastic sealant or metal-backed foil tape, which are far more effective than regular duct tape.

Refrigerant issues also demand professional attention. Even a small refrigerant loss – around 10% – can increase your annual energy costs by as much as 20%. Simply topping off refrigerant is a short-term fix and can become an expensive habit.

Other hidden issues, like loose electrical connections, dirty blower wheels, or gaps in insulation, can also impact your system’s performance. Advanced diagnostic methods, such as those used by Hydrodynamics, can identify these energy-draining problems that might otherwise go unnoticed.

Professional inspections do more than just reveal hidden issues – they also provide actionable steps for effective maintenance.

Benefits of Regular Maintenance

Regular maintenance goes beyond fixing current issues; it also helps prevent energy waste from creeping back into your system. A clean and well-maintained HVAC system can operate with up to 15% less energy, potentially saving homeowners between $200 and $300 annually on energy bills.

“Dirt and neglect are the top causes of heating and cooling system failure and inefficiency.” – Denise Minor-Hoes, ENERGY STAR

Routine tune-ups ensure your system stays in peak condition by cleaning evaporator and condenser coils, fine-tuning airflow, lubricating moving parts, and calibrating thermostat settings. These steps reduce the strain on your system, which not only lowers energy usage but also minimizes wear and tear on its components.

Scheduling bi-annual maintenance – checking your cooling system in the spring and your heating system in the fall – can help catch minor problems before they escalate into costly emergencies. While an annual maintenance visit typically costs between $150 and $300, emergency repairs can range anywhere from $300 to over $1,000. Regular upkeep can also extend your HVAC system’s lifespan to 15–20 years, compared to just 10–12 years for systems that are neglected.

For a thorough energy efficiency evaluation or maintenance services, consider reaching out to Hydrodynamics. Their technicians offer specialized tests, such as duct blaster assessments and thermographic inspections, to ensure your HVAC system is running as efficiently as possible. These professional services are the perfect complement to your efforts to reduce energy waste and keep your home comfortable year-round.

Conclusion

Catching HVAC energy waste early can trim your energy bills by as much as 15%. Keep an eye on your monthly utility bills – unexplained spikes might be a red flag. Also, watch for warning signs like weak airflow, strange noises, or unpleasant odors, which could mean your system is overworking unnecessarily.

Regular maintenance is a game changer when it comes to efficiency. HVAC systems over 10 years old often lose their edge and may need replacing to keep operating costs under control.

“Addressing issues early can help you save up to 15% on your energy bills.” – U.S. Department of Energy

But maintenance isn’t the only piece of the puzzle. Energy waste can stem from leaky ducts, poor insulation, or blocked vents. Sealing and insulating ducts alone can improve efficiency by up to 20%. And if you upgrade to an ENERGY STARÂŽ certified smart thermostat, you could save around $100 annually.

If routine checks and maintenance don’t completely solve the problem, it’s time to bring in a professional. Hydrodynamics offers advanced diagnostic services to uncover hidden issues like duct leaks or refrigerant loss – problems that DIY fixes often overlook. Whether it’s routine upkeep or a professional inspection, taking action now can help you cut energy costs, extend your HVAC system’s lifespan, and keep your home comfortable throughout the year.

FAQs

How can I tell if my HVAC system is outdated and inefficient?

If your HVAC system has been around for more than a decade, it might be worth checking if it’s still running efficiently. Common signs that your system may be outdated include rising energy bills, frequent repairs, and inconsistent indoor temperatures. Most air conditioners and heat pumps are built to last about 10–12 years, so if yours is approaching or exceeding that age, it may not be performing at its best.

Older systems often have trouble maintaining steady performance, which can result in frequent on-and-off cycling or certain rooms feeling too hot or too cold. Upgrading to a modern, energy-efficient HVAC system can reduce utility costs and create a more comfortable environment in your home or business.

What are the warning signs that my HVAC system needs maintenance?

Your HVAC system often sends out clear signals when it needs professional care. Be alert for unusual sounds like rattling, squealing, or grinding. Pay attention to strange smells, such as a burning odor or a musty scent, and watch for temperature inconsistencies that don’t match your thermostat settings. Other red flags include uneven heating or cooling, frequent cycling (when the system keeps turning on and off), or unexpected spikes in your energy bills.

When these issues pop up, it’s time to bring in a professional. A qualified technician can handle tasks like cleaning components, replacing filters, calibrating sensors, and inspecting ductwork to get your system back to peak performance. Regular maintenance not only helps avoid expensive repairs but can also reduce your utility bills. Hydrodynamics provides expert HVAC maintenance services to ensure your system stays efficient and reliable all year long.

How often should I change my HVAC air filter to keep it running efficiently?

To keep your HVAC system running smoothly, make it a habit to replace the air filter regularly. Inspect the filter monthly, especially during high-usage times like summer and winter. If it looks dirty, don’t wait – replace it right away.

Most filters need to be swapped out at least once every 30 days. If your system sees lighter use, you might stretch this to three months, but even if the filter looks clean, replacing it every quarter helps prevent debris buildup that could overwork your system. If you have pets, smokers, or a lot of dust in your home, you may need to replace the filter more often – sometimes as frequently as every two weeks.

Changing your filter regularly not only improves airflow but also reduces energy waste and can extend the lifespan of your HVAC system.

How Geothermal Networks Work: Guide for Property Owners

How Geothermal Networks Work: Guide for Property Owners

As the world seeks sustainable energy solutions, geothermal networks have emerged as a transformative option for heating and cooling systems. With their potential to decarbonize energy usage, reduce costs, and provide efficient alternatives to traditional gas and electric systems, geothermal networks are gaining significant traction among states, utilities, and property owners alike. This guide delves into the essentials of geothermal networks, drawing insights from a detailed webinar hosted by leading experts in the field.

What Are Geothermal Networks?

At their core, geothermal networks are decentralized systems that use ambient thermal energy stored in the Earth’s subsurface to provide sustainable heating and cooling. Unlike traditional geothermal systems dedicated to single buildings, networked geothermal connects multiple buildings via a loop of underground pipes filled with water or a water-antifreeze mixture. This setup allows for efficient heat exchange without combustion, making it a clean and renewable solution.

How Geothermal Networks Differ From Traditional Systems

  • Traditional Geothermal Systems: Typically serve one building, relying on localized boreholes for heating and cooling.
  • Geothermal Networks: Utilize interconnected loops to distribute thermal energy to multiple buildings, improving efficiency through shared infrastructure.

Why Geothermal Networks Work

Geothermal networks capitalize on the Earth’s stable underground temperatures to provide consistent energy. According to experts, this technology offers a series of advantages:

  • Energy Efficiency: Heat pumps used in geothermal networks achieve higher coefficients of performance (COP), significantly reducing electricity usage compared to traditional systems.
  • Grid Benefits: By reducing electricity demand during peak winter months, geothermal networks help alleviate strain on the electric grid.
  • Scalability: These networks can be expanded modularly, adding more buildings or loops over time without disrupting existing infrastructure.
  • Environmental Benefits: By transitioning buildings off fossil fuels, geothermal networks play a vital role in reducing greenhouse gas emissions and meeting state decarbonization targets.

Designing a Geothermal Network

The design of a geothermal network involves three key components:

  1. Buildings: Each building is equipped with water-source heat pumps to extract or reject thermal energy.
  2. Distribution Loops: Underground pipes circulate water at ground temperature, facilitating efficient energy transfer.
  3. Thermal Utility Management: A centralized system oversees the thermal balance, ensuring optimal performance by regulating energy inputs and outputs.

Factors Influencing Design

  • Load Diversity: Networks work best when different types of buildings (residential, commercial, municipal) with varying heating and cooling demands are connected. This diversity enhances efficiency by balancing energy needs.
  • Site Suitability: Borehole drilling, access to alternative thermal sources (e.g., sewer heat recovery), and sufficient customer density are critical considerations.
  • Customer Adoption: A strong engagement strategy is essential to ensure a critical mass of participants, as the viability of the network depends on shared infrastructure costs.

Case Studies: Success and Challenges

The Framingham, Massachusetts Pilot

Framingham serves as a pioneering example of utility-led geothermal implementation. Managed by Eversource Energy, this project connected 36 buildings, including residential, commercial, and municipal properties:

  • Key Achievements: The project reduced reliance on gas and electric resistance heating, demonstrating cost savings and emissions reductions.
  • Challenges: Retrofitting older buildings with geothermal-compatible systems proved costly, highlighting the potential cost advantages of targeting new construction.

Lessons From Lowell, Massachusetts

In contrast, a proposed project in Lowell was halted due to high costs and insufficient customer adoption. The case underscored the importance of:

  • Aligning project size with customer participation to avoid cost inefficiencies.
  • Leveraging economies of scale to lower per-unit costs.

Opportunities in Rural and Urban Areas

Urban Areas: Dense neighborhoods with diverse building types and significant heating and cooling demands are ideal for geothermal networks. These areas maximize the efficiency of shared infrastructure.

Rural Areas: While less dense regions pose challenges, creative solutions such as repurposing existing water networks for thermal delivery can make rural geothermal networks feasible. However, unclustered buildings remain a significant barrier.

Policy and Regulatory Support

State policies play a crucial role in advancing geothermal adoption. Massachusetts has been at the forefront, with measures including:

  • Regulatory approvals for utility-led pilots.
  • Legislation redefining gas utilities as thermal utilities capable of managing geothermal networks.
  • Integrated energy planning to align geothermal deployment with grid decarbonization goals.

Other states, such as Maryland and Colorado, are also exploring geothermal networks through demonstration projects and legislative incentives.

Benefits for Homeowners, Businesses, and Communities

Geothermal networks offer a range of advantages for different stakeholders:

  • Homeowners:
    • Lower energy bills.
    • Reliable heating and cooling without dependence on fossil fuels.
  • Businesses:
    • Reduced operational costs and enhanced sustainability.
    • Opportunities to meet corporate decarbonization targets.
  • Communities:
    • Local job creation in drilling and installation.
    • Improved air quality and reduced energy inequities.

Key Takeaways

  • Geothermal Networks Are Scalable: Their modular nature allows for incremental growth, making them adaptable to various community sizes and energy demands.
  • Efficiency Drives Cost Savings: By sharing infrastructure and utilizing high-efficiency heat pumps, geothermal networks reduce operational costs and strain on the electric grid.
  • Customer Engagement Is Essential: Successful projects require strong community buy-in and education to ensure sufficient participation.
  • Target New Construction for Cost Effectiveness: Retrofitting older buildings can be expensive; integrating geothermal into new developments offers significant cost advantages.
  • Supportive Policies Are Critical: Legislative and regulatory frameworks are vital to scale geothermal networks and ensure utility involvement.
  • Diverse Load Profiles Enhance Efficiency: Connecting buildings with varying energy demands maximizes the system’s effectiveness and reduces overall costs.
  • Adaptability Across States: While urban areas remain the primary focus, rural opportunities exist with creative planning and resource utilization.

Conclusion

Geothermal networks represent a transformative opportunity to decarbonize heating and cooling systems while promoting energy efficiency and equity. As the technology evolves, collaboration among utilities, policymakers, and communities will be crucial in addressing challenges and scaling its benefits. With proper planning, geothermal networks can pave the way for a cleaner, more sustainable future – right beneath our feet.

Source: “Geothermal Networks: An Opportunity for States (8.11.25)” – Clean Energy Group / Clean Energy States Alliance, YouTube, Aug 11, 2025 – https://www.youtube.com/watch?v=JDTIPQ3sSNI