How to Maintain an HRV System
Maintaining an HRV (Heat Recovery Ventilation) system ensures clean air, energy efficiency, and a longer lifespan. Here’s a quick breakdown of key maintenance tasks:
- Clean filters every 2–3 months: Vacuum and wash with mild soap. Replace filters 1–2 times a year if needed.
- Inspect and clean the heat recovery core annually: Vacuum, wash with soap and water, and air dry before reinstalling.
- Check the condensate drain every 6 months: Ensure water flows freely to prevent clogs or mold.
- Clean ventilation grilles and ductwork every 6–12 months: Remove blockages like dirt, leaves, or snow.
- Inspect fans and controls annually: Clean fan blades, test settings, and ensure the system operates smoothly.
For more complex tasks like balancing airflow, cleaning blower wheels, or addressing motor issues, schedule professional servicing yearly. Proper maintenance keeps your HRV system running efficiently for 10–15 years at an average cost of $75 per year.
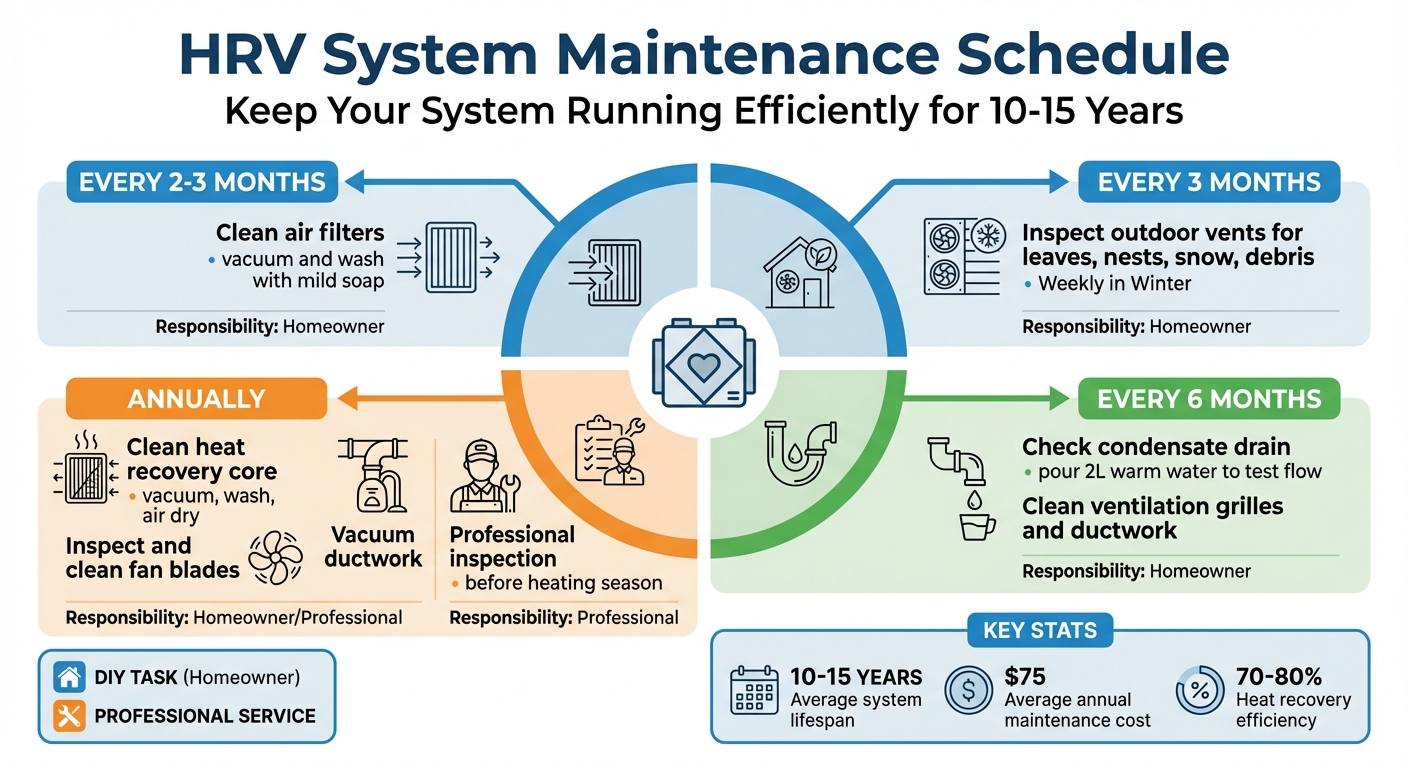
HRV System Maintenance Schedule and Task Frequency Guide
HRV Maintenance: How to use and maintain a heat recovery ventilation system
sbb-itb-99db659
Safety Precautions Before Starting Maintenance
Before diving into any maintenance on your HRV system, it’s crucial to take steps to avoid electrical shocks or mechanical injuries. These safety measures are non-negotiable, whether you’re cleaning filters or checking the heat exchange core.
Turn Off Power and Unplug the System
Start by switching off your HRV using the main control switch or wall controller, and unplug it entirely to eliminate any risk of accidental activation or electrical hazards.
“For safety’s sake, turn the HRV off and unplug it before starting any work on it.” – Canada Mortgage and Housing Corporation (CMHC)
Even seemingly simple tasks, like replacing filters, can become dangerous if the system unexpectedly powers on. Make sure all components are completely dry before you plug it back in and restore power.
Also, take a moment to review your owner’s manual for guidance specific to your HRV model before moving forward.
Consult the Owner’s Manual
Your owner’s manual is your go-to resource for detailed instructions on accessing panels, caring for filters, and cleaning the heat exchanger. Following these model-specific guidelines helps you avoid unnecessary damage and keeps your system working efficiently.
“Every model is different, so you’ll need to consult the manual for instructions on how to maintain your specific HRV system’s heat exchange core.” – Team Harding
Routine Cleaning and Maintenance Tasks
Once safety measures are in place, it’s time to tackle these essential maintenance tasks. All you’ll need are a few basic household items: a vacuum, mild soap, and water.
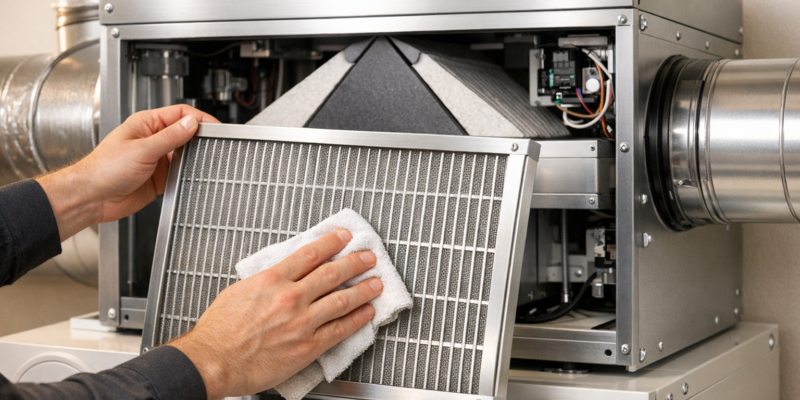
Clean or Replace Air Filters
Your HRV’s air filters are critical for keeping dust, pollen, and other particles out of your home’s air supply. To keep your system running smoothly and ensure good air quality, clean these filters every two months. Start by opening the front access door and sliding the filters out.
Use a vacuum to remove loose dust, insects, and debris from the filter surface. After vacuuming, soak the filters in warm, soapy water, rinse them thoroughly, and let them air dry completely before putting them back. Reinstalling damp filters can lead to mold growth or damage the system.
“Dirty or clogged filters can lower the HRV’s efficiency and pollute the air cycling back into your home.” – Lincolnberg
If the filters still look grimy after cleaning or show signs of wear, it’s time to replace them. Homes with pets or those in dusty areas may need more frequent filter cleaning. Otherwise, plan to replace filters once or twice a year.
| Task | Frequency | Method |
|---|---|---|
| Filter Cleaning | Every 2–3 months | Vacuum and wash with mild soap and warm water |
| Filter Replacement | Every 6–12 months | Replace with manufacturer-approved filters |
Once the filters are clean, move on to inspecting the heat recovery core.
Inspect and Clean the Heat Recovery Core
The heat recovery core is the centerpiece of your HRV system, responsible for transferring warmth between incoming and outgoing air. To keep it functioning properly, inspect and clean it annually – spring or fall is ideal when the system isn’t under heavy use. Follow your manual’s instructions to carefully remove the core.
Begin by vacuuming dust, dirt, and cobwebs from the core and the surrounding cabinet. Next, soak the core in warm, soapy water, rinse it thoroughly, and let it air dry completely before reinstalling. Handle the core with care to avoid damage.
“Vacuuming the core and washing it with soap and water will reduce dust that can build up inside the core.” – CMHC
While the core is out, take the opportunity to wipe down the inside of the HRV cabinet. This is also a good time to pour about 2 liters of warm water into the drain pan to ensure the condensate drain is clear.
Check and Clean the Condensate Drain
As your HRV operates, it generates condensation that collects in a drain pan and exits through a plastic tube or pipe. To avoid clogs that could cause water backups, system damage, or mold, inspect the drain at least once a year.
Locate the drain tube and pour about 2 liters of warm water into the drain pan. Check the external drain exit to ensure the water flows freely. If there’s a blockage, use a pipe cleaner or a mix of baking soda and vinegar to clear it. Finally, wipe down the drain tray to remove any dirt or debris before closing the unit.
Inspect Ventilation and Mechanical Components
Taking care of your system goes beyond just changing filters or maintaining the core. It’s equally important to pay attention to ventilation pathways and mechanical controls. Regularly inspecting grilles, ductwork, and fans ensures that air can flow freely, bringing in fresh air and expelling stale air. Blockages or mechanical problems in these areas can reduce the system’s efficiency. Aim to check these components every 6 to 12 months. Afterward, focus on servicing mechanical parts to keep the entire system running smoothly.
Clean Ventilation Grilles and Ductwork
Start by checking outdoor intake and exhaust hoods for blockages like leaves, nests, or snow. During the winter, these checks should happen more frequently since snow and ice can quickly build up and obstruct airflow.
Inside your home, remove ventilation grilles and clean them by vacuuming or washing with mild soapy water if needed. While the grilles are off, vacuum as far into the duct openings as you can to clear out debris. If you encounter stubborn blockages, professional cleaning might be necessary.
Keep an ear out for unusual sounds that may signal mechanical issues. Also, check the airflow at the vents while the system is running to ensure both intake and exhaust functions are operating correctly.
Inspect and Service Fans and Controls
Once you’ve cleaned the visible parts, it’s time to focus on the mechanical components. Turn off the power and carefully clean dust from the fan blades to help maintain proper airflow. While most modern HRV fans don’t require lubrication, older models might have oil intakes that need a few drops of motor lubricating oil each year. Check your owner’s manual to confirm this step.
Test the control settings, timers, and humidity sensors to make sure they’re responding as they should. If the air in your home feels stale or overly humid even with the system running, the humidity sensor might need adjustment or calibration. For more advanced maintenance – like inspecting belts, adjusting tension, cleaning blower wheels, or lubricating bearings – schedule a professional service appointment during your annual system checkup.
| Component | Maintenance Action | Recommended Frequency |
|---|---|---|
| Outdoor Hoods | Check for leaves, nests, snow, and debris | Every 6 months/Seasonally |
| Interior Grilles | Vacuum and wipe clean | Every 6–12 months |
| Ductwork | Inspect ends and vacuum internal debris | Annually |
| Fans | Brush blades and listen for unusual noise | Annually |
| Controls/Sensors | Test settings and humidity sensors | Every 6–12 months |
Create a Maintenance Schedule
Once you’ve tackled routine cleaning and inspections, setting up a structured maintenance schedule is key to keeping your HRV system running smoothly over the long haul.
A consistent schedule helps you stay on top of tasks that, if neglected, can impact both air quality and system performance. As R.S. Andrews explains, “Regular maintenance means your HRV system can keep swapping out that old indoor air for fresh outdoor air without a hitch, ensuring your home stays comfortable and healthy”.
To make things manageable, split tasks into two categories: frequent DIY jobs (like cleaning filters and vents every 2–3 months) and annual deep-cleaning tasks (such as servicing the heat recovery core and fans before the heating season). This ensures your system is ready to handle the increased workload during the colder months.
You should also adapt your schedule based on your local environment. For example, homes in dusty areas or with pets may need more frequent maintenance. Similarly, during winter, outdoor vents should be checked weekly instead of every three months, especially in areas prone to heavy snow or frost.
| Task | Frequency | Responsibility |
|---|---|---|
| Clean Air Filters | Every 2–3 months | Homeowner |
| Inspect Outdoor Vents | Every 3 months (weekly in winter) | Homeowner |
| Clean Indoor Grilles | Every 6–12 months | Homeowner |
| Replace Air Filters | 1–2 times per year | Homeowner |
| Clean Heat Recovery Core | Annually (spring or fall) | Homeowner/Professional |
| Check Condensate Drain | Every 6 months | Homeowner |
| Clean Fan Blades | Annually | Homeowner/Professional |
| Professional Inspection | Annually (before heating season) | Professional |
Don’t forget to keep your owner’s manual within reach – it’s your go-to guide for model-specific cleaning instructions, recommended filter types, and any unique requirements. To stay organized, mark these tasks on your calendar so nothing slips through the cracks.
When to Contact Hydrodynamics for Professional Service
Taking care of routine maintenance at home is a good start, but there are times when calling in the pros at Hydrodynamics is the smarter move. Knowing when to get expert help can prevent expensive repairs and keep your system running smoothly.
Strange noises coming from your HRV are a big warning sign. If you hear rattling, banging, or whistling, it could mean loose parts, blockages, or motor issues that need professional attention. Likewise, if the air inside your home feels constantly stale or humid – even after cleaning the filters – or if you spot excess condensation or mold near vents, it’s a sign your system isn’t handling moisture as it should.
Sometimes, DIY efforts just aren’t enough. More complex tasks, like balancing the system, adjusting belt tension, cleaning blower wheels, or ensuring electrical connections are secure, require skilled hands. Hydrodynamics’ technicians are equipped to handle these challenges. As R.S. Andrews explains, “Annual or semi-annual servicing by a qualified technician can help tackle more complex maintenance tasks, such as checking and cleaning the fans and motors, verifying system balance, and addressing technical issues”.
Aim for professional maintenance at least once a year, ideally before the heating season kicks in, to catch potential problems early. Hydrodynamics’ team offers advanced diagnostics, airflow tests, deep duct cleaning, and performance checks to spot issues like motor wear or core degradation that might go unnoticed during routine upkeep.
For households in dusty areas, with pets, or where residents have respiratory sensitivities, more frequent inspections are a good idea. With proper care, HRV systems can last 10 to 15 years. Regular professional service not only extends the life of your system but also ensures it continues recovering 70% to 80% of heat from exhaust air.
Conclusion
Maintaining your HRV system doesn’t take much effort, but it can make a big difference in both air quality and energy savings. Simple tasks like cleaning filters, checking vents, and cleaning the heat recovery core can go a long way in keeping your system efficient. These steps help your HRV recover 70% to 80% of heat from exhaust air, protecting your investment and ensuring your home stays comfortable throughout the year.
Some parts of the system need extra attention. For instance, check the condensate drain regularly to make sure it’s flowing properly – this helps prevent mold growth. Also, inspecting ventilation grilles and fan blades can stop dust buildup before it impacts performance. As R.S. Andrews puts it, “Proper maintenance of your HRV system is crucial for ensuring it continues to provide fresh, clean air while keeping energy costs low”.
For more complex tasks, annual professional servicing is essential. Companies like Hydrodynamics can handle detailed work such as balancing airflow, checking motor health, adjusting belt tension, and verifying electrical connections. This kind of expert care can extend your system’s life to 10–15 years while keeping operating costs around $75 per year. Pairing professional checkups with regular maintenance ensures your system runs efficiently for the long haul.
FAQs
How often should I get my HRV system professionally serviced?
It’s a good idea to have your HRV (Heat Recovery Ventilation) system professionally serviced once a year. This helps the system run efficiently, extends its lifespan, and keeps the air quality in your home or building at its best.
During a maintenance visit, a technician will clean the filters, check all components, and fix any potential problems to ensure everything is working properly. Annual servicing is particularly crucial if your HRV system operates continuously or if you live in a region with harsh weather conditions.
What safety steps should I take before maintaining my HRV system?
Before diving into maintenance for your heat recovery ventilator (HRV) system, it’s crucial to take a few safety measures to protect both yourself and the equipment. Here’s what you need to do:
- Turn off the power: Start by switching off the HRV at its control panel or thermostat. Then, shut off the dedicated circuit breaker. Double-check that the fan has completely stopped spinning before you begin.
- Secure the power source: If you can, use a lock-out tag on the breaker or power switch. This ensures no one accidentally restores power while you’re working.
- Wear protective gear: Safety glasses and gloves are a must. They’ll shield you from dust, debris, or sharp edges that might be exposed during maintenance.
- Clear the workspace: Make sure the area around the intake and exhaust vents is clear of loose objects, leaves, or snow. Also, ensure your work area is dry and well-lit to avoid slips or other accidents.
If you’re not confident about handling parts like the heat-exchange core or blower motor, don’t hesitate to call a qualified HVAC technician. Following these steps will help you steer clear of electrical hazards, injuries, and potential damage to your HRV system.
Why should I clean the heat recovery core in my HRV system regularly?
Keeping the heat recovery core in your HRV system clean is key to ensuring it works efficiently. As dust and debris build up on the heat-exchange plates over time, the system’s ability to transfer heat diminishes. This not only leads to higher energy use and increased utility costs but can also put extra strain on the system.
A clean core also plays an important role in maintaining good indoor air quality. Without regular cleaning, contaminants can circulate throughout your home. By taking care of the core, you keep your HRV system running smoothly, delivering fresh, clean air while helping you save on energy.