How to Test HVAC Efficiency Each Season
Seasonal HVAC testing keeps your system performing efficiently and reduces energy costs. By checking for issues like airflow problems, dirty components, or incorrect refrigerant levels, you can prevent expensive repairs and extend the life of your system. Here’s a quick breakdown of what you need to know:
- Why test each season? Seasonal changes put different strains on your HVAC system. Regular testing helps identify problems early, such as dirty coils or low refrigerant, which can reduce efficiency by 10–30%.
- Key efficiency metrics: Learn about SEER (cooling efficiency), HSPF (heating efficiency), and AFUE (fuel efficiency) to understand your system’s performance.
- Tools to use: Essential tools include digital thermometers, anemometers, and refrigerant gauges to measure temperature, airflow, and pressure accurately.
- Safety first: Always follow safety protocols when working with electrical components or refrigerants.
- Seasonal maintenance tips: Clean filters, inspect ductwork, and clear debris around outdoor units to maintain efficiency year-round.
Testing your HVAC system ensures lower energy bills, better performance, and a longer lifespan. If your results show major issues, call a professional for deeper diagnostics and repairs.
HVAC Systems Testing for Energy Efficiency – Day 1
Tools and Equipment for HVAC Efficiency Testing
Having the right tools can mean the difference between precise diagnostics and mere guesswork. High-quality, professional tools are essential for year-round HVAC testing and maintenance. The key lies in understanding what each tool measures and how to use it safely when working with electrical components and refrigerants. These tools form the backbone of accurate seasonal assessments, ensuring your HVAC system performs reliably.
Testing Tools You’ll Need
To get started, you’ll need a range of specialized tools designed to measure various aspects of your HVAC system’s performance:
- Digital thermometers: Opt for models with dual probes to simultaneously measure supply and return air temperatures. This allows you to calculate temperature differentials across the system, which is critical for assessing efficiency.
- Anemometers: These devices measure airflow velocity, which is a key indicator of system performance. A hot-wire anemometer, in particular, can provide precise readings of air speeds, helping you identify issues like blocked filters, closed dampers, or undersized ducts that force the system to work harder.
- Manometers: Use these to detect abnormal pressure drops across filters, coils, and ductwork. Such drops often point to underperforming components, like clogged filters or dirty evaporator coils.
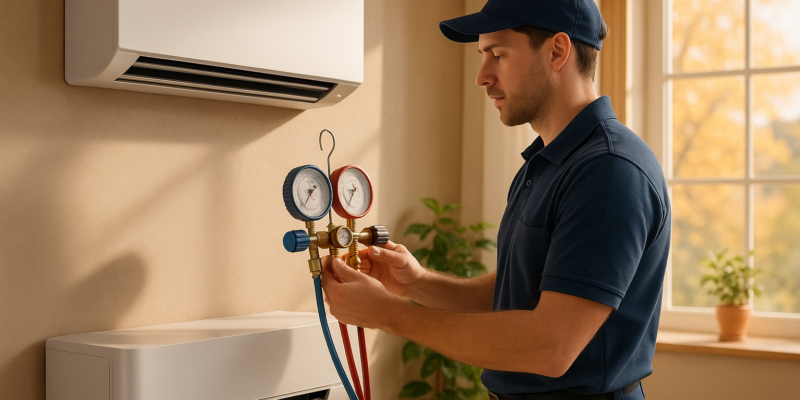
- Refrigerant manifold gauges: These gauges measure high and low pressure to verify the correct refrigerant charge. An improper charge can lead to reduced cooling capacity or excessive strain on the compressor.
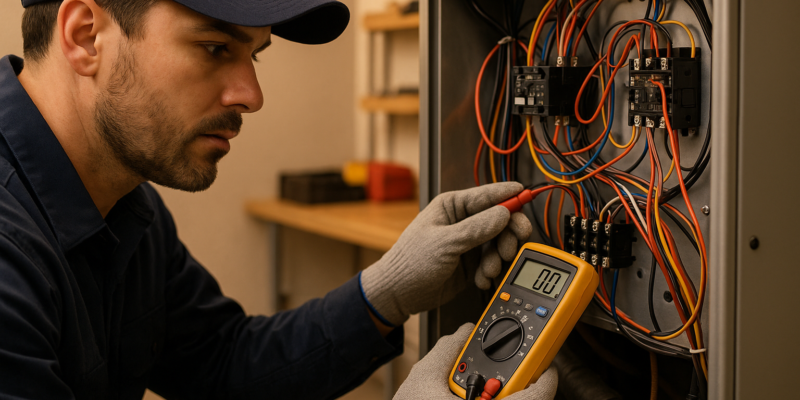
- Digital multimeters: These versatile tools measure electrical parameters such as voltage, current, and resistance. For example, if a blower motor is drawing unusually high amperage, it could signal worn bearings or debris buildup.
- Data loggers: These are invaluable for tracking temperature and humidity over extended periods. They can reveal performance trends, such as a heat pump struggling at specific outdoor temperatures or an air conditioner cycling too frequently during peak usage.
Safety Equipment and Procedures
Once you’ve gathered the right tools, following strict safety protocols is non-negotiable. Working with HVAC systems involves potential electrical and refrigerant hazards, so taking proper precautions is essential.
- Electrical Safety: Always turn off power at the breaker before opening any electrical panels or handling wiring. Use a non-contact voltage tester to confirm circuits are de-energized before starting work.
- Refrigerant Handling: Refrigerants are stored under high pressure and can be hazardous. Wear safety glasses and gloves when connecting manifold gauges, and consider using a respirator with organic vapor cartridges to prevent exposure. Refrigerants can cause frostbite on contact and displace oxygen in confined spaces, so handle them with care.
- General Safety Gear: Equip yourself with cut-resistant gloves, knee pads, and a headlamp for added protection and comfort, especially when working in tight spaces like attics or crawl spaces.
Before beginning any efficiency testing, clear debris around the equipment, ensure proper ventilation, and keep a Class C fire extinguisher nearby. Never work alone when dealing with high-voltage systems or confined spaces.
Tool Calibration
Accurate diagnostics depend on properly calibrated tools. Most digital instruments should be calibrated annually, though basic checks can be done more frequently. For example:
- Calibrate thermometers using an ice bath (32°F) and boiling water (212°F).
- Compare pressure gauges against a known standard or send them to a calibration lab for high-precision adjustments.
How to Test HVAC Efficiency by Season
Different seasons call for specific HVAC tests to ensure the system is running efficiently. For spring and summer, focusing on temperature differential testing is a reliable way to gauge air conditioning performance.
Testing Air Conditioning Efficiency in Spring and Summer
Start by running the air conditioner for 15–30 minutes. This allows the system to stabilize and ensures proper airflow and cycling are in place.
One essential method is Temperature Differential Testing. Use a digital thermometer to record the temperatures at the supply and return vents once the system stabilizes.
Then, calculate the difference by subtracting the supply vent temperature from the return vent temperature. A well-functioning unit should show a temperature difference of at least 15°F.
Understanding Your Test Results
After completing your seasonal tests, the next step is making sense of the performance numbers. These results provide a snapshot of your system’s current efficiency and overall health.
What Performance Numbers Tell You
Your test results should align with U.S. efficiency standards. For cooling systems, an ideal temperature difference between return and supply air is 15°F to 20°F. If the difference is less than 15°F, it could point to issues such as low refrigerant levels, dirty coils, or restricted airflow.
For heating systems, gas furnaces should produce supply air temperatures between 130°F and 170°F, depending on outdoor conditions and system design. Heat pumps, on the other hand, typically deliver supply air between 85°F and 105°F. While heat pump output may feel cooler compared to a furnace, it still effectively heats your home.
Airflow measurements are another critical factor. They should fall within manufacturer specifications, typically 350–450 CFM per ton. If airflow is below this range, the problem could be clogged filters, blocked ducts, or a malfunctioning blower motor.
To assess energy efficiency, compare your system’s actual energy usage to its rated performance. For electric systems, track your monthly kilowatt-hour (kWh) usage, and for gas units, monitor therms. Compare these numbers to previous years and manufacturer estimates to identify any inefficiencies.
When to Call a Professional
If your test results consistently fall outside the ideal ranges, it’s time to involve a professional. Here are some specific scenarios where expert help is necessary:
- Cooling tests with temperature differentials below 15°F: This could indicate refrigerant leaks, compressor issues, or severe airflow problems.
- Unusual energy usage: A sudden 20% or more increase in your energy bills, without changes in weather or usage patterns, suggests underlying efficiency problems.
- System cycling issues: Short cycling – when the system frequently turns on and off in cycles shorter than 10 minutes – may be caused by electrical issues, refrigerant problems, or an oversized system.
- Furnace supply air outside 120°F–180°F: This could signal issues with combustion, the heat exchanger, or gas pressure. Similarly, heat pump output outside the normal range requires attention.
- Airflow below 300 CFM per ton: Low airflow or uneven temperatures across rooms might indicate ductwork problems, blower motor failures, or design flaws.
- Carbon monoxide detection: If any heating system test reveals carbon monoxide, shut the system down immediately and seek professional service.
Even if individual readings seem acceptable, a gradual decline in performance over multiple seasons is a red flag. For example, an annual efficiency drop of 10% to 15% may indicate aging components that need evaluation or replacement planning.
If multiple concerning readings appear at once, it’s a sign of interconnected issues that go beyond basic troubleshooting. In such cases, a qualified HVAC professional can provide a comprehensive diagnosis and recommend the best course of action.
sbb-itb-99db659
Seasonal Maintenance for Better HVAC Efficiency
Keeping up with regular maintenance is key to ensuring your HVAC system runs efficiently. Once you’ve completed your seasonal efficiency tests, ongoing care helps your system maintain peak performance, use energy wisely, and provide consistent comfort throughout the year. This seasonal maintenance checklist works alongside your efficiency tests to keep everything in top shape.
Seasonal Maintenance Checklist
Spring Maintenance
Spring is the perfect time to get your cooling system ready for the warmer months ahead. Start by replacing air filters according to the manufacturer’s recommendations. Next, give some attention to the outdoor condenser unit – clear away leaves, dirt, and other debris, then gently rinse the coils with a garden hose. Be careful not to bend or damage the fins.
Switch your thermostat from heating to cooling mode. If you have a programmable thermostat, adjust its schedule to match the longer daylight hours and rising temperatures. Set cooling levels appropriately for when you’re home and away to maximize energy efficiency.
Summer Maintenance
During the summer, it’s all about ensuring your air conditioner can handle the heat. Check refrigerant lines for ice buildup, which could point to airflow problems or low refrigerant levels. Make sure the area around your outdoor unit is free from overgrown vegetation to allow proper airflow.
Take time to inspect ductwork in areas like basements, crawl spaces, or attics. Look for loose connections, damaged insulation, or air leaks. Sealing these leaks can improve system efficiency and help lower energy bills.
Fall Preparation
As fall rolls in, it’s time to shift focus to your heating system. Run a full heating cycle on your furnace or heat pump before the cold sets in, and pay attention to any unusual noises that might indicate worn components. Clean or replace filters to eliminate built-up dust and pollen, and ensure the area around your furnace is clear of clutter or flammable items. Maintaining a safe clearance around your heating equipment is essential for proper operation.
Winter Maintenance
In winter, when your system is working overtime, keep a close eye on its performance. Make sure vents and registers aren’t blocked by furniture or other items, as this can disrupt airflow and cause uneven heating. If you have a heat pump, check the outdoor unit regularly to remove any snow or ice buildup – but avoid using sharp tools that could damage the equipment.
Throughout all seasons, it’s important to lubricate moving parts like blower motors and fan bearings as specified by the manufacturer. While many modern systems have sealed bearings that don’t need lubrication, older units may require periodic oiling to keep them running smoothly.
How Regular Maintenance Improves Efficiency
By following these seasonal maintenance steps, you can ensure your HVAC system runs efficiently over the long term. Routine tasks like cleaning or replacing air filters help maintain airflow, while cleaning the coils supports effective heat transfer for both heating and cooling. Proper lubrication of moving parts reduces friction, helping the system operate more smoothly and efficiently.
Preventive maintenance also catches small issues – like a loose belt or a dirty flame sensor – before they escalate into bigger, more expensive problems. Addressing these minor concerns early can prevent breakdowns during extreme weather and help you avoid costly emergency repairs. Plus, regular upkeep often ensures compliance with manufacturer warranty requirements.
In short, a well-maintained HVAC system is not only more efficient but also more reliable, offering better comfort and energy savings throughout the year. By sticking to these seasonal tasks, you can keep your system running smoothly and in line with efficiency standards.
Hydrodynamics: Your Partner for HVAC Efficiency Testing
Seasonal check-ups and maintenance are great for keeping your HVAC system in shape, but some problems need more than just routine care. When efficiency issues go beyond what basic tests can uncover, it’s time to bring in the experts. This is where professional HVAC services step in, offering specialized tools and tailored solutions to tackle those tricky problems.
Professional HVAC Efficiency Services
Hydrodynamics Inc., a trusted name since 1994, has been delivering comprehensive HVAC services to residential, commercial, and industrial clients. Their efficiency testing relies on calibrated instruments to uncover problems that standard homeowner tests might overlook.
Their services include a thorough analysis of your system’s performance. From detecting refrigerant leaks to identifying ductwork inefficiencies or worn-out components, they dig deeper than surface-level inspections. They also ensure that temperature differentials and airflow pressures fall within the required ranges, leaving no stone unturned.
But they don’t stop at testing. If your system isn’t meeting performance standards, Hydrodynamics offers upgrades designed to improve efficiency and cut down on utility bills. Whether it’s modern heat pumps, ductless systems, or geothermal heating and cooling solutions, they bring advanced options to the table. For commercial clients, their expertise even extends to industrial heating equipment, offering tailored solutions for more complex systems.
To complement seasonal testing, Hydrodynamics provides preventative maintenance programs. These programs catch potential issues during routine service calls, helping to prevent problems before they impact your system’s performance. When combined with your own seasonal checks, their services ensure your HVAC system runs smoothly all year long.
Why Choose Hydrodynamics
As a family-owned and operated business since 1994, Hydrodynamics brings decades of hands-on experience to every job. Their local roots mean they’re familiar with the unique challenges posed by the area’s climate, ensuring your HVAC system is prepared to handle whatever the seasons bring.
What sets Hydrodynamics apart is their wide-ranging expertise. Unlike companies that focus on just one aspect of HVAC work, they handle everything – from basic repairs and installations to advanced industrial heating systems and waste oil systems. This all-encompassing approach allows them to evaluate your system’s efficiency from multiple angles and deliver solutions tailored to your specific needs.
Their dedication to energy-efficient solutions aligns seamlessly with the purpose of seasonal efficiency testing. Whether you’re looking for a quick tune-up to boost performance or a full upgrade to modern, high-efficiency equipment, their technicians are ready with options that help reduce energy usage and lower your bills.
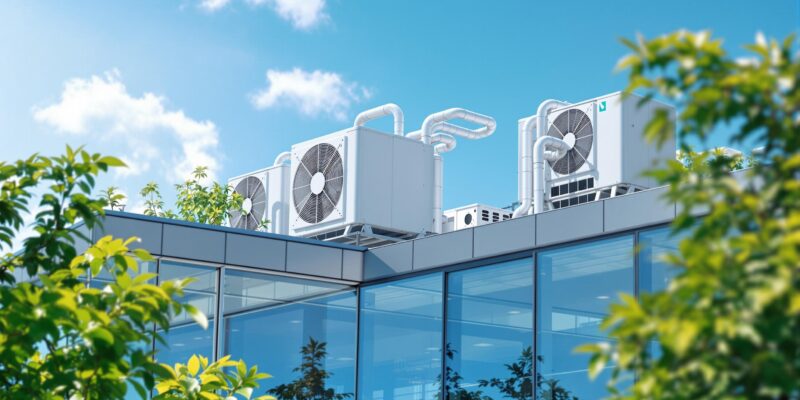
For commercial and industrial clients, Hydrodynamics offers specialized services for large-scale systems like rooftop heating and AC units. These systems often have unique efficiency requirements that go beyond the scope of standard residential testing, making professional expertise essential.
When seasonal tests uncover issues or you need a deeper analysis, Hydrodynamics combines technical know-how with reliable service to keep your HVAC system operating at its best all year round.
Conclusion: Maintaining HVAC Efficiency Year-Round
Testing your HVAC system throughout the year is one of the easiest ways to protect your investment and keep energy costs in check. By prioritizing seasonal efficiency checks, you’re setting your system up for reliable performance and a longer lifespan.
Key Points to Remember
- Regular testing reduces costs and extends system life. Routine maintenance not only lowers energy bills but can also significantly extend the lifespan of your HVAC system, which typically lasts 10–20 years. Tools like digital thermometers, manometers, and multimeters can help you catch minor issues early, preventing costly damage to major components like compressors and heat exchangers.
- Clean filters, coils, and ducts improve indoor air quality. Keeping these components clean reduces the spread of dust, allergens, and other particles in your home, creating a healthier environment for everyone.
- Safety is a priority. Seasonal checks can uncover hazards like refrigerant leaks, faulty wiring, or cracked heat exchangers that might lead to serious risks, such as carbon monoxide exposure.
- Professional expertise matters. Services from companies like Hydrodynamics can identify hidden problems using advanced tools and knowledge, ensuring your HVAC system runs efficiently through every season.
By keeping these points in mind, you’ll be better equipped to maintain your HVAC system and enjoy consistent performance year-round.
Your Next Steps
To keep your system running efficiently, take these practical steps as you move forward with a proactive maintenance routine:
- Focus on the upcoming season. Whether it’s prepping for the heat of summer or the chill of winter, start by checking air filters, inspecting visible components, and measuring temperature differentials to spot any early signs of wear or malfunction.
- Establish a seasonal testing schedule. Plan comprehensive checks in spring and fall, and focus on season-specific components – like cooling systems in summer and heating systems in winter – when those systems are in use.
- Know when it’s time to call a pro. If your testing reveals unusual temperature differentials (outside the typical 15–20°F range), abnormal pressure readings, or any safety concerns, contact an HVAC professional immediately. Regular professional maintenance is often required to keep your system’s warranty valid, ensuring both performance and financial protection.
- Consider preventative maintenance programs. Combining your seasonal checks with professional inspections can help catch problems early, keeping your system efficient and reliable over time.
With these steps, you’ll be on your way to maintaining a comfortable, energy-efficient home while extending the life of your HVAC system.
FAQs
What are the warning signs that my HVAC system might need professional help after a seasonal checkup?
After completing a seasonal HVAC efficiency test, certain signs might suggest your system needs professional attention. Keep an ear out for strange noises like banging or rattling, and take note of unpleasant odors or uneven temperatures throughout your home. If your energy bills suddenly climb without an obvious explanation, it could point to an issue with efficiency.
Other warning signs include weakened airflow, the system cycling on and off more frequently than normal, or struggling to maintain your preferred temperature. Tackling these problems quickly with professional help can prevent further damage and keep your HVAC system running smoothly all year long.
How often should I calibrate my HVAC testing tools for accurate results?
To get precise readings, HVAC testing tools need to be calibrated at least once a year. For tools involved in more critical measurements, it’s better to calibrate them every six months.
Routine calibration is key to keeping your equipment dependable and ensuring your HVAC system runs smoothly. Be sure to check and follow the manufacturer’s recommendations for calibration schedules specific to your tools.
What key metrics should I monitor to evaluate my HVAC system’s efficiency each season?
To get a clear picture of how well your HVAC system performs year-round, keep an eye on a few essential performance metrics:
- Seasonal Energy Efficiency Ratio (SEER): This measures how efficiently your system cools your home during the summer months.
- Heating Seasonal Performance Factor (HSPF): This evaluates your system’s heating efficiency during colder weather.
- Energy Efficiency Ratio (EER): A quick way to gauge overall energy performance.
- Coefficient of Performance (COP): This shows how effectively your system converts energy into heating or cooling.
By tracking these metrics, you can ensure your HVAC system is running smoothly, cut down on energy costs, and spot areas that might need improvement. Regular monitoring can also help your equipment last longer and keep your indoor environment comfortable no matter the season.