Duct Leakage Testing for Retrofit Projects
Duct leakage testing is critical for improving HVAC efficiency in retrofit projects. It identifies where heated or cooled air escapes from ductwork, often wasting 20–30% of HVAC energy. Testing ensures compliance with U.S. energy codes, improves comfort, and reduces energy costs.
Key Takeaways:
- Purpose: Measures air loss in duct systems, especially in older buildings.
- Process: Pressurizes ducts to 25 Pascals and measures leakage in CFM25.
- Energy Savings: Sealing leaks can cut energy loss by up to 30% and save 10–20% annually.
- Compliance: Meets standards like ENERGY STAR, IECC, and ASHRAE 90.1.
- Equipment: Tools include duct testers, digital manometers, smoke detectors, and infrared cameras.
- Documentation: Accurate records are required for code compliance and rebates.
Duct leakage testing not only ensures regulatory compliance but also enhances HVAC performance, reduces energy waste, and improves indoor comfort. Regular maintenance and retesting sustain these benefits over time.
Tools and Equipment for Duct Leakage Testing
Testing Tools and How They Work
When tackling duct leakage testing in retrofit projects, having the right tools is non-negotiable. These specialized tools are designed to measure airflow, detect leaks, and ensure accurate results. Let’s break down the essentials:
The duct tester – often called a duct blaster – is the backbone of any testing setup. Priced between $2,000 and $3,500, it features a calibrated fan and pressure gauges to measure airflow and pressure. The process involves sealing all supply and return registers using tape, cardboard, or adhesive plastic sheeting, then attaching the calibrated fan to the main return duct. This setup creates a controlled 25 Pascal environment, allowing technicians to measure the airflow (CFM25) required to maintain that pressure.
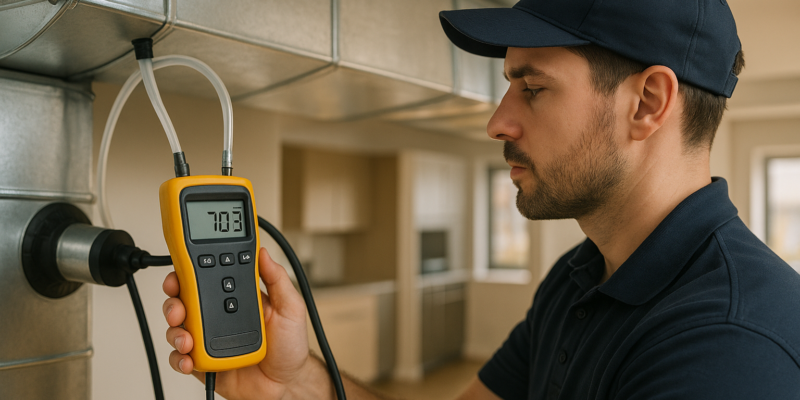
Digital manometers are another must-have. These devices measure pressure differences in Pascals or inches of water gauge, with prices ranging from $400 to $1,200. Many modern models come with features like data logging and wireless connectivity, making real-time analysis and reporting a breeze.
For larger projects, such as multifamily buildings, a blower door is indispensable. These systems, costing $2,500 to $4,500, test the entire building envelope by comparing pressure differences and airflow. This method is particularly useful for identifying leaks that let conditioned air escape into unconditioned spaces like attics or crawl spaces.
To pinpoint leaks in specific duct runs, pressure pans are used alongside blower door tests. These tools, costing between $100 and $300, are placed over supply or return registers to measure pressure differences and identify problem areas.
For visual leak detection, tools like smoke pencils or theatrical smoke machines are effective and budget-friendly, ranging from $30 to $300. By releasing visible smoke near suspected leaks, technicians can easily spot and address problem areas.
Lastly, infrared cameras offer a non-invasive way to detect temperature differences caused by air leaks. These cameras, priced between $500 and $5,000, are often used to supplement quantitative methods, providing a clear picture of where leaks occur without disturbing finished surfaces.
| Tool | Primary Function | Price Range (USD) | Key Features |
|---|---|---|---|
| Duct Tester | Quantitative leakage measurement | $2,000–$3,500 | Calibrated fan, pressure gauge, CFM25 measurement |
| Digital Manometer | Pressure measurement | $400–$1,200 | Data logging, wireless connectivity |
| Blower Door | Building envelope testing | $2,500–$4,500 | Complete system pressurization |
| Smoke Pencil/Machine | Visual leak detection | $30–$300 | Immediate leak location identification |
| Infrared Camera | Thermal diagnostics | $500–$5,000 | Non-invasive temperature analysis |
Measurement Units and Standards
Duct leakage testing relies on standardized measurements to ensure results are consistent and compliant. In the U.S., airflow is measured in cubic feet per minute (CFM), while pressure is recorded in Pascals (Pa) or inches of water gauge (in. w.g.).
The standard test pressure of 25 Pascals (equal to 0.10 inches of water gauge) closely mirrors typical duct operating pressures, making it a reliable benchmark for assessing real-world performance. Results are expressed as CFM25, which indicates the airflow needed to maintain 25 Pascals in the duct system.
This measurement is crucial because it directly ties to energy efficiency. Each CFM of leakage represents conditioned air that escapes instead of reaching living spaces. Standards like ENERGY STAR and IECC set thresholds for compliance, often requiring total duct leakage to remain at or below 4 CFM25 per 100 square feet of conditioned floor area or 40 CFM25 total, whichever is larger. For example, in a 2,000-square-foot home, the maximum allowable leakage would be 80 CFM25.
To ensure accuracy, professional-grade duct testers must undergo regular calibration in line with RESNET HERS Rating protocols, BPI Analyst procedures, and local energy codes. This guarantees that measurements are reliable and meet the requirements for code compliance and energy efficiency programs.
These standardized units and protocols are essential for documenting test results, especially when applying for energy efficiency rebates or meeting regulatory requirements, as many programs demand precise documentation formats and units.
Step-by-Step Guide to Duct Leakage Testing
Preparation and Inspection
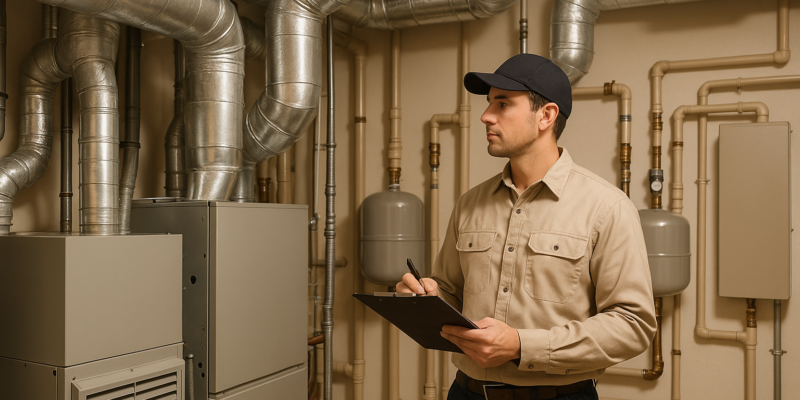
Start by sealing all supply and return registers with tape or adhesive plastic sheeting. This creates a closed system, ensuring accurate pressurization. Before you begin testing, make sure all electrical systems are turned off, the workspace is clear, and the air handler and ductwork are fully installed.
Take time to inspect the accessible ductwork carefully. Look for gaps, loose connections, or deteriorated seals, especially around joints, boots, and the air handler. Common trouble spots include disconnected duct sections, damaged flex duct connections, and gaps where rigid ducts meet. Fixing these issues before testing saves time and ensures more reliable results. If you spot any problems, consider taking photos – they can be helpful for planning repairs and meeting compliance requirements.
Once you’ve completed the inspection and sealed the registers, you’re ready to move on to the testing phase.
Performing the Tests
To measure total duct leakage, use a duct blaster test. Connect the calibrated duct tester to the main return duct or air handler, ensuring the connection is secure. With all registers sealed, use the tester’s fan to pressurize the duct system to exactly 25 Pascals.
Keep an eye on the digital manometer until the system stabilizes at 25 Pascals. The fan will balance its output to match the air escaping through leaks, providing the CFM25 reading. This value represents the cubic feet per minute of air needed to maintain 25 Pascals within the system.
If the home has ductwork running through unconditioned spaces like attics or crawl spaces, consider using a combined blower door and duct tester test. In this method, the blower door depressurizes the house while the duct tester pressurizes the ducts. This approach isolates leaks in unconditioned areas, where they have the biggest impact on energy efficiency.
For pinpointing specific problem areas, the blower door with pressure pan method is highly effective. Place a pressure pan over individual supply or return registers while the blower door operates. Elevated pressure readings indicate significant leakage in that specific duct run, helping you prioritize repairs.
During testing, leave one door or window slightly open to prevent unwanted pressure changes in the building envelope. This ensures the measurements reflect duct leakage and not air escaping through the building itself.
Once testing is complete, shift your focus to recording and analyzing the results accurately.
Reading and Recording Results
When the duct system stabilizes at 25 Pascals, record the CFM25 reading. Be sure to document test conditions, including outdoor temperature, the equipment used, and the test date. This CFM25 value represents the total airflow escaping through leaks and is critical for compliance calculations.
Compare the recorded CFM25 to ENERGY STAR and RESNET standards. For instance, these standards require leakage to be ≤4 CFM25 per 100 square feet or no more than 40 CFM25 total. In a 1,800-square-foot home, the maximum allowable leakage would be 72 CFM25.
Take photos of the test setup and summarize your findings, including how the results compare to code requirements. If you encounter unusual conditions – like extreme weather or equipment limitations – note them in your report. Thorough documentation is essential for compliance verification and participation in energy efficiency programs.
If the test reveals leakage above code limits, refer back to the problem areas identified during your visual inspection. This information helps guide repair efforts and estimate the time and materials needed to fix the issues. Keep in mind that duct leakage can account for 20%–30% of total HVAC energy loss in homes with poorly sealed ducts. Accurate testing and detailed documentation are key to improving energy efficiency.
While professional energy raters typically provide official compliance reports, maintaining your own detailed records ensures a smoother retrofit process and supports any warranty or performance claims you may need to make later.
Regulatory Compliance and Reporting
U.S. Duct Leakage Standards Explained
Regulatory compliance establishes the criteria for acceptable duct leakage, building on the testing methods previously discussed. In the U.S., duct leakage requirements are primarily guided by the International Residential Code (IRC) and the International Energy Conservation Code (IECC). These codes, alongside standards from ASHRAE and guidelines from SMACNA, define when testing is necessary, acceptable leakage rates, and how results should be documented.
For residential systems, the standard leakage threshold is 4 CFM25 per 100 ft² or 40 CFM25 total, depending on which is greater.
In commercial retrofit projects, SMACNA’s HVAC Air Duct Leakage Test Manual (1985) is a key resource. Leakage class requirements vary depending on duct size and system type. For example, a leakage class of 6 or lower might be required based on the application and specific local code adoption.
It’s essential to check for local code modifications before starting any testing. Some jurisdictions may require both total duct leakage and leakage-to-outdoors (LTO) tests, while others might only mandate one type, depending on the ductwork’s location.
Third-party verification by RESNET/HERS raters ensures compliance by confirming that all documentation meets strict reporting standards.
| Standard/Protocol | Acceptable Leakage Rate | Test Pressure | Applicability |
|---|---|---|---|
| RESNET/HERS | ≤4 CFM25 per 100 ft² or ≤40 CFM25 | 25 Pascals | Residential |
| SMACNA | Varies by duct class/size | 25 Pascals | Commercial/Industrial |
| ASHRAE | Used alongside SMACNA | 25 Pascals | Commercial/Residential |
With these standards in mind, proper documentation is crucial to ensure compliance with regulatory requirements.
How to Document Test Results
Once testing is complete, thorough documentation is essential for demonstrating compliance and avoiding delays in project approval. Compliance reports should include detailed information such as the test date, project address, tester credentials, equipment details (including calibration data), test conditions, methods used, and the measured leakage results.
Key elements to include in a compliance report:
- Test date and project address
- Tester credentials and equipment serial numbers
- Calibration dates and test conditions
- Test method and measured leakage values
- Comparison to required thresholds
- Supporting materials like photos and floor plans
Reports must follow U.S. formatting standards: dates in mm/dd/yyyy, numbers with commas for thousands, and measurements in imperial units. Temperatures should be recorded in Fahrenheit, while pressure can be noted in Pascals or inches of water column.
To streamline the approval process, include calibration certificates, annotated floor plans, and photos of the test setup. Digital reporting tools can also help minimize errors and simplify data entry.
Common documentation challenges – like incomplete data, missing calibration records, or unclear test conditions – can lead to report rejection. Using standardized checklists and double-checking all entries before submission can help avoid these issues.
For retrofit projects, it’s important to document any pre-existing conditions that might influence testing, such as inaccessible ductwork or unusual system configurations. When sealing work is performed, include both pre- and post-repair test results to show the improvements made.
Hydrodynamics Inc. specializes in certified duct leakage testing and code-compliant reporting for retrofit projects. Their expertise in HVAC retrofits ensures that documentation meets industry standards, helping to reduce the risk of costly rework and project delays.
sbb-itb-99db659
Duct Sealing and Retesting Methods
Sealing Techniques That Work
Getting duct sealing right requires the use of appropriate materials and proper application methods. Two of the most dependable options for sealing duct leaks in retrofit projects are mastic sealant and UL 181-rated foil tape. Mastic sealant is ideal for covering joints, seams, and small holes. It’s applied directly to the leak using a brush or gloved hand, ensuring full coverage. Once cured, this flexible material can handle the natural expansion and contraction of ductwork without cracking.
For metal ducts, UL 181-rated foil tape is a great choice for sealing joints and seams. Before applying the tape, make sure the surface is clean and dry. Press the tape firmly into place, smoothing out any air bubbles to ensure a tight seal. If you encounter larger gaps, you can reinforce the seal by embedding mesh tape into the mastic. For flexible ducts, inspect for tears or loose connections, and secure these areas with mechanical fasteners as required.
For hard-to-reach leaks, Aeroseal offers a high-tech solution. This method involves injecting a sealant mist into the ducts, which finds and seals leaks from the inside. While this approach is particularly useful for complex systems, it does require specialized equipment and trained professionals.
Before starting any sealing work, always turn off the HVAC system. Allow the mastic sealant to cure fully – typically about 24 hours – before retesting the system. Once the sealing is complete, retesting is necessary to confirm the improvements.
Why Retesting is Required
Retesting plays a crucial role in verifying the success of duct sealing efforts. After the initial leakage test, retesting ensures that the sealing has reduced air loss to levels that meet code requirements. This step confirms the system’s improved performance and efficiency .
It’s important to document both pre- and post-sealing test results. This includes recording CFM25 values, detailing the repairs made, listing the materials used, and keeping copies of the test protocols. Proper documentation is essential for demonstrating compliance.
Additionally, third-party certification can provide an extra layer of verification. As Hydrodynamics Inc. highlighted in October 2025, external certification ensures that the retrofitted system meets energy efficiency and safety standards. This independent review also validates the accuracy of the sealing work and overall system performance.
Long-Term Maintenance and Inspections
Once the ducts are sealed and retested, the focus shifts to ongoing maintenance to preserve the system’s energy efficiency. Regular upkeep ensures that the benefits of duct sealing – like lower energy bills – continue over time. Annual inspections are recommended to check for new leaks, deteriorating sealant, or physical damage that may have occurred since the initial work.
During these inspections, watch for signs of sealant failure, such as visible gaps, cracks, loose or peeling tape, or symptoms like increased dust, uneven indoor temperatures, or higher energy bills.
“Maintain Your Heating System: Schedule regular HVAC maintenance and consider upgrading to energy-efficient systems like heat pumps or high-efficiency furnaces.”
- Hydrodynamics Inc.
Periodic retesting every three to five years – or after major renovations – helps ensure that duct leakage remains under control. If inspections reveal new issues, repairs should be made promptly using the same sealing methods as before. Always follow up with retesting to confirm that the repairs were effective.
Hydrodynamics Inc. offers professional maintenance and inspection services for sealed duct systems. Their expertise includes scheduling regular maintenance and conducting retesting to ensure long-term performance for retrofit projects.
Properly sealed and maintained ducts can cut energy losses by 20–30%, saving U.S. homeowners hundreds of dollars annually, depending on the system size and the extent of the original leaks . Regular maintenance and retesting are key to maintaining these savings and sustaining the system’s efficiency over time.
Duct Leakage Testing Basics
Conclusion
Duct leakage testing plays a key role in ensuring the success of HVAC retrofit projects, delivering benefits that go well beyond simply meeting code requirements. In older duct systems, especially those running through unconditioned spaces like attics or crawlspaces, leaks can waste up to 30% of conditioned air. This not only drives up energy costs but also impacts indoor comfort significantly. By pinpointing the sources of leakage, testing lays the foundation for targeted repairs and long-term energy savings.
The process measures leakage using CFM25 at 25 Pascals, providing clear data to prioritize repairs and meet compliance standards. Proper duct sealing can cut energy loss by as much as 30%, resulting in noticeable annual savings. Additionally, it reduces strain on HVAC systems, potentially extending their lifespan and lowering maintenance costs down the road.
Expertise in installation is crucial. Hydrodynamics Inc. brings years of experience and uses calibrated equipment, ensuring retrofit projects align with regulatory standards while achieving long-term efficiency. Their adherence to industry best practices helps avoid common mistakes, such as incorrect pressure settings or incomplete sealing, ensuring optimal results.
Accurate documentation is another vital aspect, as it supports compliance and can be essential for qualifying for rebates.
Regular maintenance and periodic retesting are equally important. These steps help maintain the efficiency gained through duct sealing by catching new leaks or wear-and-tear issues early, safeguarding the investment made in the retrofit.
For project managers and building owners, duct leakage testing is far more than a regulatory step – it’s a reliable way to boost energy efficiency, enhance comfort, and achieve meaningful cost savings over time.
FAQs
How does duct leakage testing help save energy in HVAC retrofit projects?
Duct leakage testing is a key step in boosting energy efficiency during HVAC retrofit projects. By pinpointing and sealing leaks in the ductwork, it ensures that conditioned air flows directly to its intended areas without unnecessary loss. This not only cuts down on energy waste but also helps reduce utility costs.
Sealing ducts properly also improves the overall performance of the HVAC system. It leads to more consistent indoor temperatures and enhances comfort throughout the space. Plus, this process supports compliance with energy efficiency standards, making it an important part of sustainable building upgrades.
What tools and equipment are needed for duct leakage testing, and how are they used?
To carry out duct leakage testing effectively, you’ll need a handful of key tools and equipment. The centerpiece of your setup is a duct leakage tester, which usually includes a calibrated fan, a pressure gauge, and sealing materials like tape or mastic. This equipment is crucial for pressurizing the duct system and pinpointing spots where air might be escaping.
A manometer is another must-have tool, as it measures pressure differences and confirms the system is sealed correctly. For spotting leaks visually, tools like smoke pencils or fog machines can come in handy. When used together, these tools not only help meet energy efficiency standards but also enhance the performance of HVAC systems. Using them properly ensures you can detect leaks and keep the system running efficiently and dependably.
Why is it important to retest ducts after sealing leaks, and how often should this be done?
Retesting ducts after sealing leaks is an essential step to confirm the repairs worked and to ensure the system runs efficiently. Skipping this step makes it hard to know if all leaks were properly sealed or if further adjustments are necessary to meet compliance standards and improve energy efficiency.
Testing should ideally be done right after sealing to check the results. For long-term upkeep, it’s a good idea to test for duct leakage every few years or during regular HVAC inspections – especially for older systems or when concerns about energy use come up.